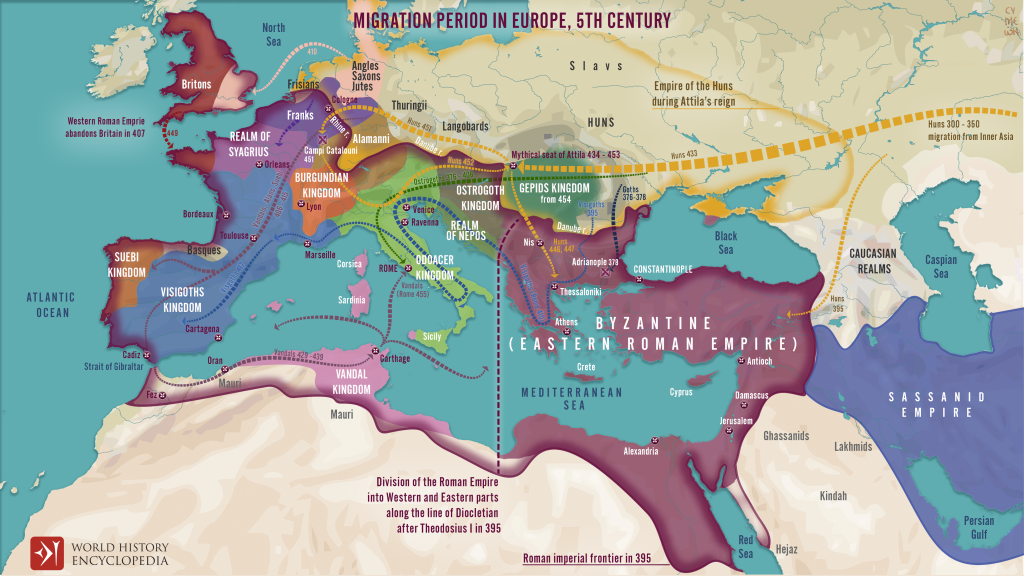
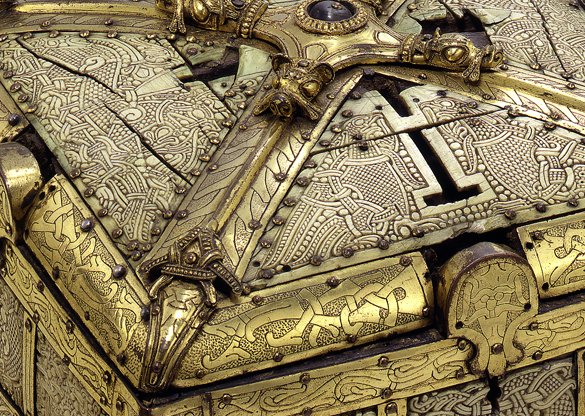
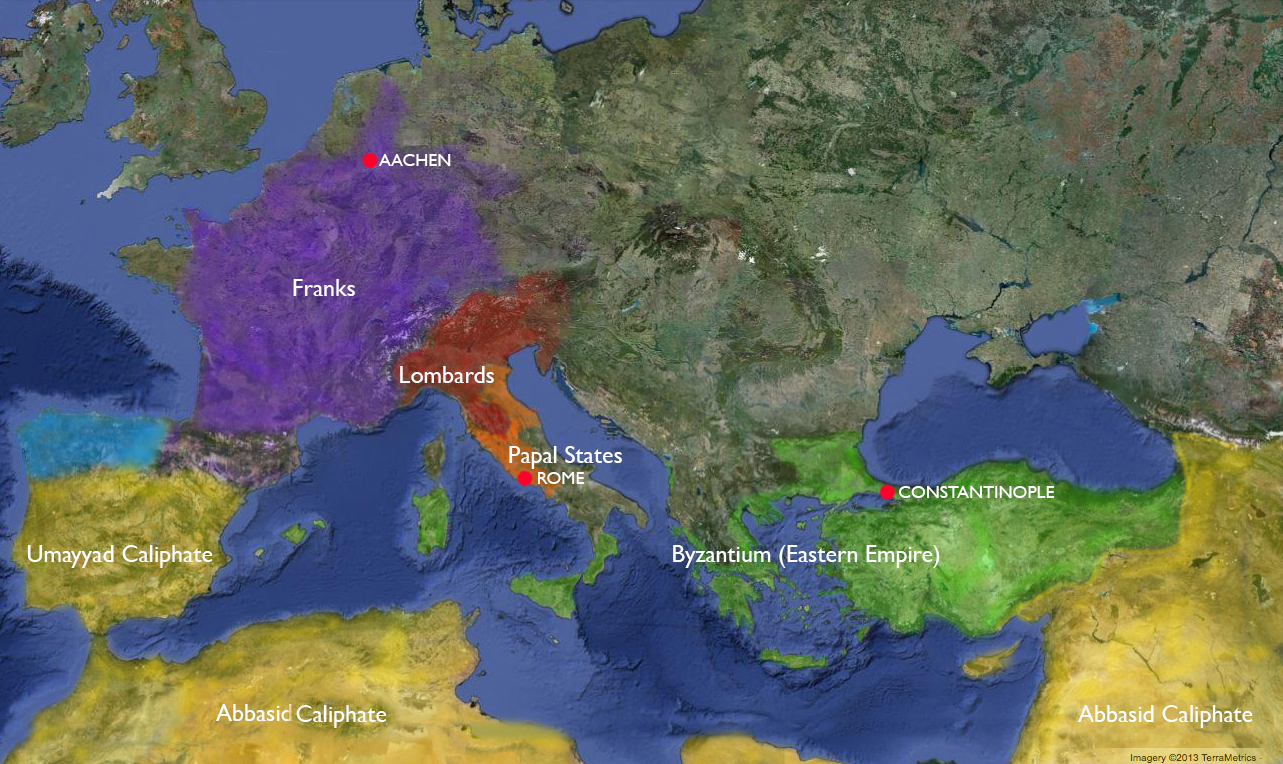
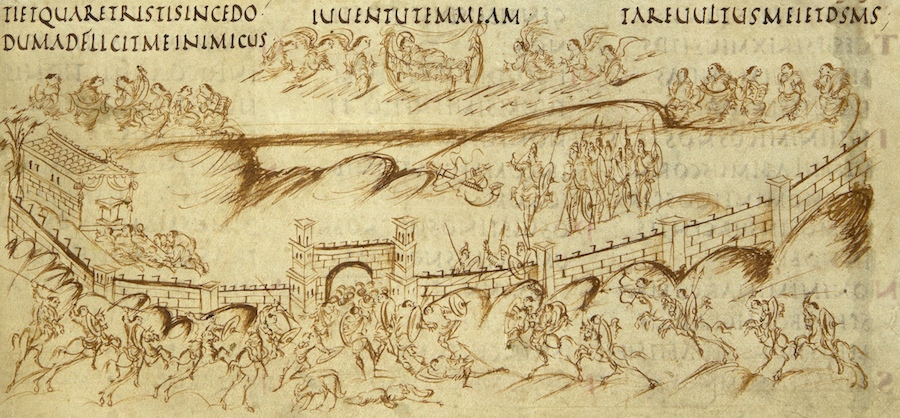
This chapter covers a number of regions and political entities from roughly 500 – 1200 CE. This includes powerful sea-going people from Scandinavia, monasteries and other communities based in the British Isles and the rise of the Carolingian and Ottonian kingdoms (who saw themselves as the heirs to the Roman Empire). These cultures were in contact with one another and shared a visual vocabulary.
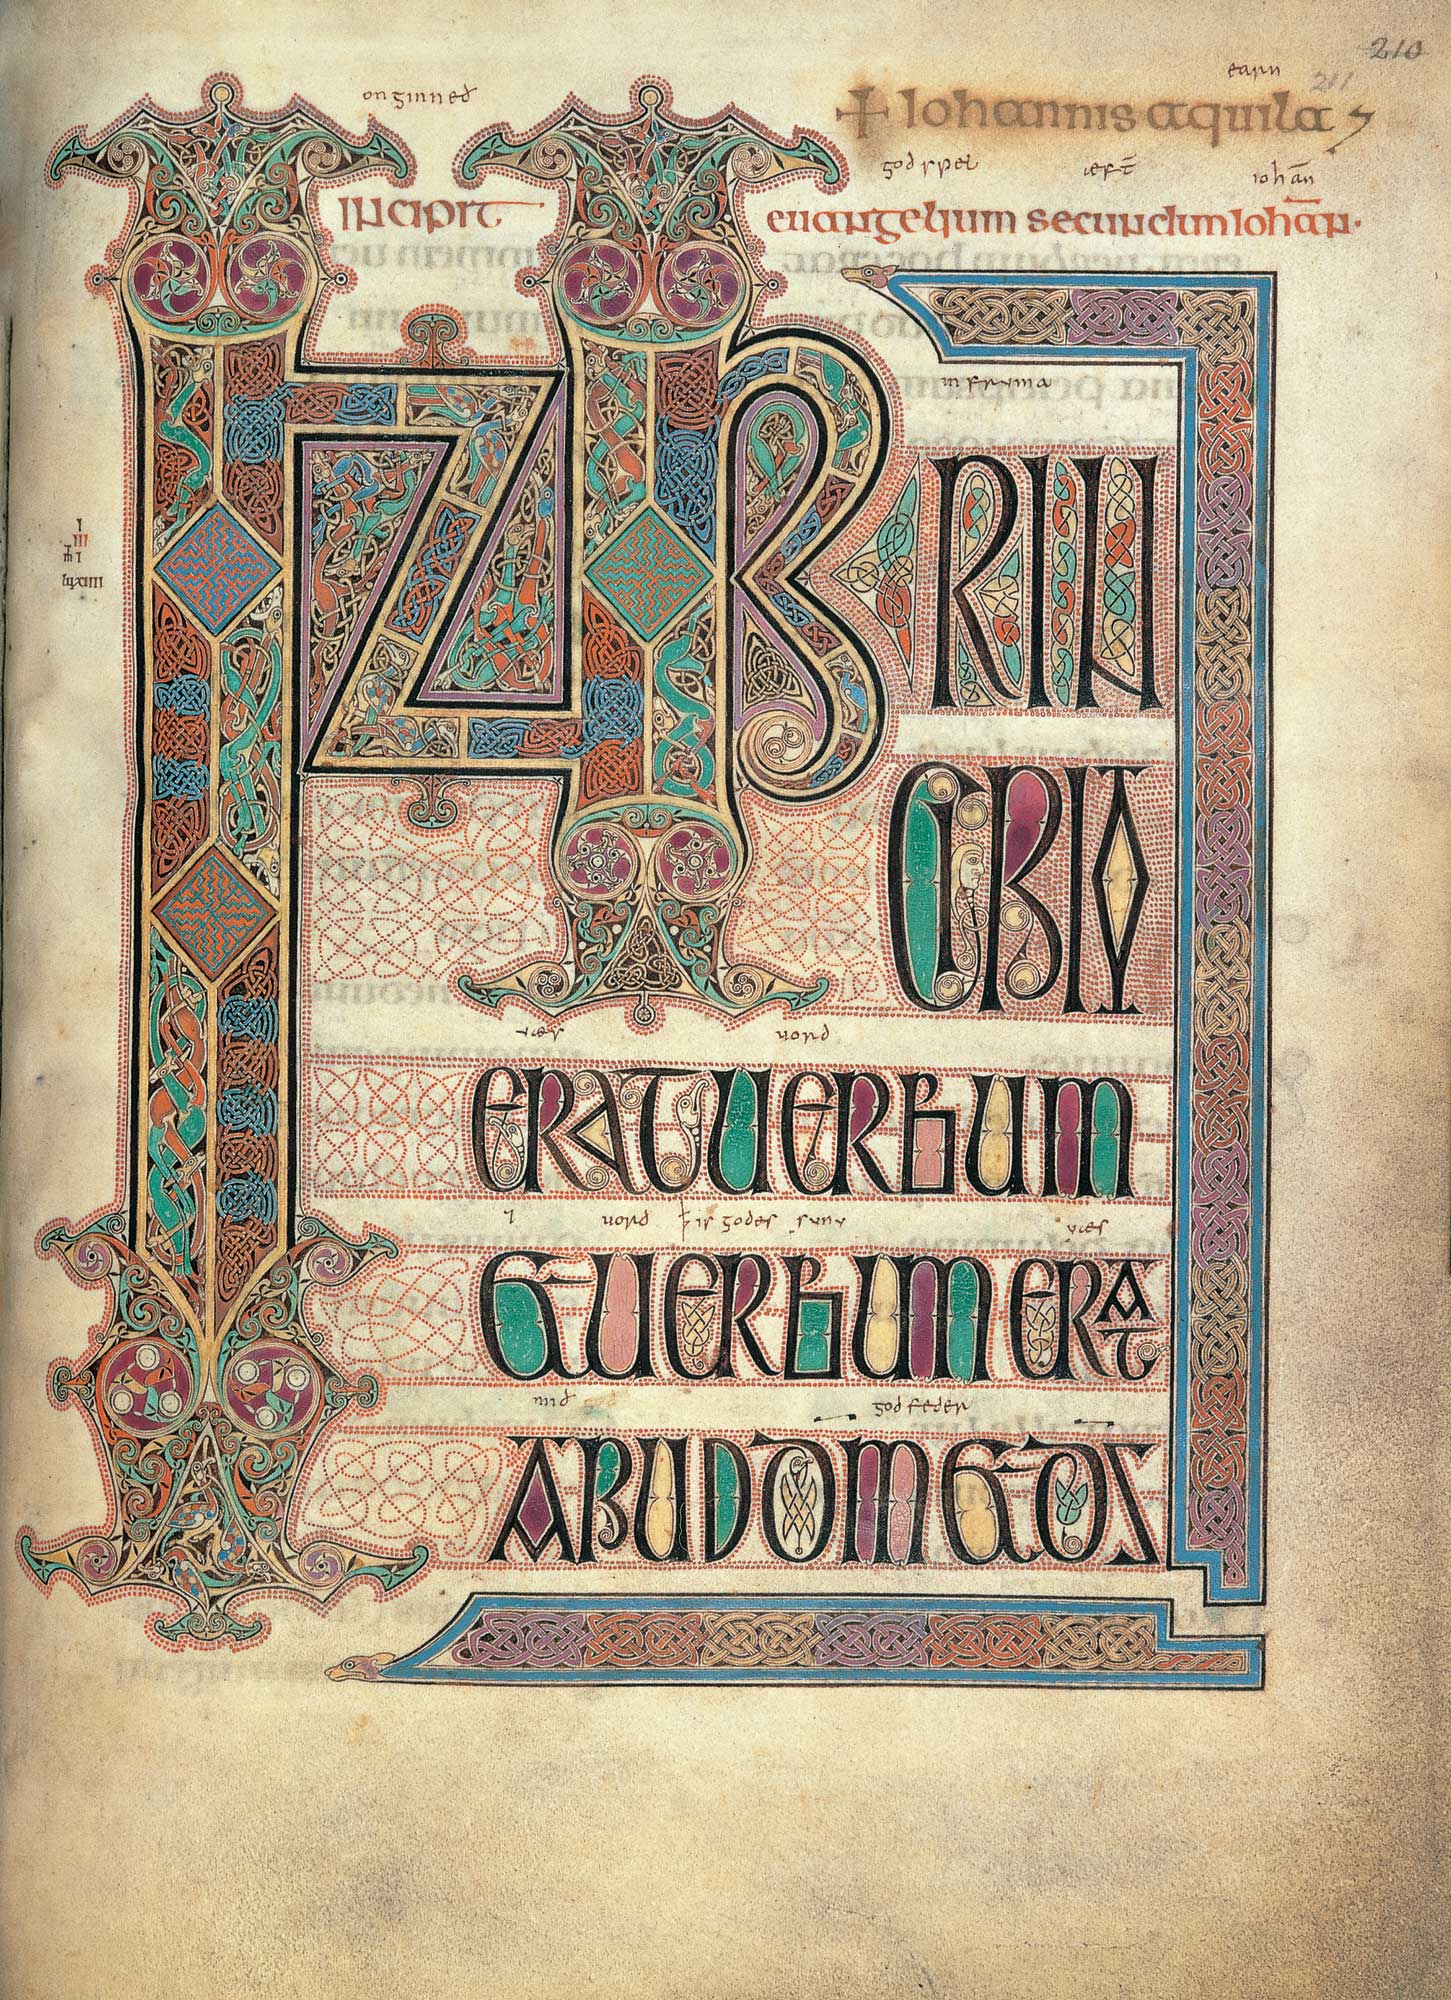
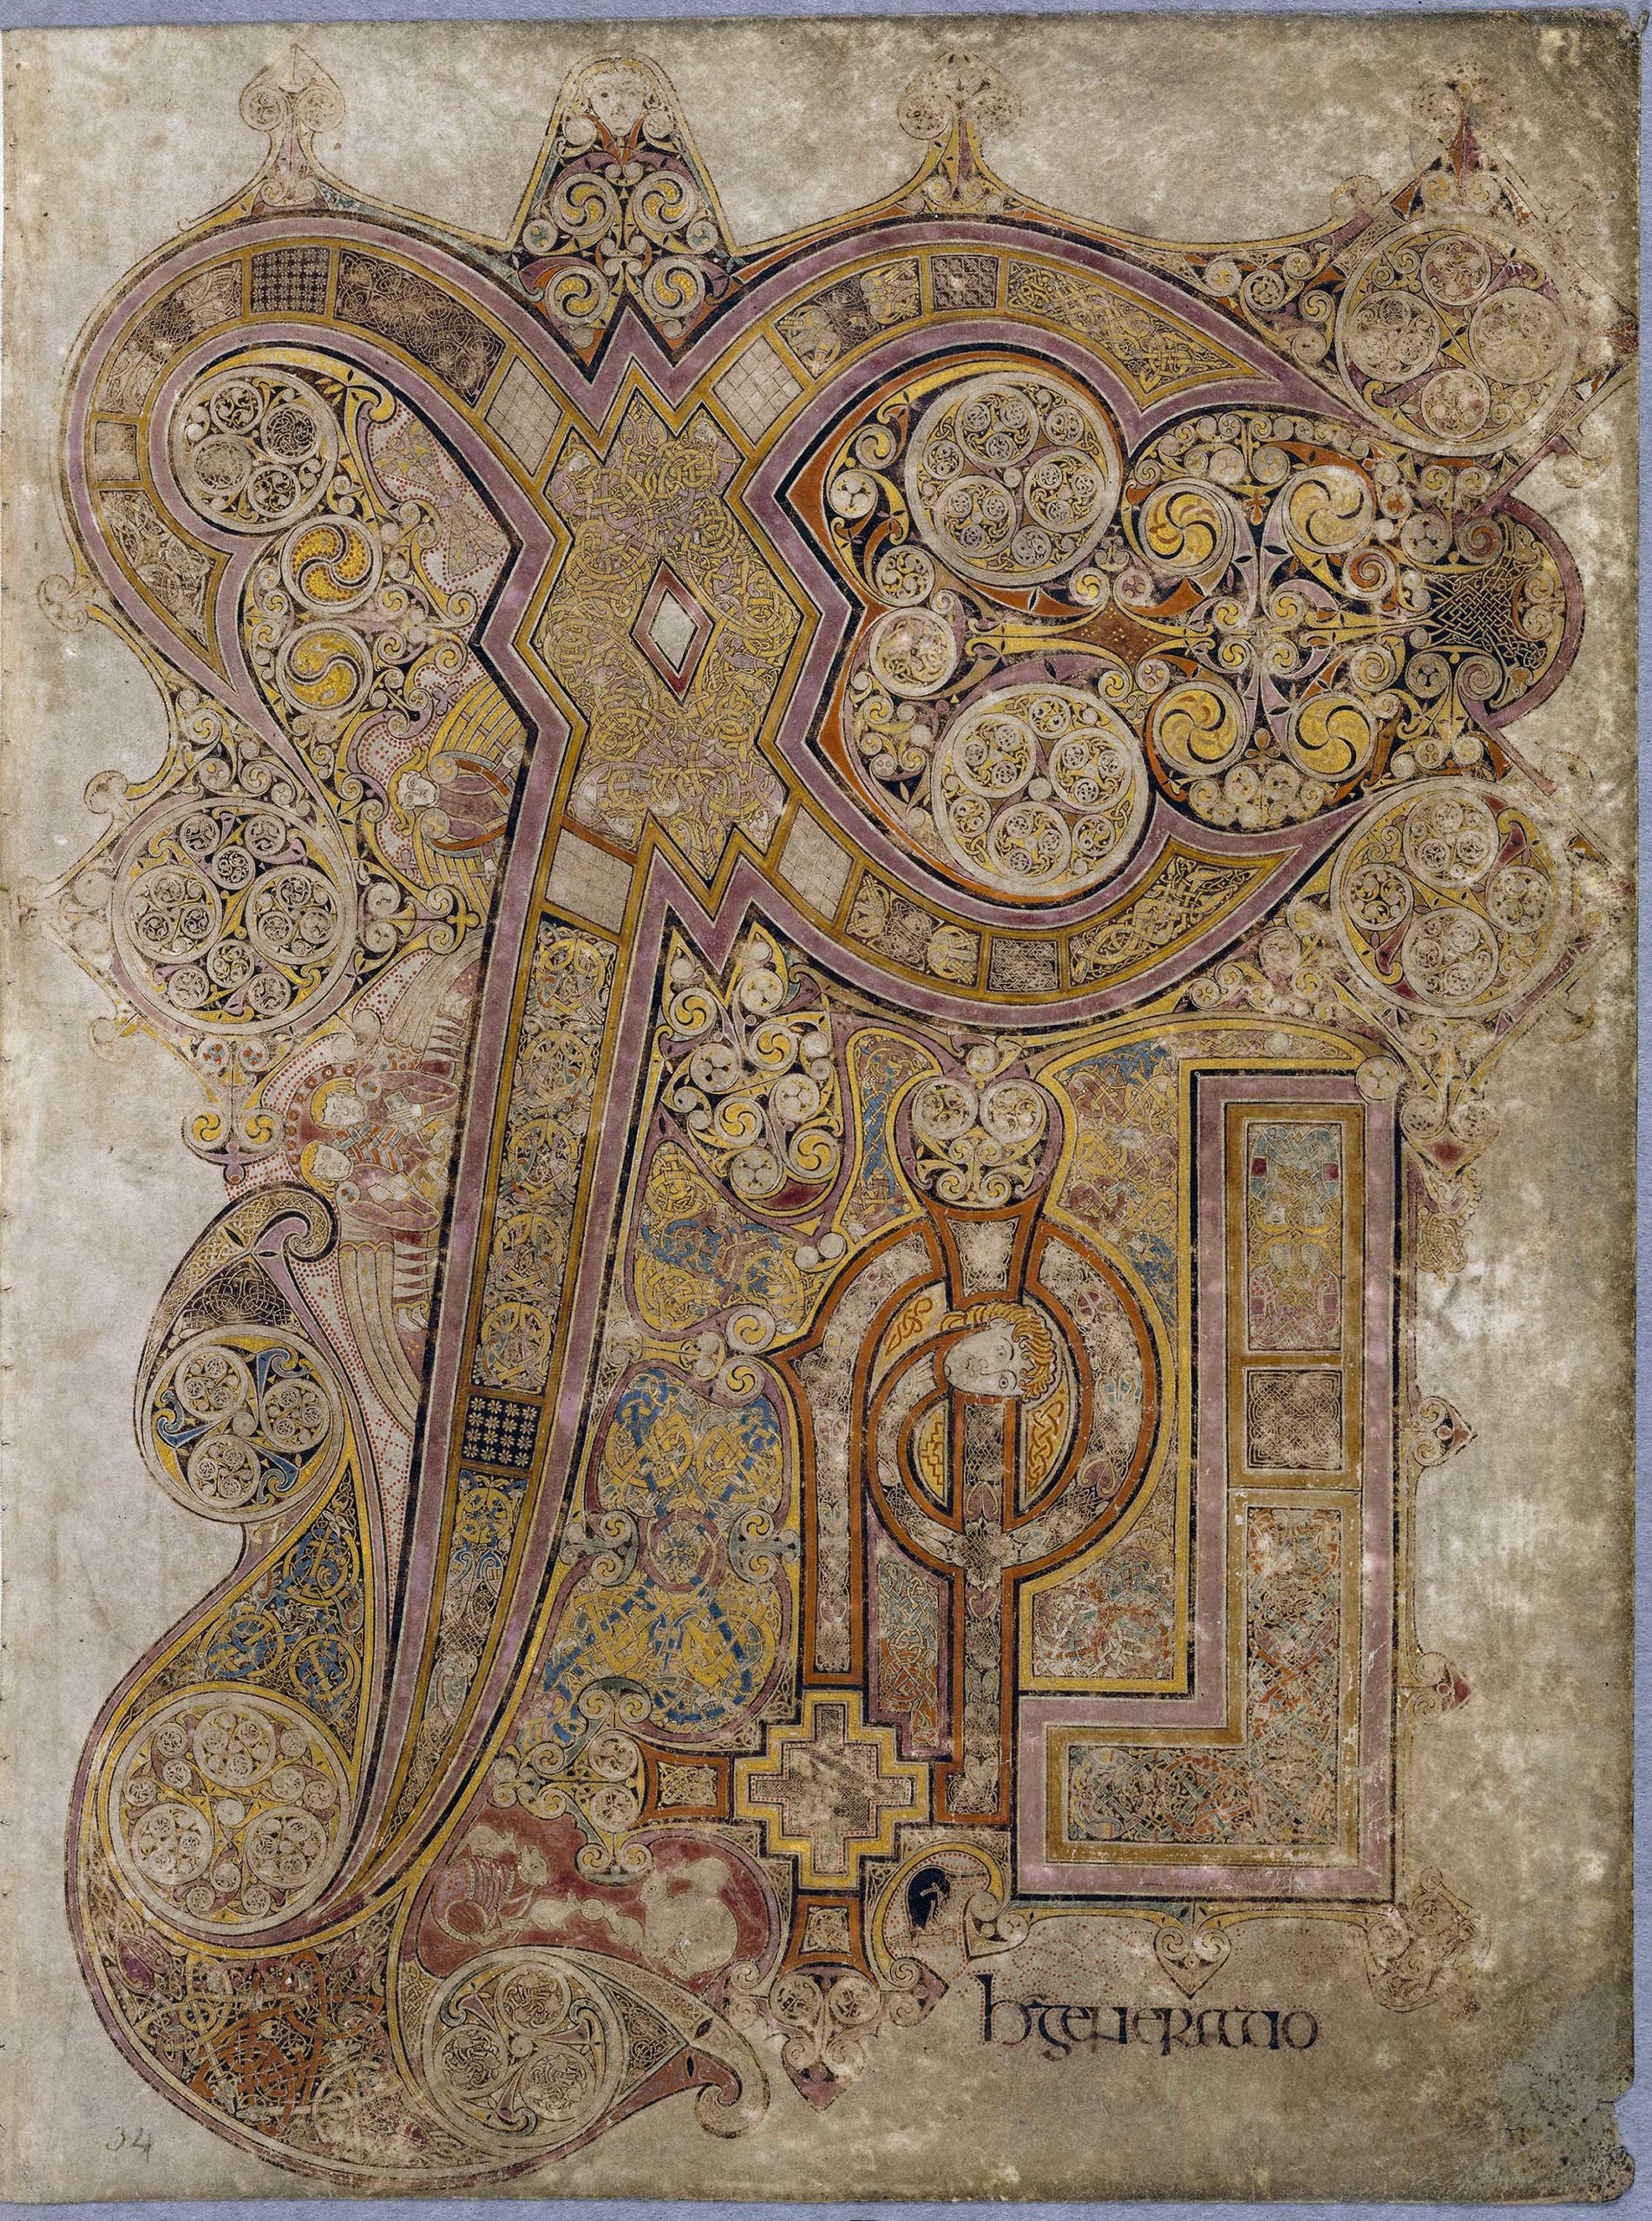
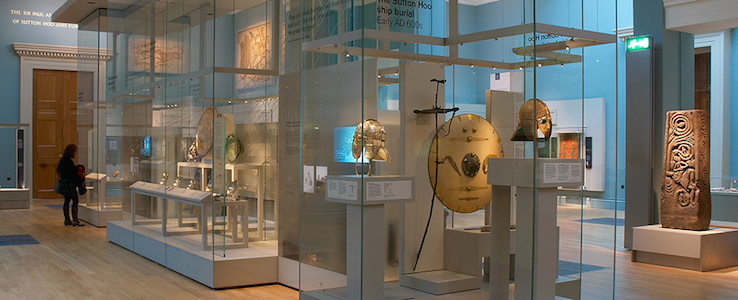
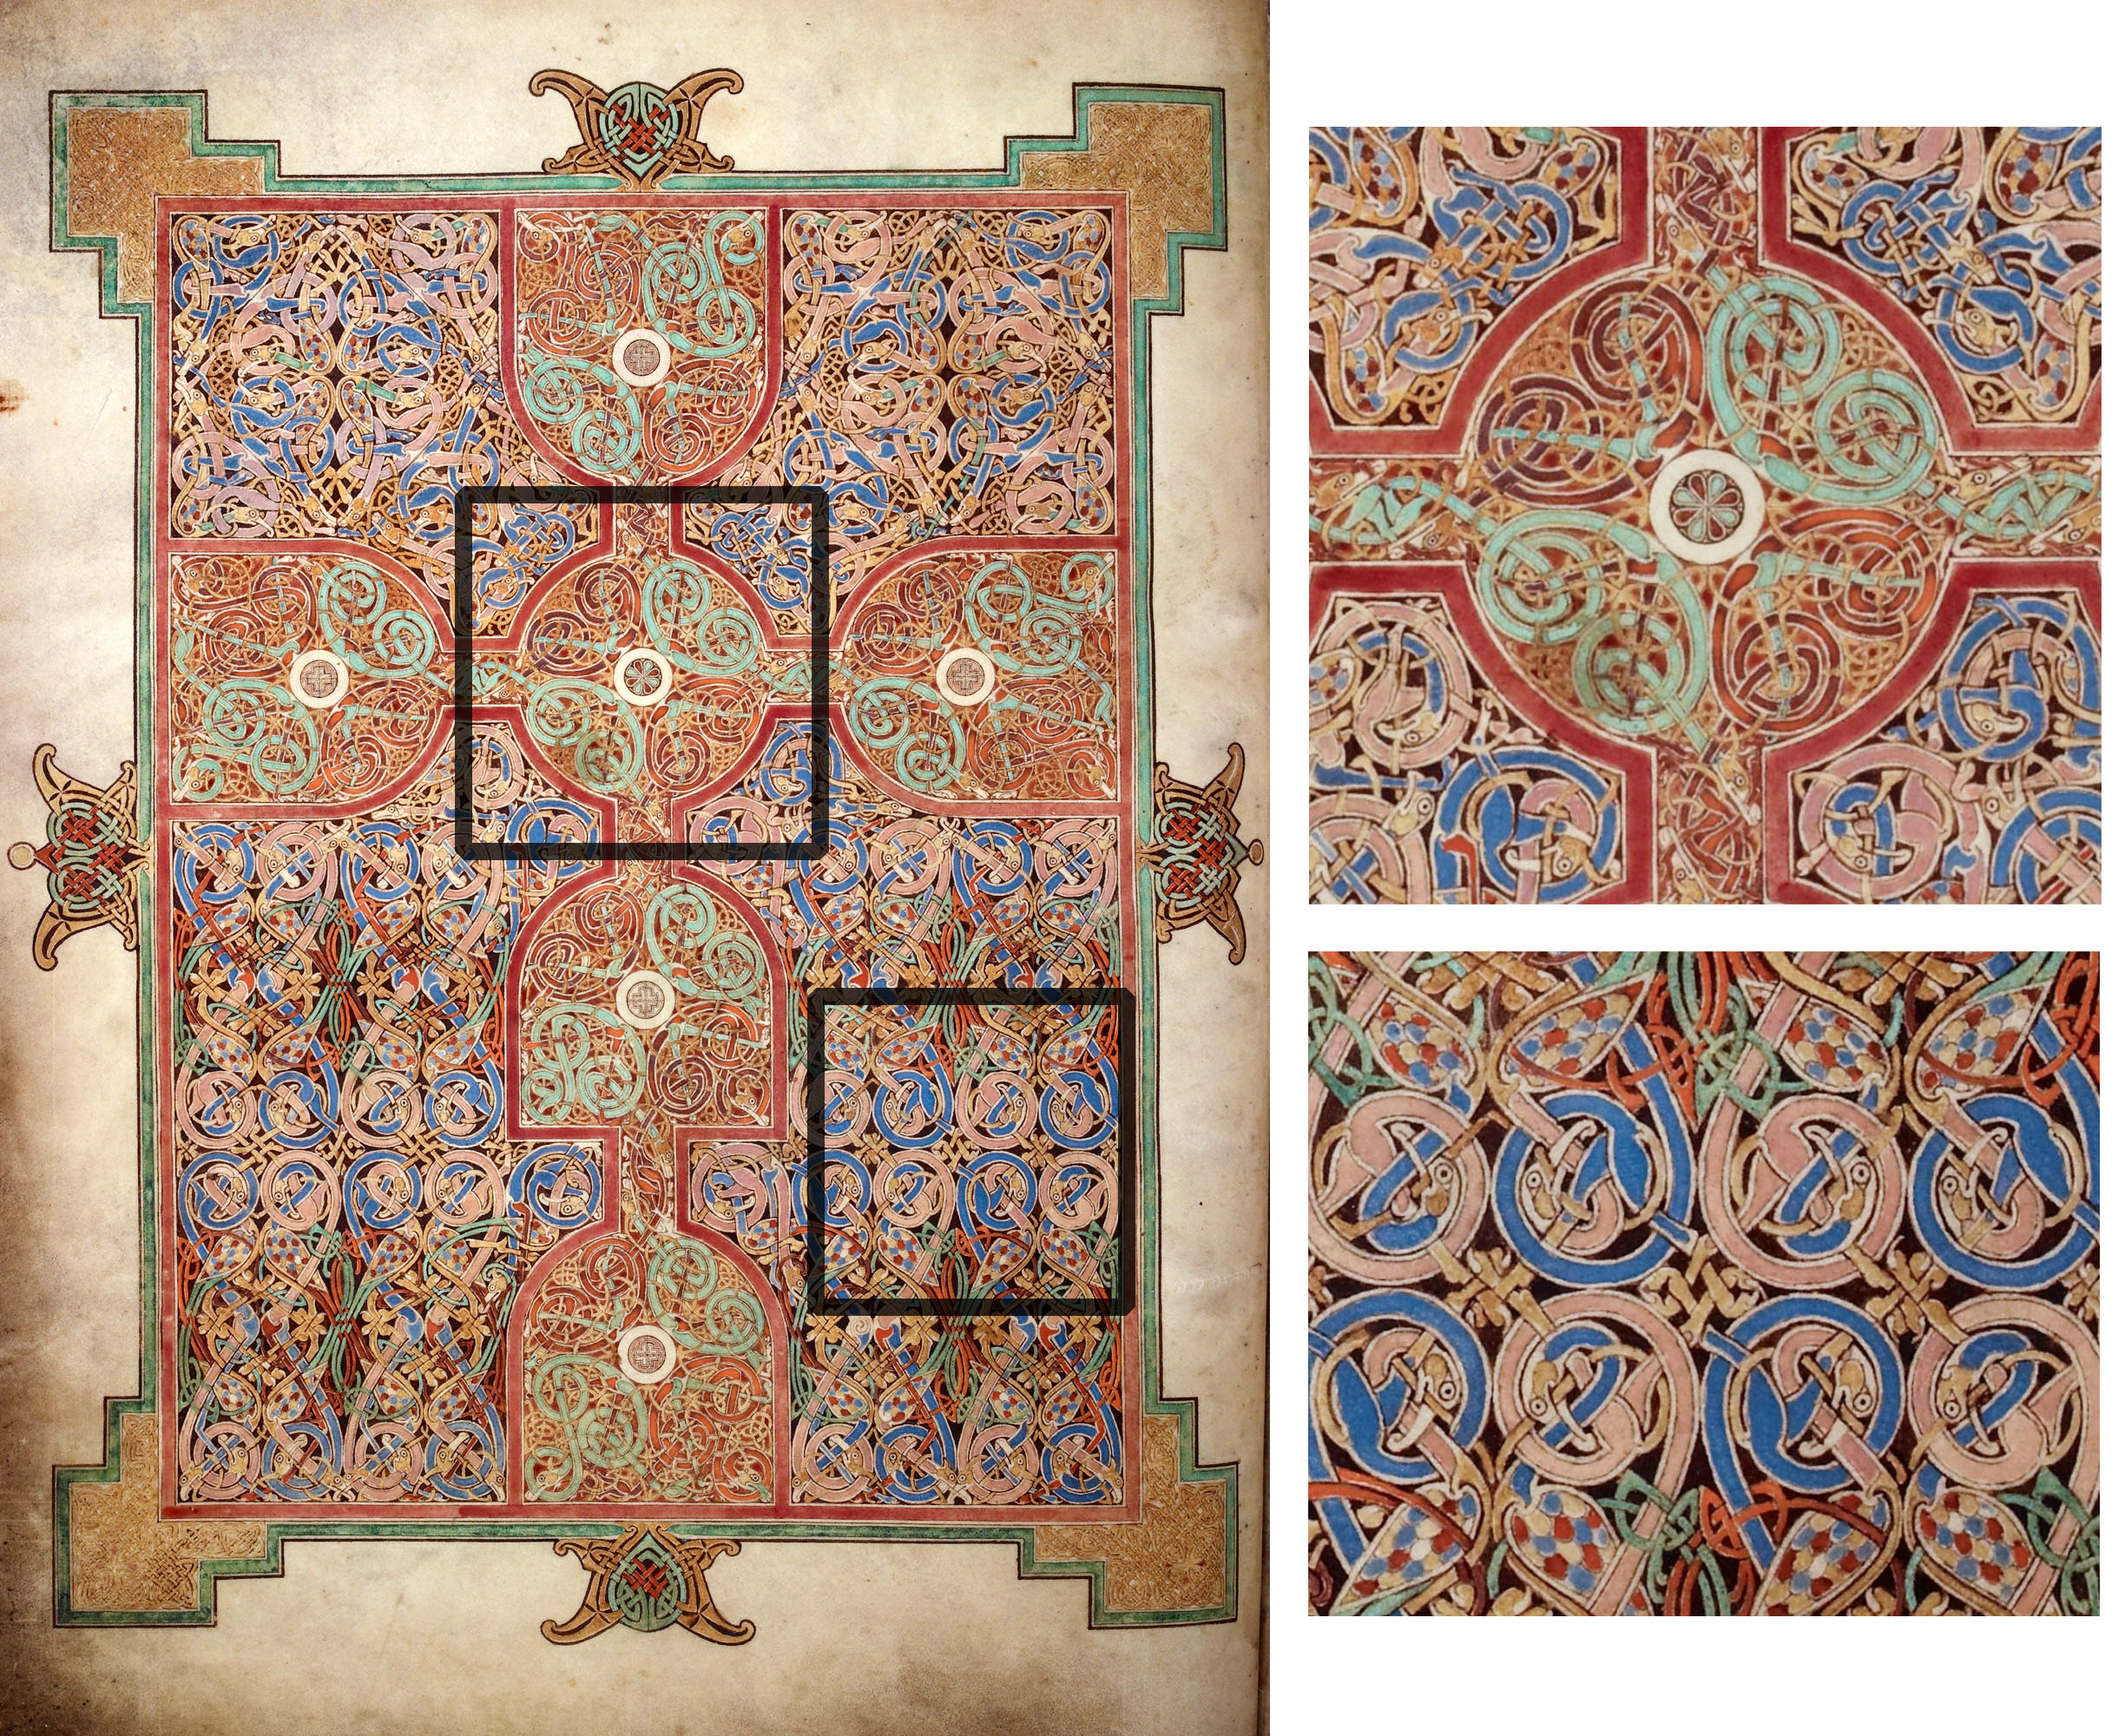
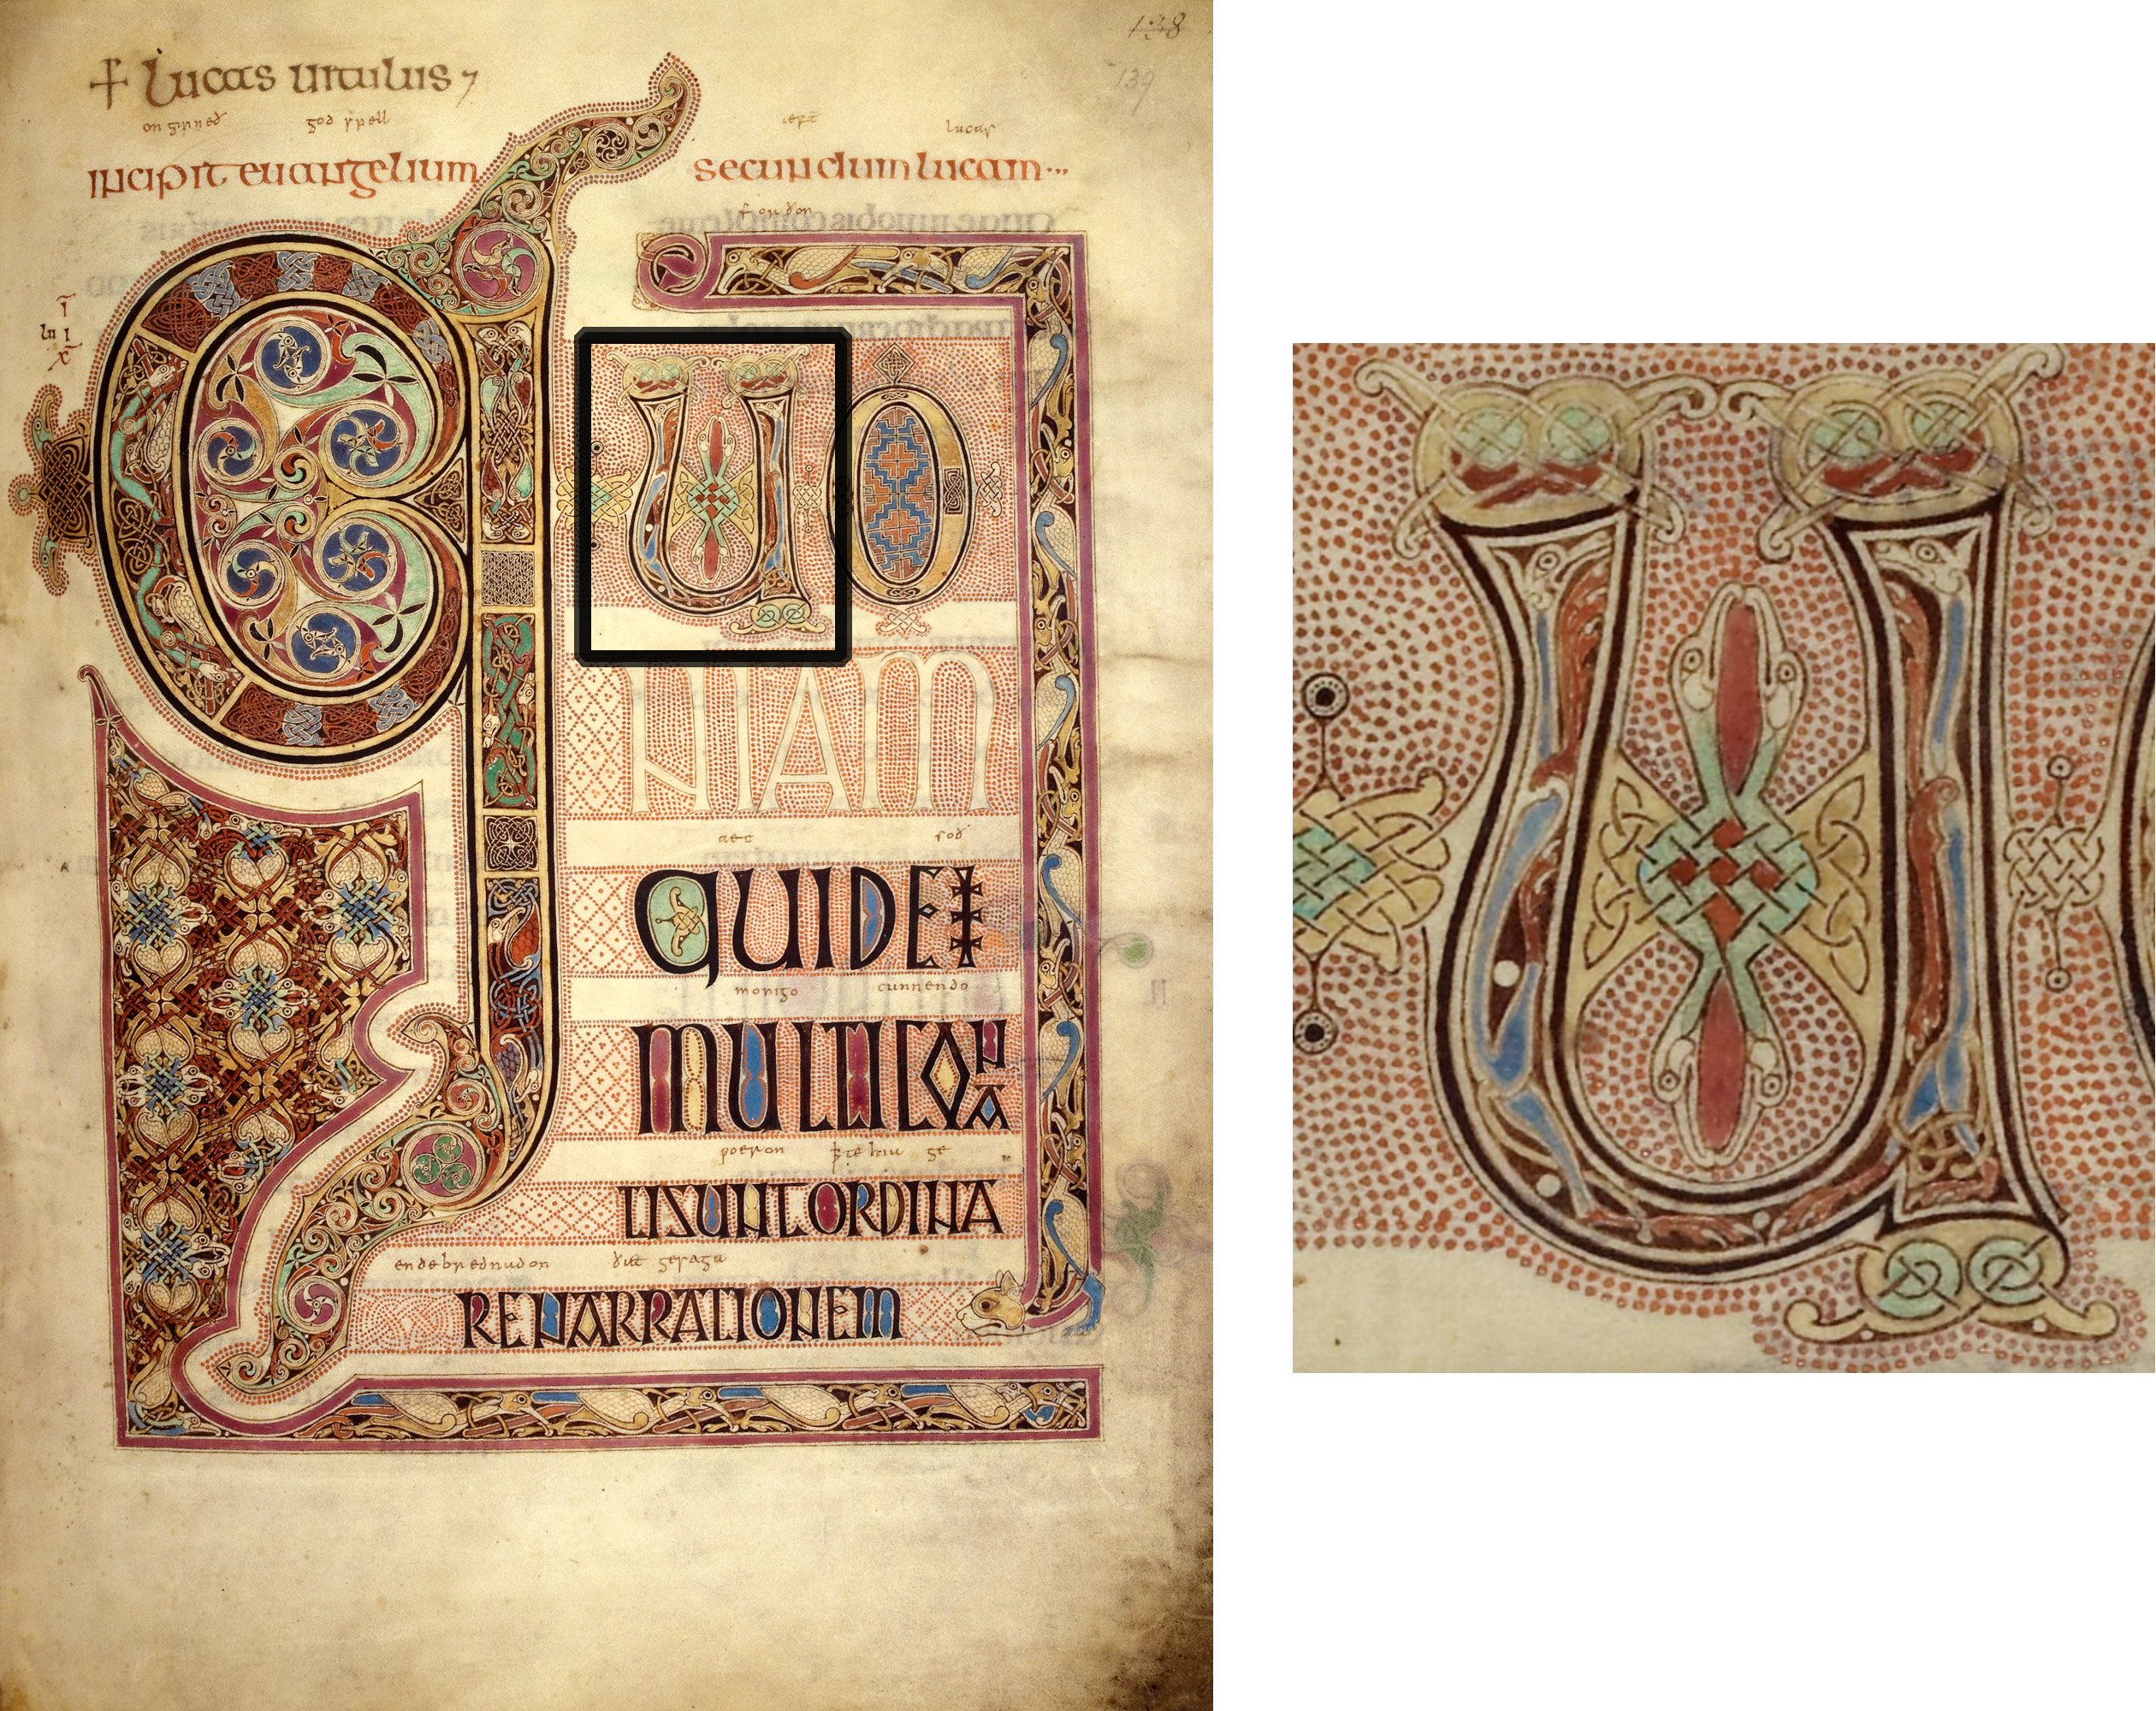
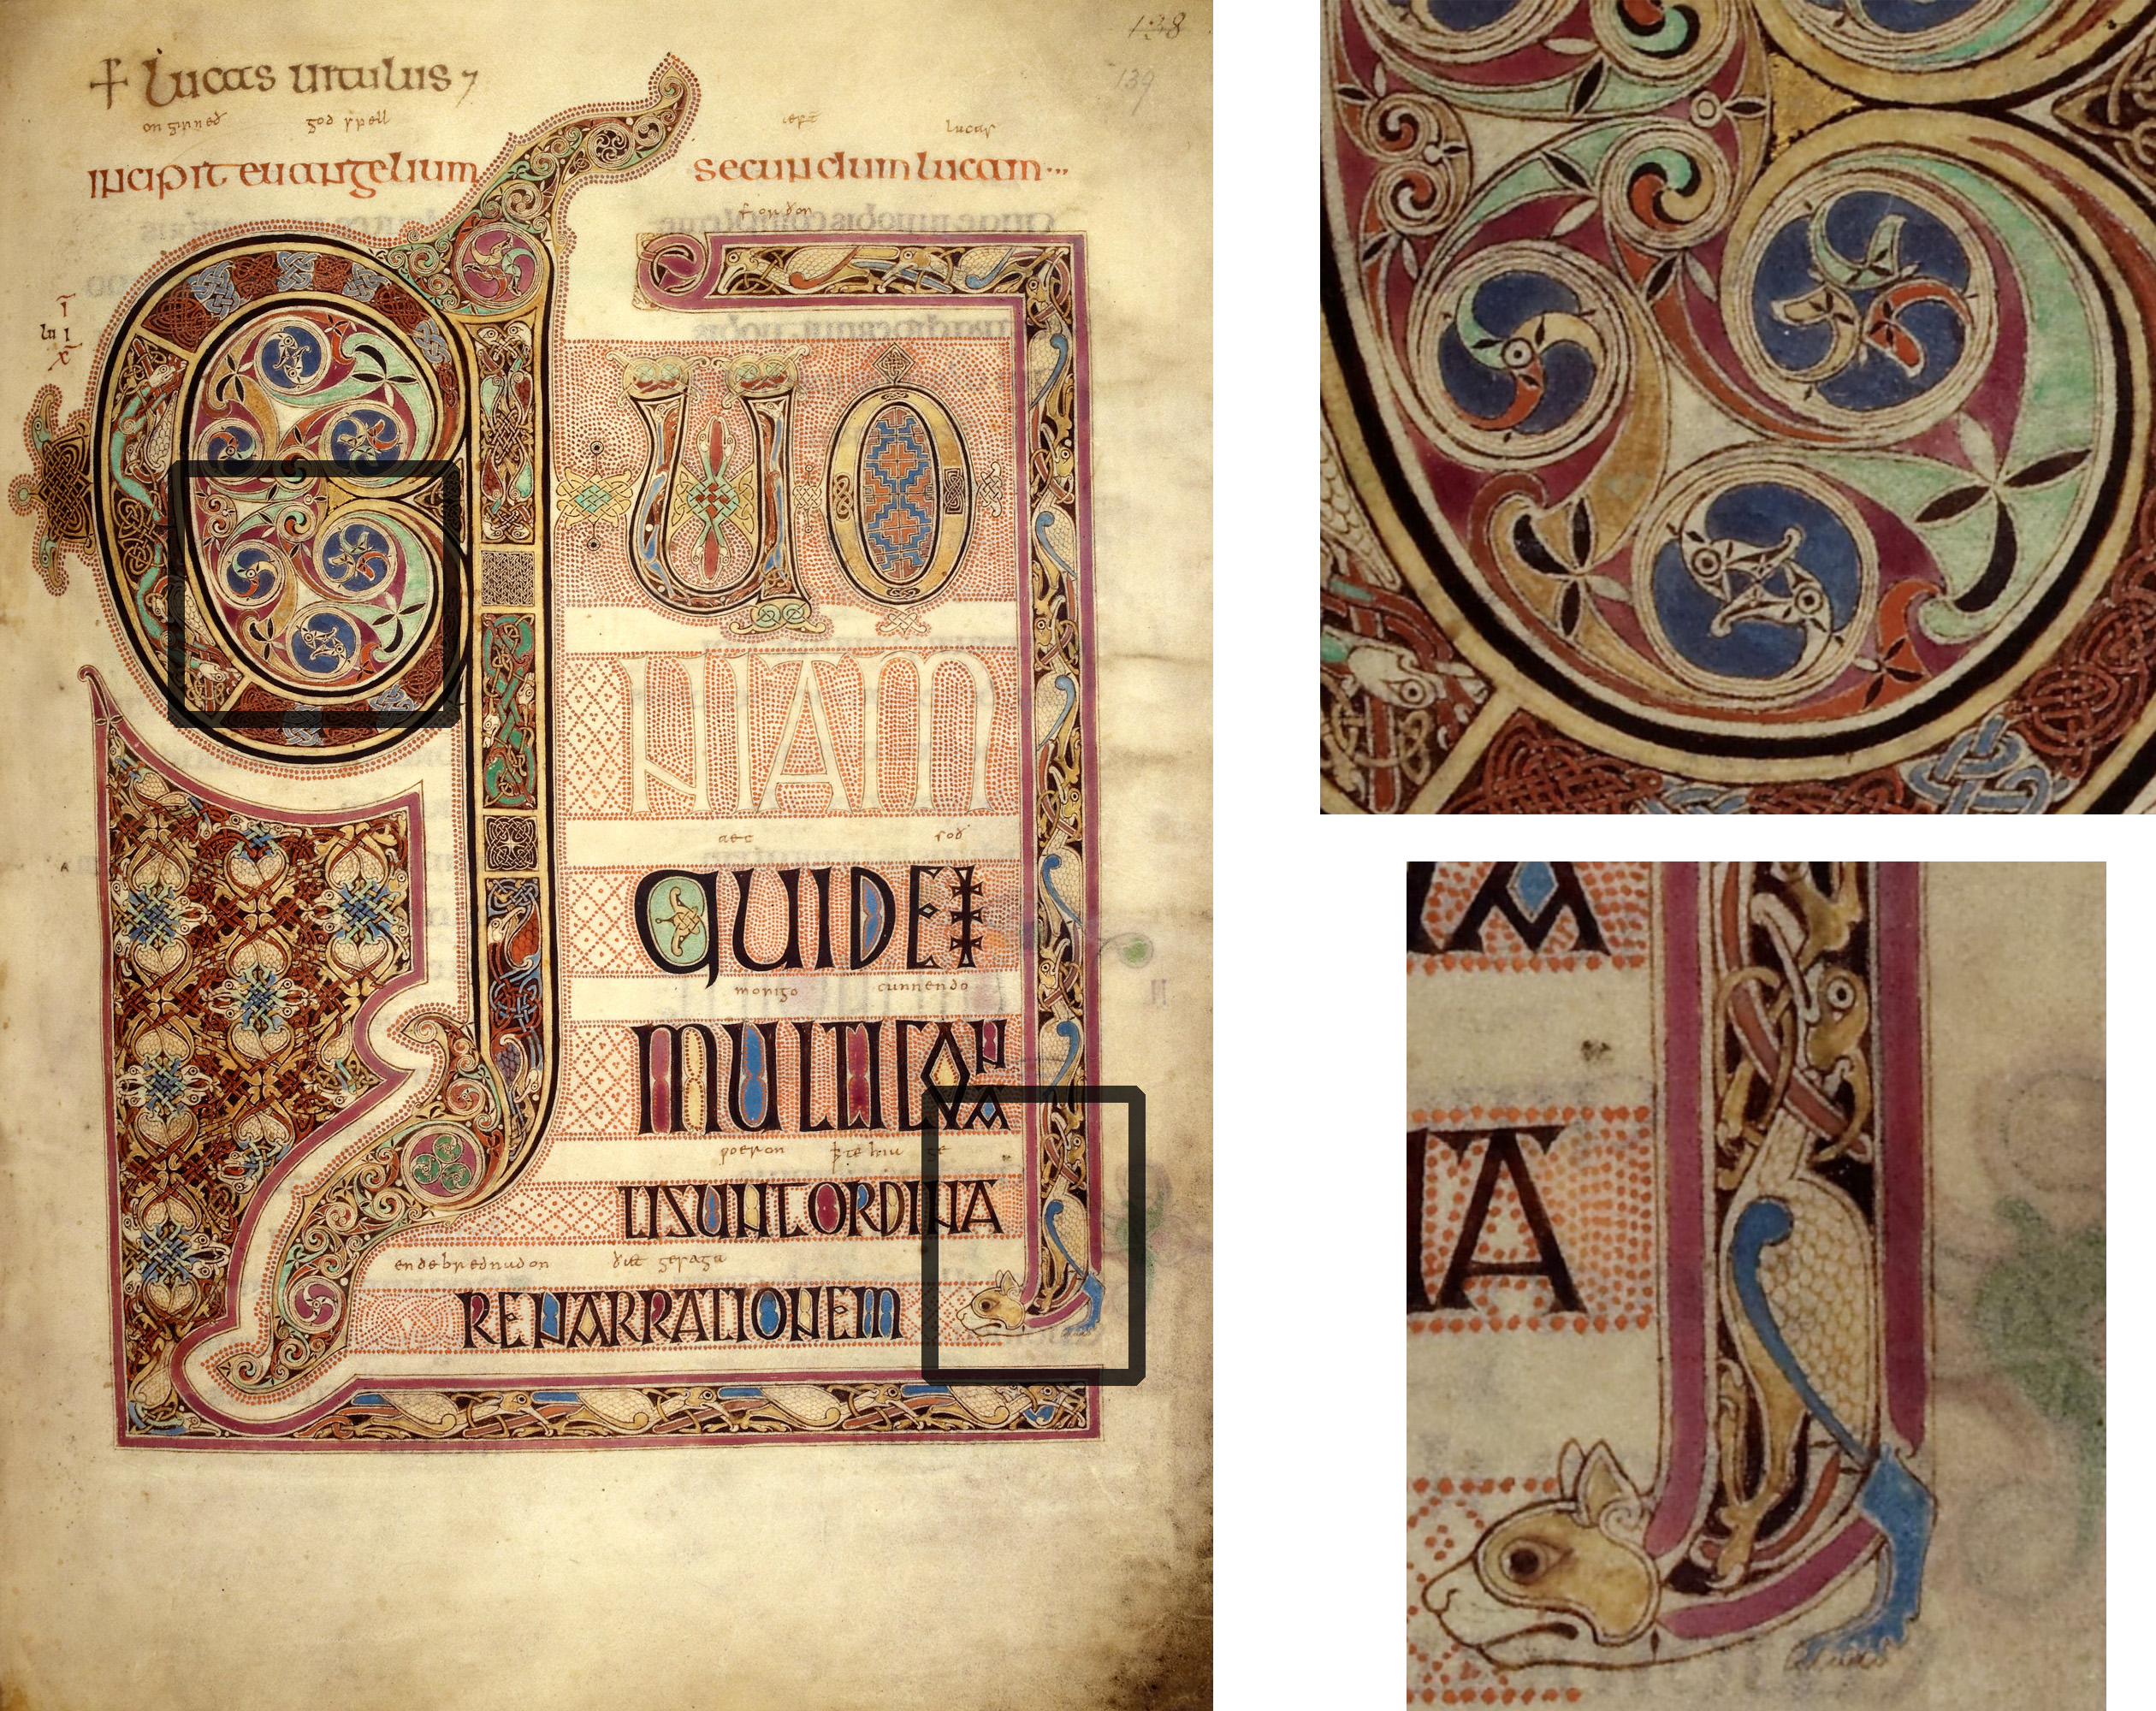
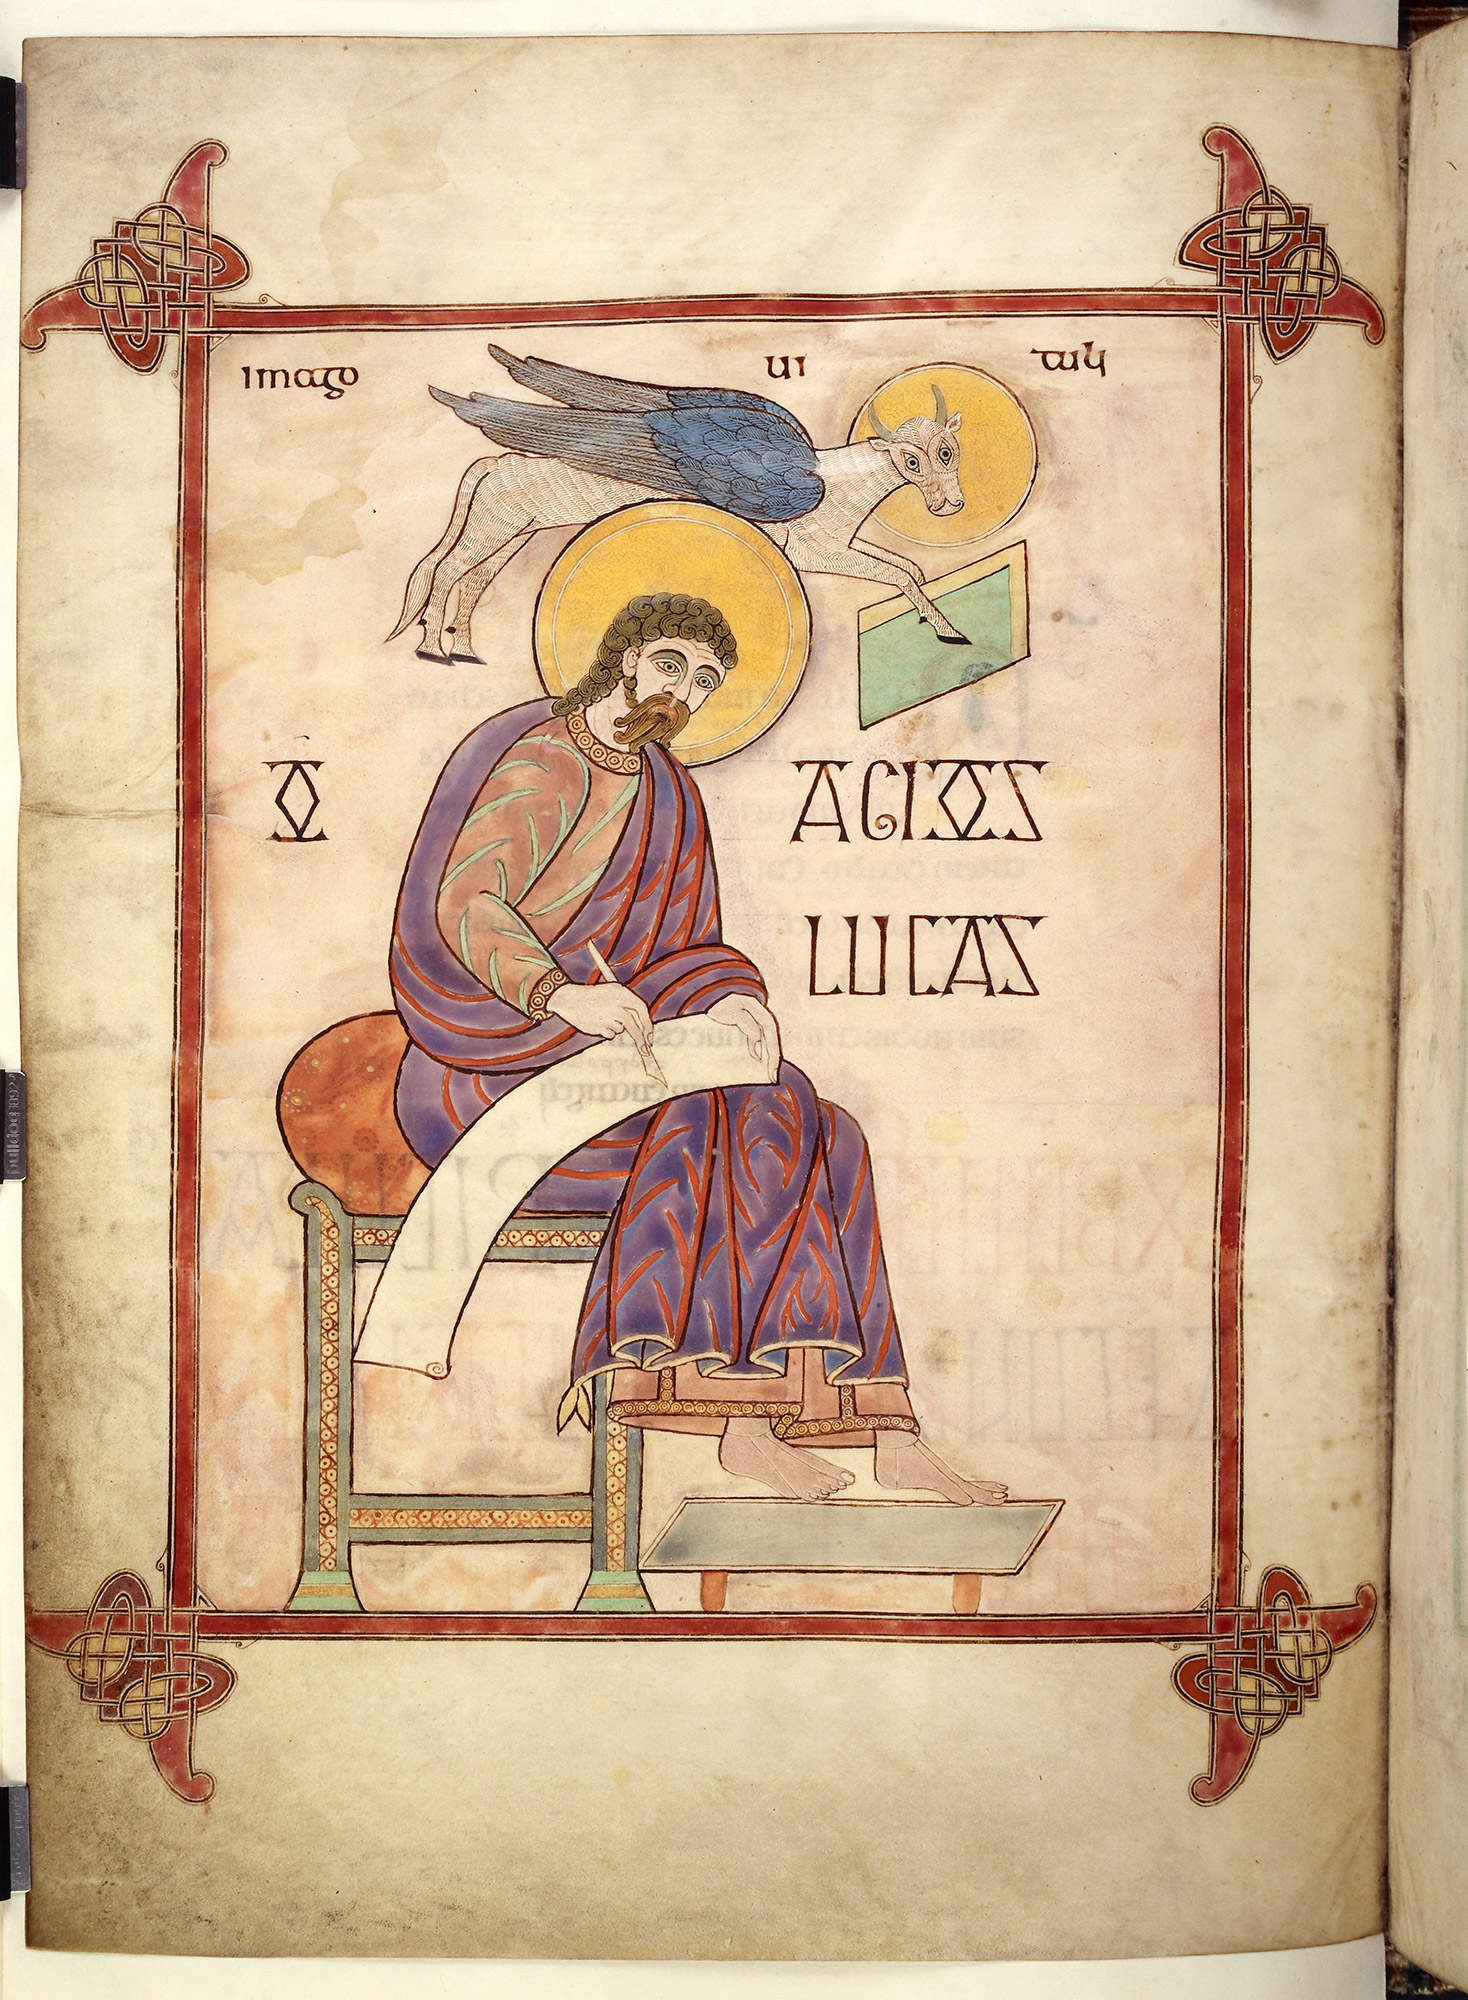
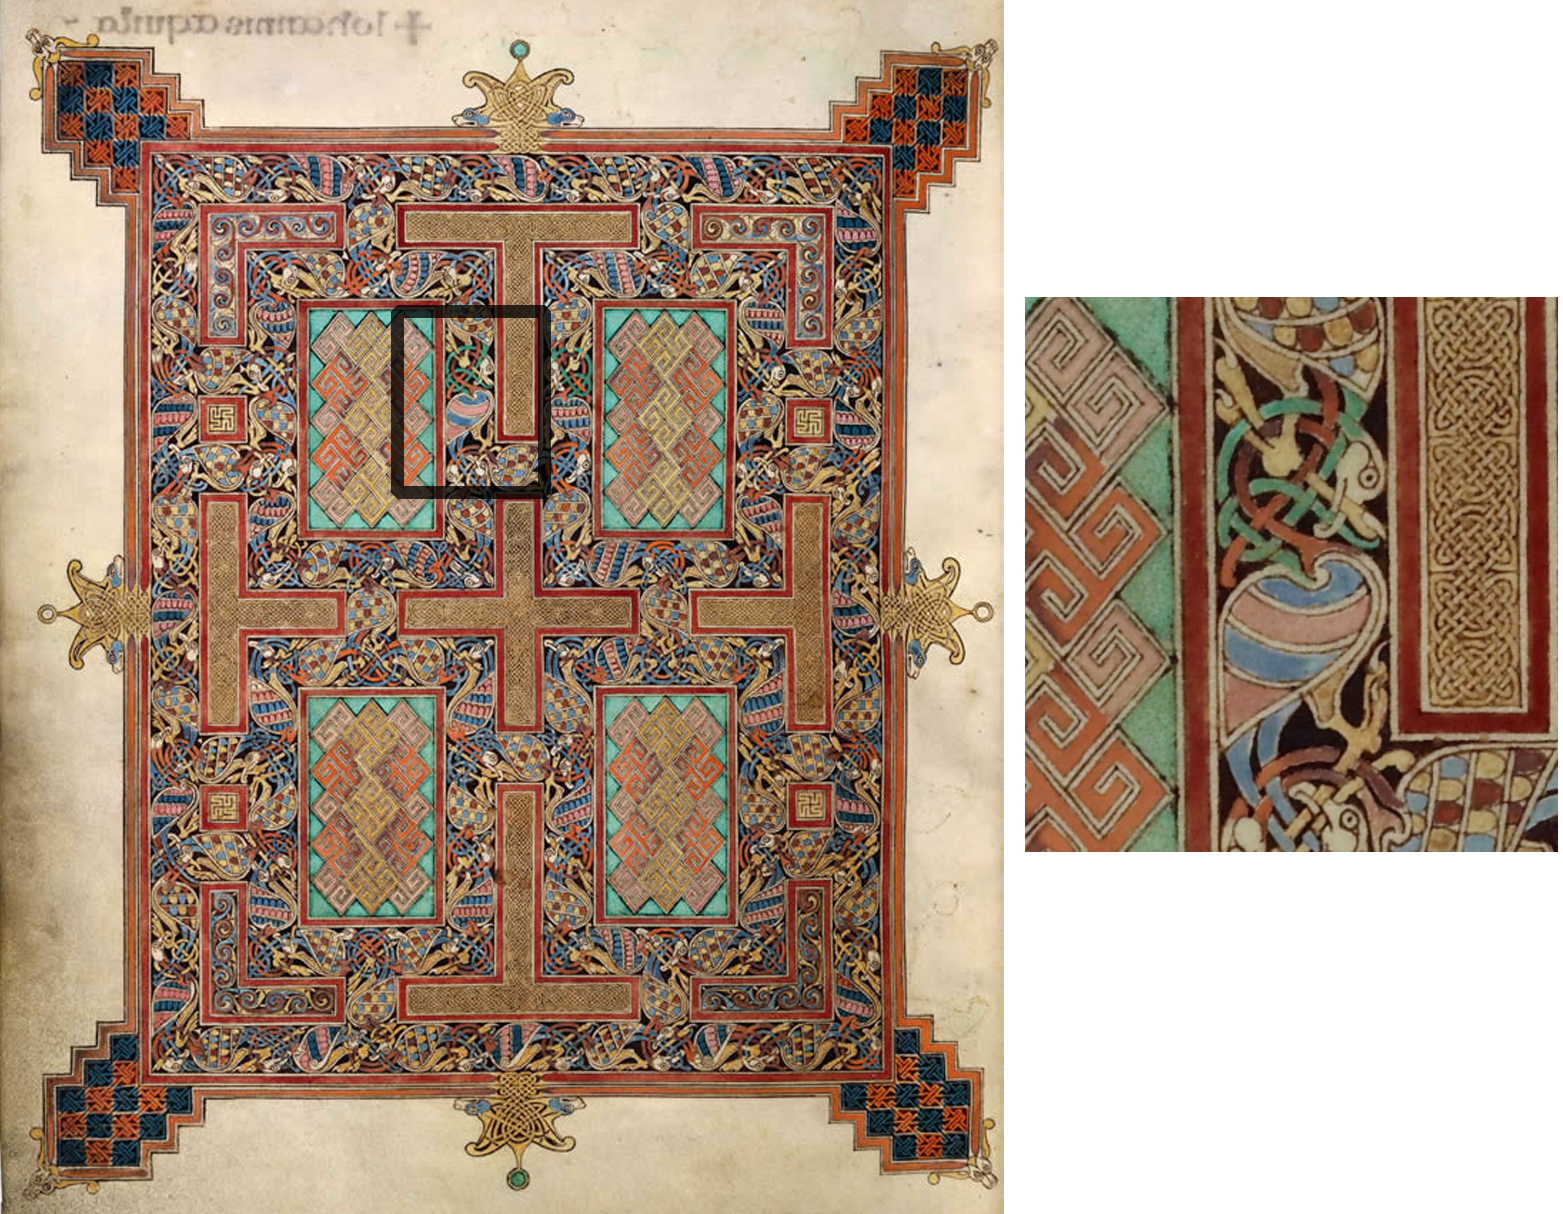
The Lindisfarne Gospels, c. 700, parchment, 36.5 x 27.5 cm (The British Library)
The Norse visual world
The visual world was of great importance to the Norse. Significant resources were devoted to the creation of astonishing objects and the acquisition of foreign goods (through plunder and trade alike), and because of their highly mobile endeavors, Norse-made and Norse-influenced objects have been found across a wide geographic expanse.
An array of sophisticated, meticulously crafted objects survive. Fine imported materials were used, but local materials were also expertly handled by highly skilled craftspeople. Woodworking, for example, was an essential skill, and detailed wood carvings have been uncovered and restored. This material is susceptible to rot and fire, and so we can conclude that what survives today is a small fraction of the woodwork that once existed.
Objects made from more tenacious materials—like metal and stone—comprise the majority of what art historians have left to examine. Metal jewelry, storage vessels, and other utilitarian objects have been uncovered from burials and hoards. Ivory and bone carvings have also been found, as have a limited number of precious textiles and stone carvings.
The styles of Viking Art
Many objects served practical and symbolic purposes and their complex decorative patterns can be a challenge to untangle. Highly-stylized motifs weave around and flow into one another, so that following a single form from one end to the other can be difficult—if there are end points at all. Imagery was created to communicate ideas about social relations, religious beliefs, and to recall a mythic past. Although many objects served pagan intentions, Christian themes began to intermingle with them as new ideas filtered into the region. Viking art is visually distinct from contemporaneous cultures (as traded objects and integrated customs demonstrate), and represents a unique way of thinking about the world.
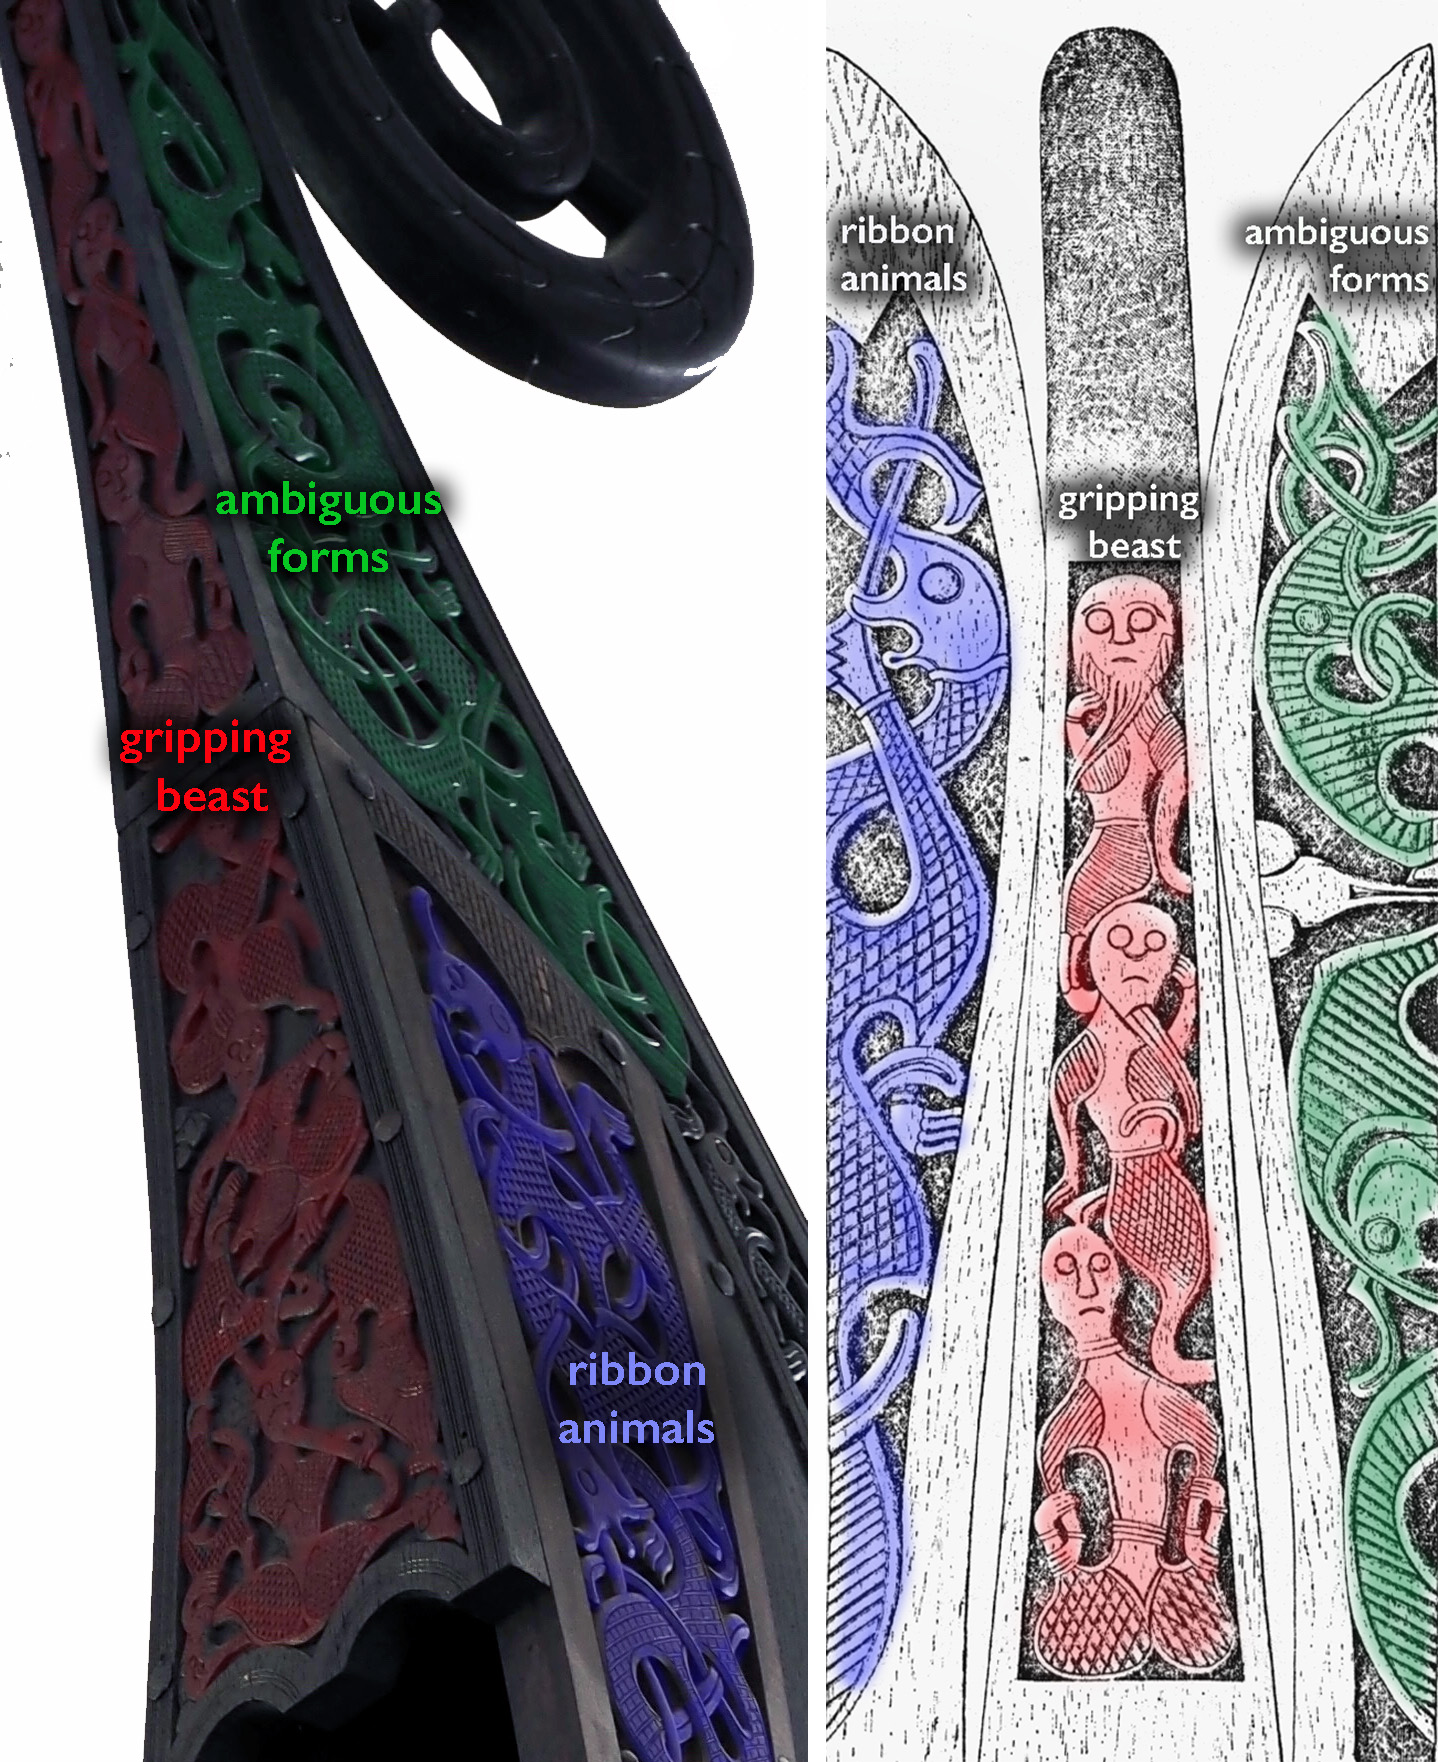
Various beasts are carved into the Oseberg ship’s stern: a ribbon-animal (in blue, also called a streaming-animal); gripping-beasts rendered with humanoid heads (in red); and more ambiguous forms that echo the bodies of creatures seen at the prow (in green). Oseberg oak longship and detail of prow with ribbon-animal and gripping-beast motifs, 9th century, found in burial mound near Tønsberg (Viking ship museum, Oslo; photo: Chad K, CC BY 2.0)
The animal motifs that frequently embellished objects are actually a continuation of artistic traditions from previous periods. Two were particularly widespread: the “ribbon-animal” and the “gripping beast.” We see both of these on the stern of the Oseberg longship.
The ribbon-animal was typically pictured as a highly abstracted creature with an elongated body and simplified features, appearing individually and in pairs. In contrast, the gripping beast—a fantastical creature with clearly defined limbs—was anchored to the borders of designs and surrounding creatures. Other animal motifs developed throughout the period, and human figures were also present. These elements, which are thought to have had particular assigned meanings, are central to the categorization of Viking Age art styles.
The Viking Art styles are:
| Oseberg |
c. 775/800–875 C.E. |
| Borre |
c. 850–975 C.E. |
| Jellinge |
c. 900–975 C.E. |
| Mammen |
c. 960s–1000/1025 C.E. |
| Ringerike |
c. 990–1050 C.E. |
| Urnes |
c. 1050–1125 C.E. |
Oseberg style
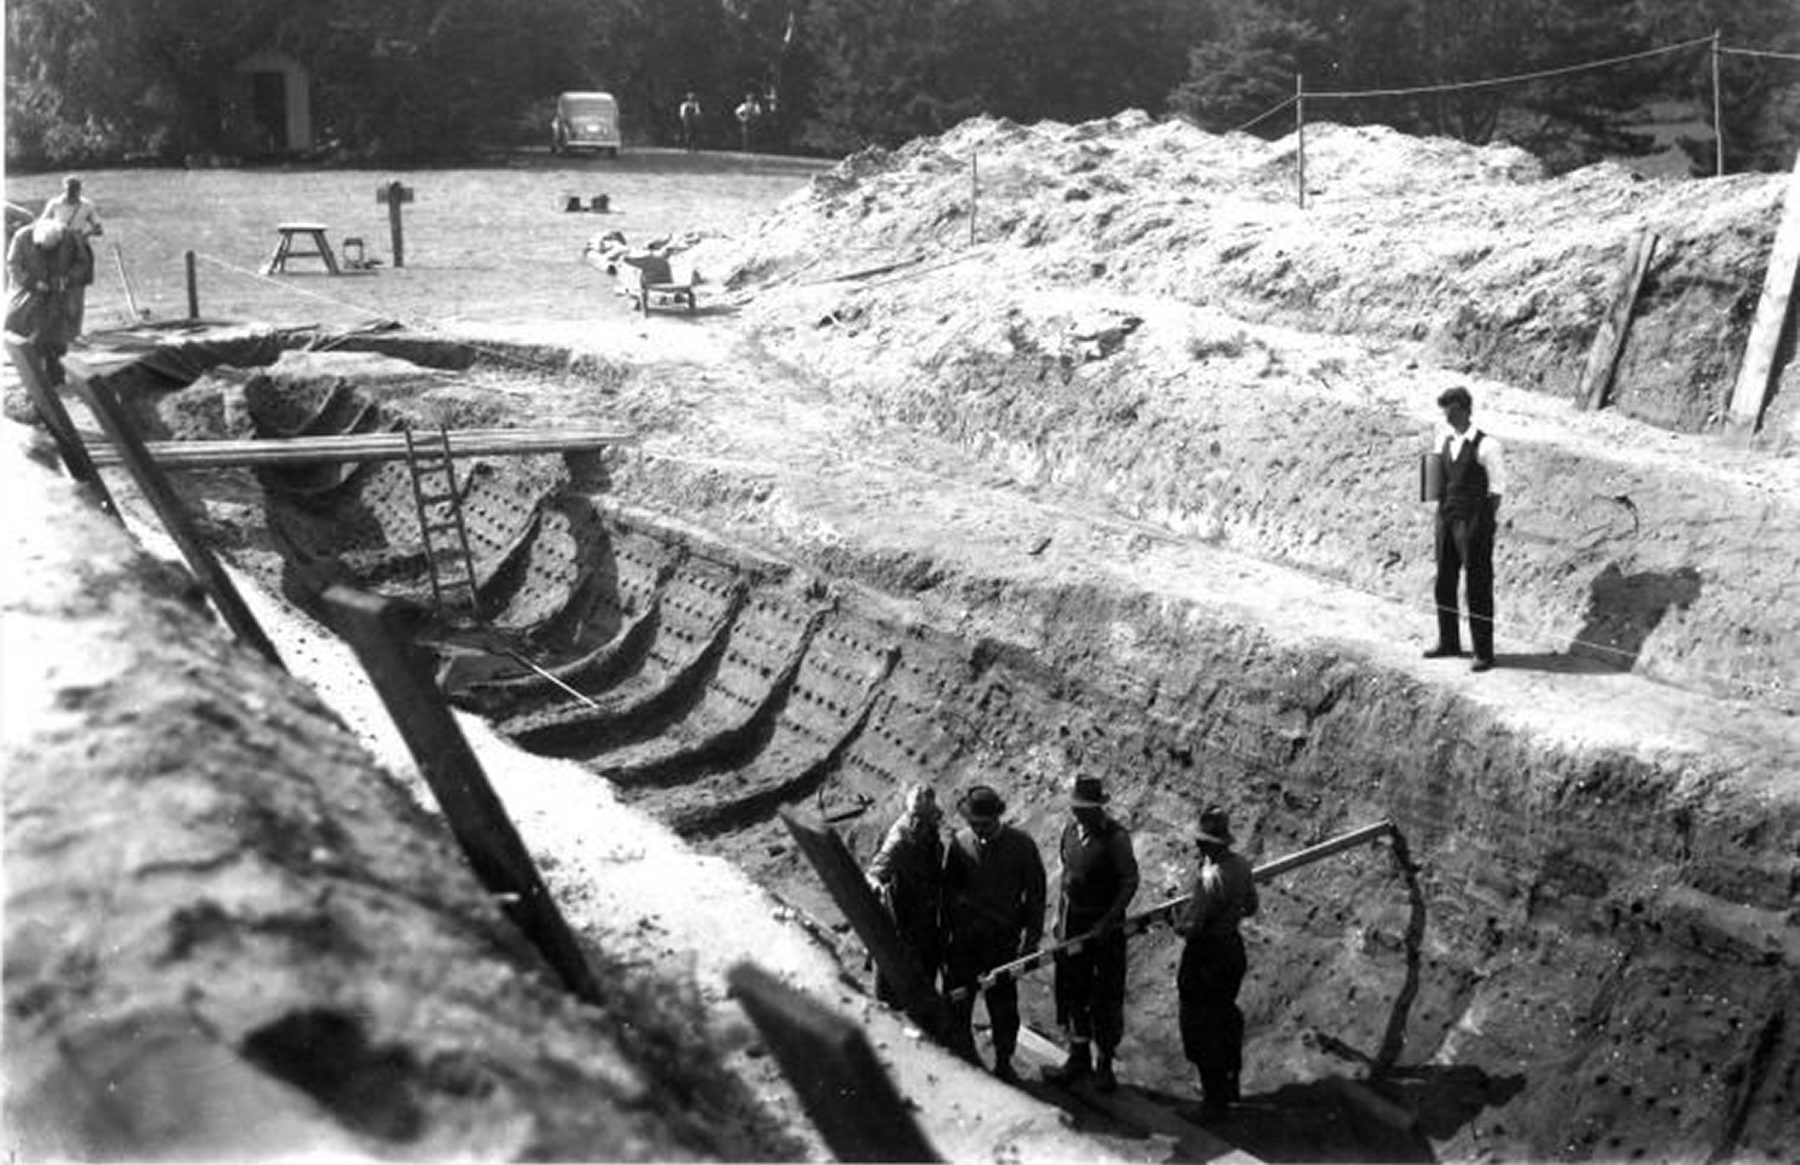
The Oseberg style was popular throughout mainland Scandinavia. Some of the most remarkable wood carving from the Viking Age was created in this style. A spectacular oak longship—found within the burial mound from which the style’s name was derived—is one of the most studied works of the period. Featuring carvings of the ribbon-animal and gripping-beast motifs in fluid combinations on its prow, it served as an elite funerary vessel for two women.

Oseberg oak longship and detail of prow, 9th century, found in burial mound near Tønsberg (Viking ship museum, Oslo; left photo: Petter Ulleland, CC BY-SA 4.0 and right photo: mararie, CC BY-SA 2.0)
Bearded man, detail on the cart, before 800, wood, found in the Oseberg burial mound (Museum of Cultural History, photo: Helen Simonsson, CC BY-SA 4.0)
The Oseberg style shows a strong interplay between zoomorphic and geometric patterns that continues artistic traditions predating the Viking Age.
In Oseberg art, animal motifs—which included birds, human faces sometimes thought to be masks (such as we see on the Oseberg burial cart), and the gripping beast—appear short and stocky, nearly equal in size, have rounded eyes, and tendril-like limbs. These schematic figures are situated within fields that divide surfaces into clear segments and emphasize the balance and organization of images. With mixtures of high- and low-relief carvings flooding their surfaces in tightly interlacing ornament, very little background is visible.
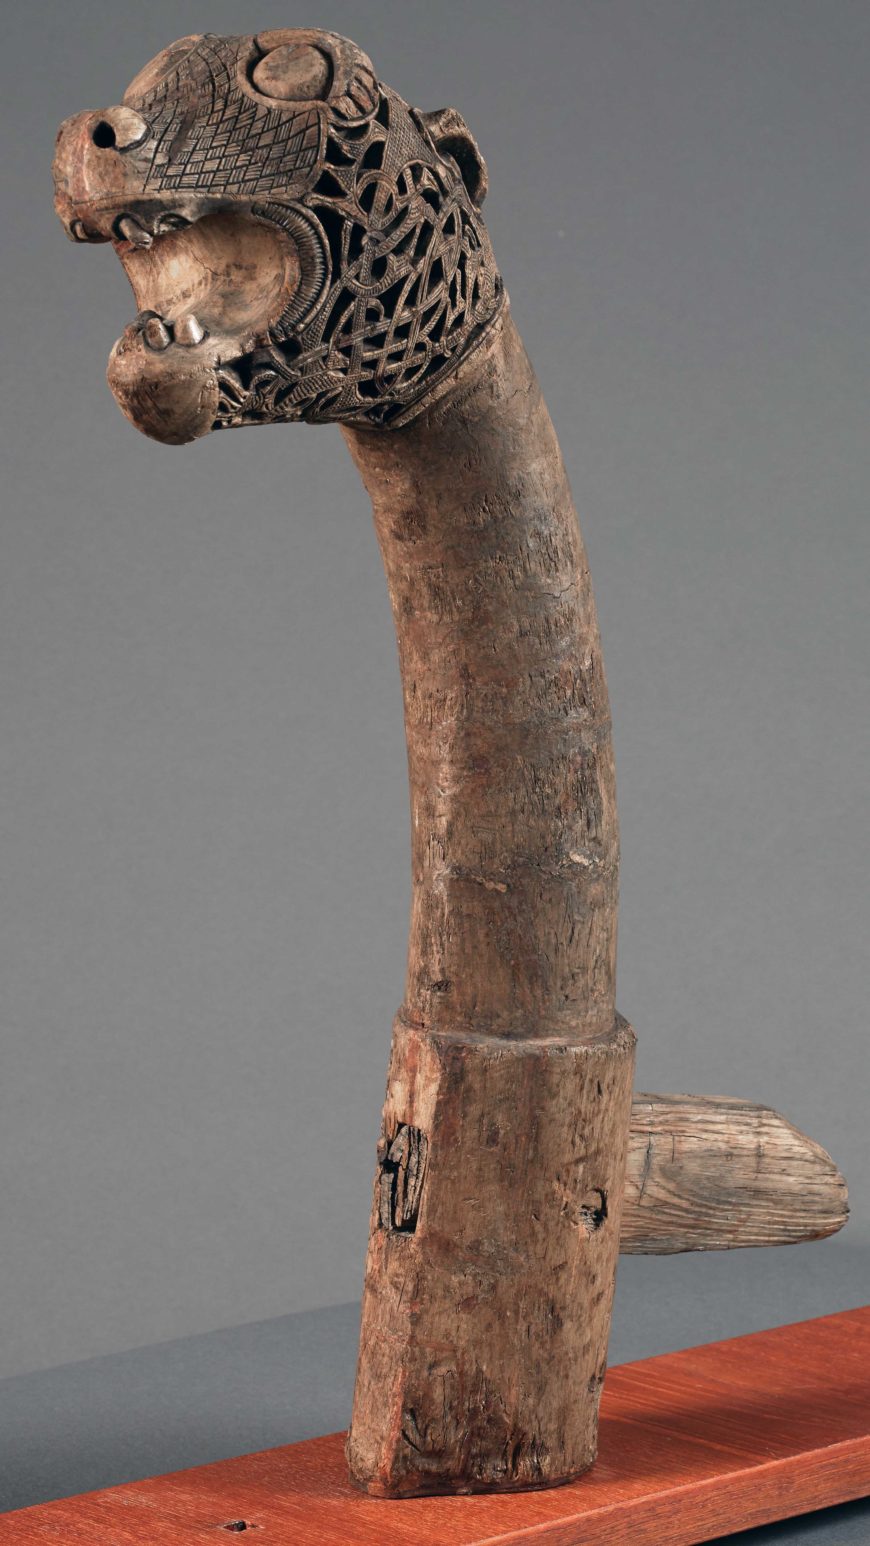
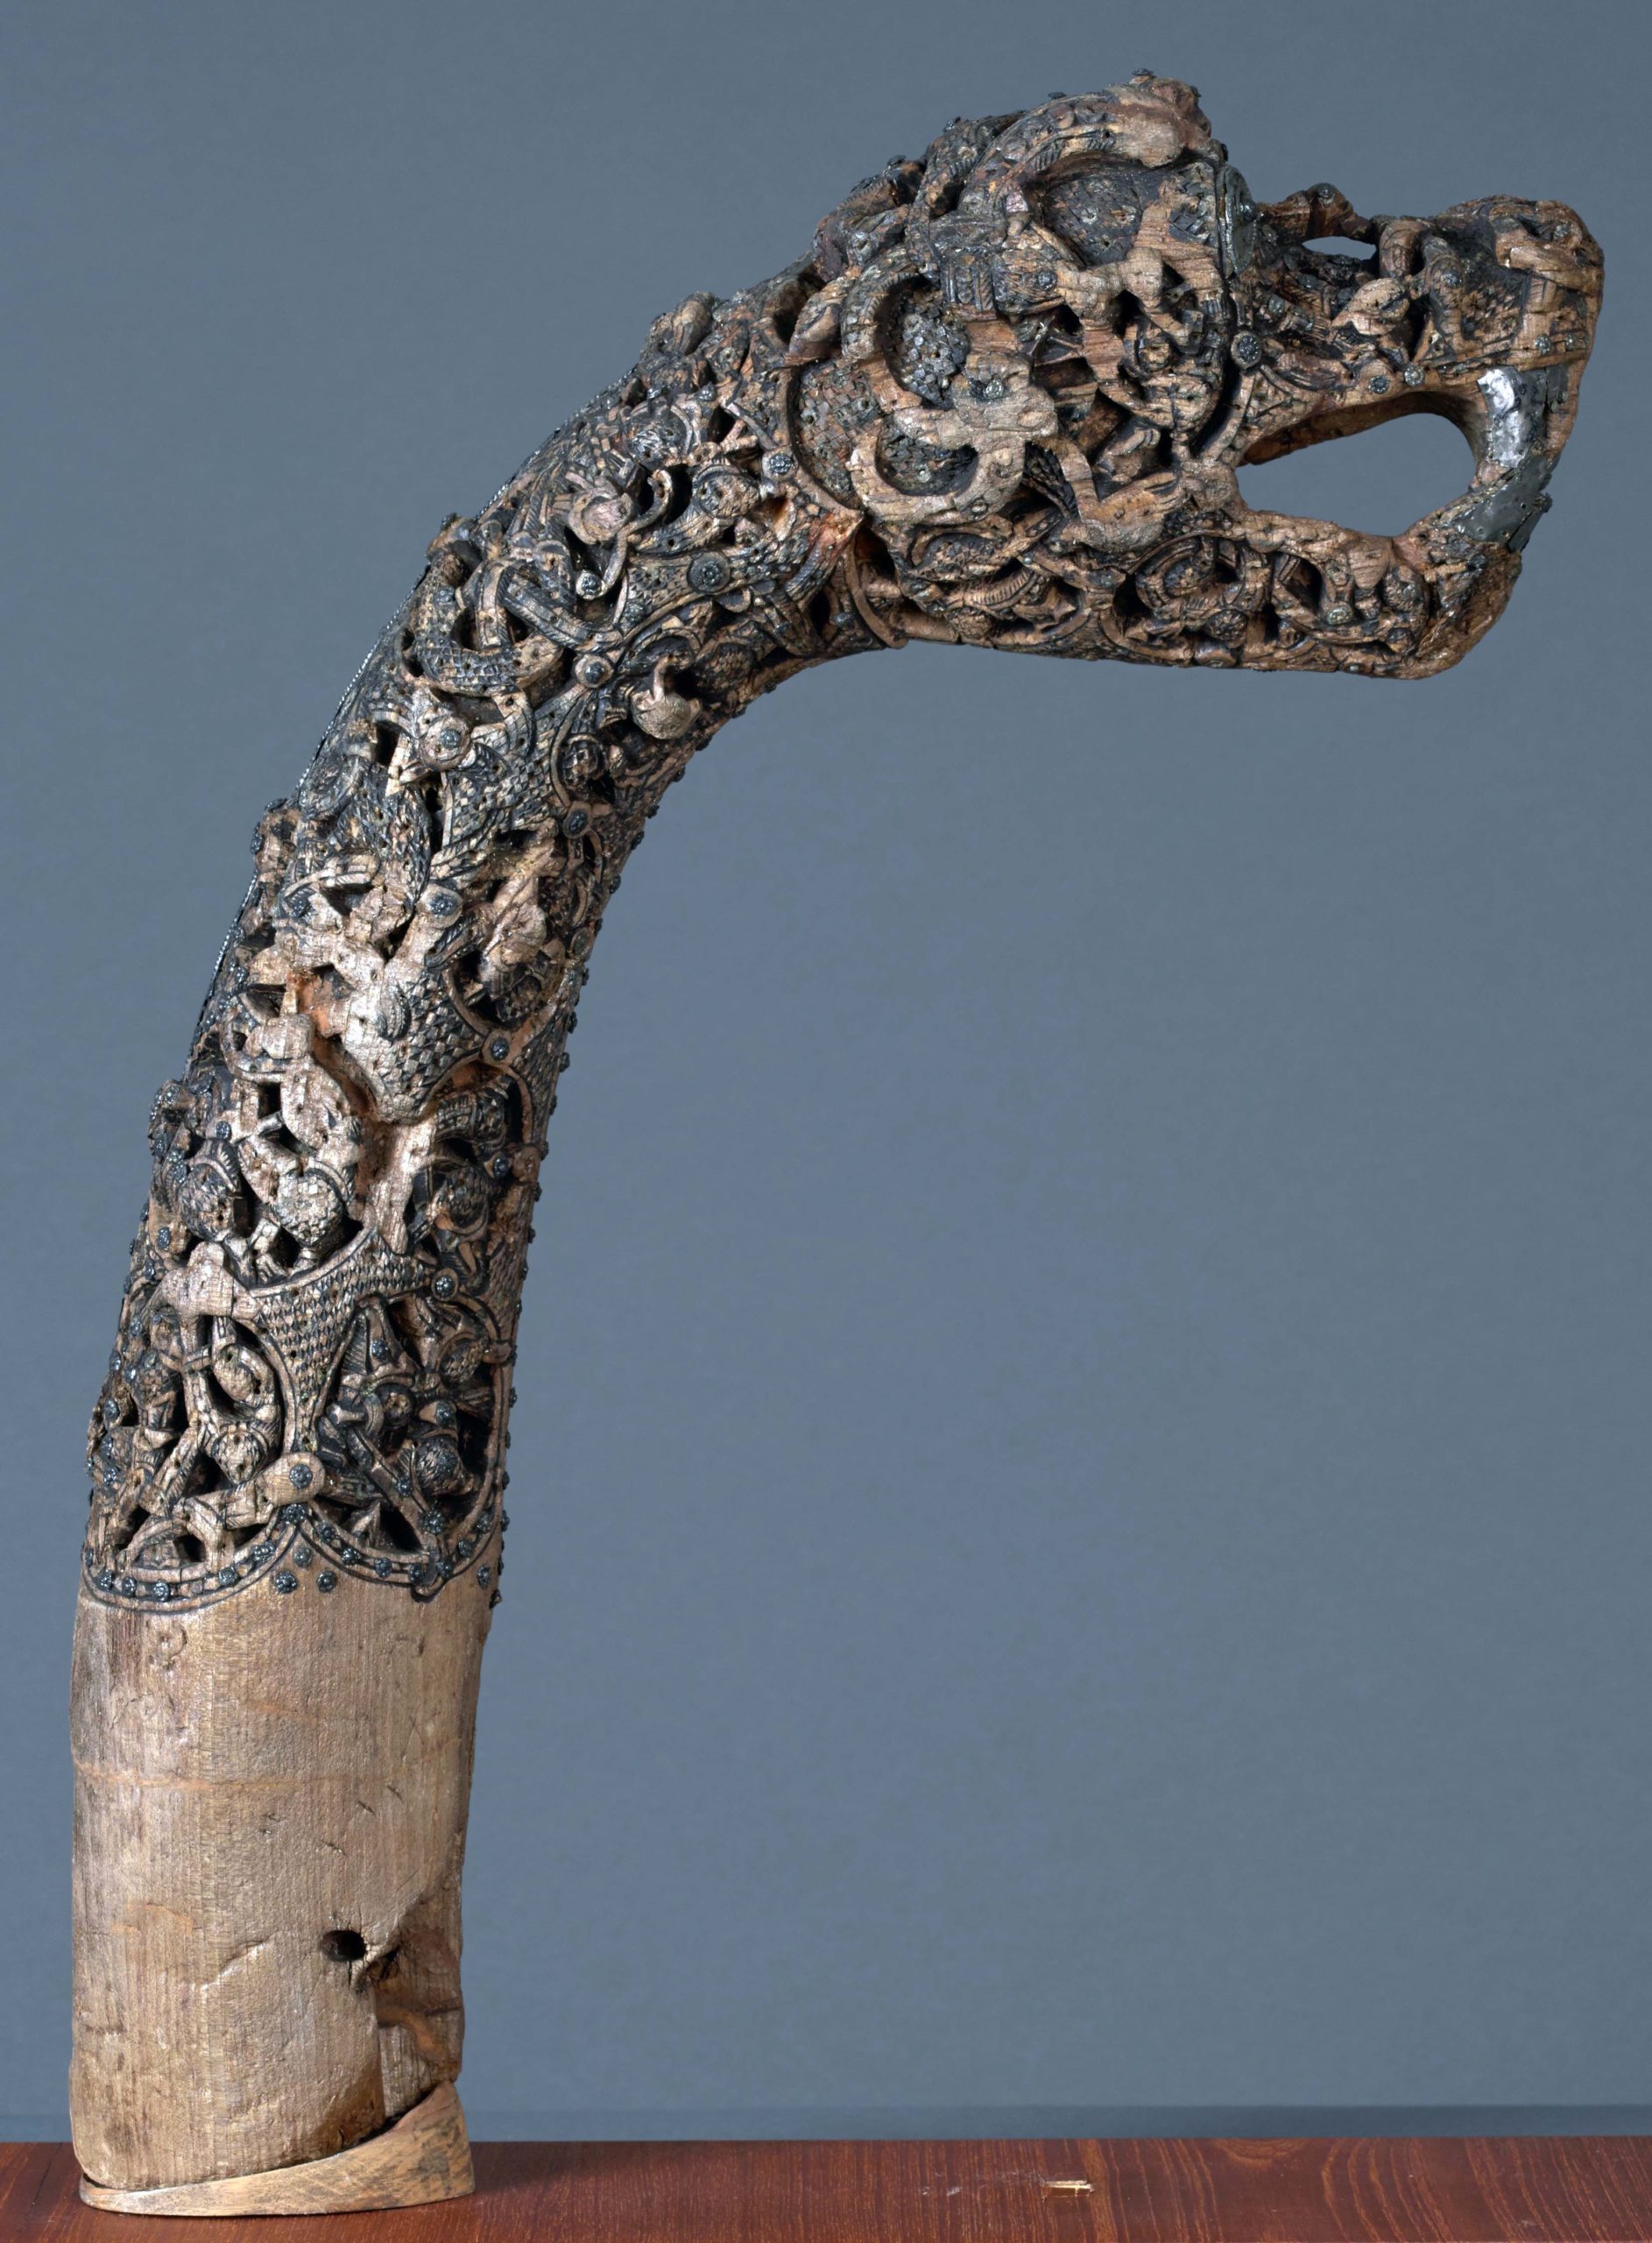
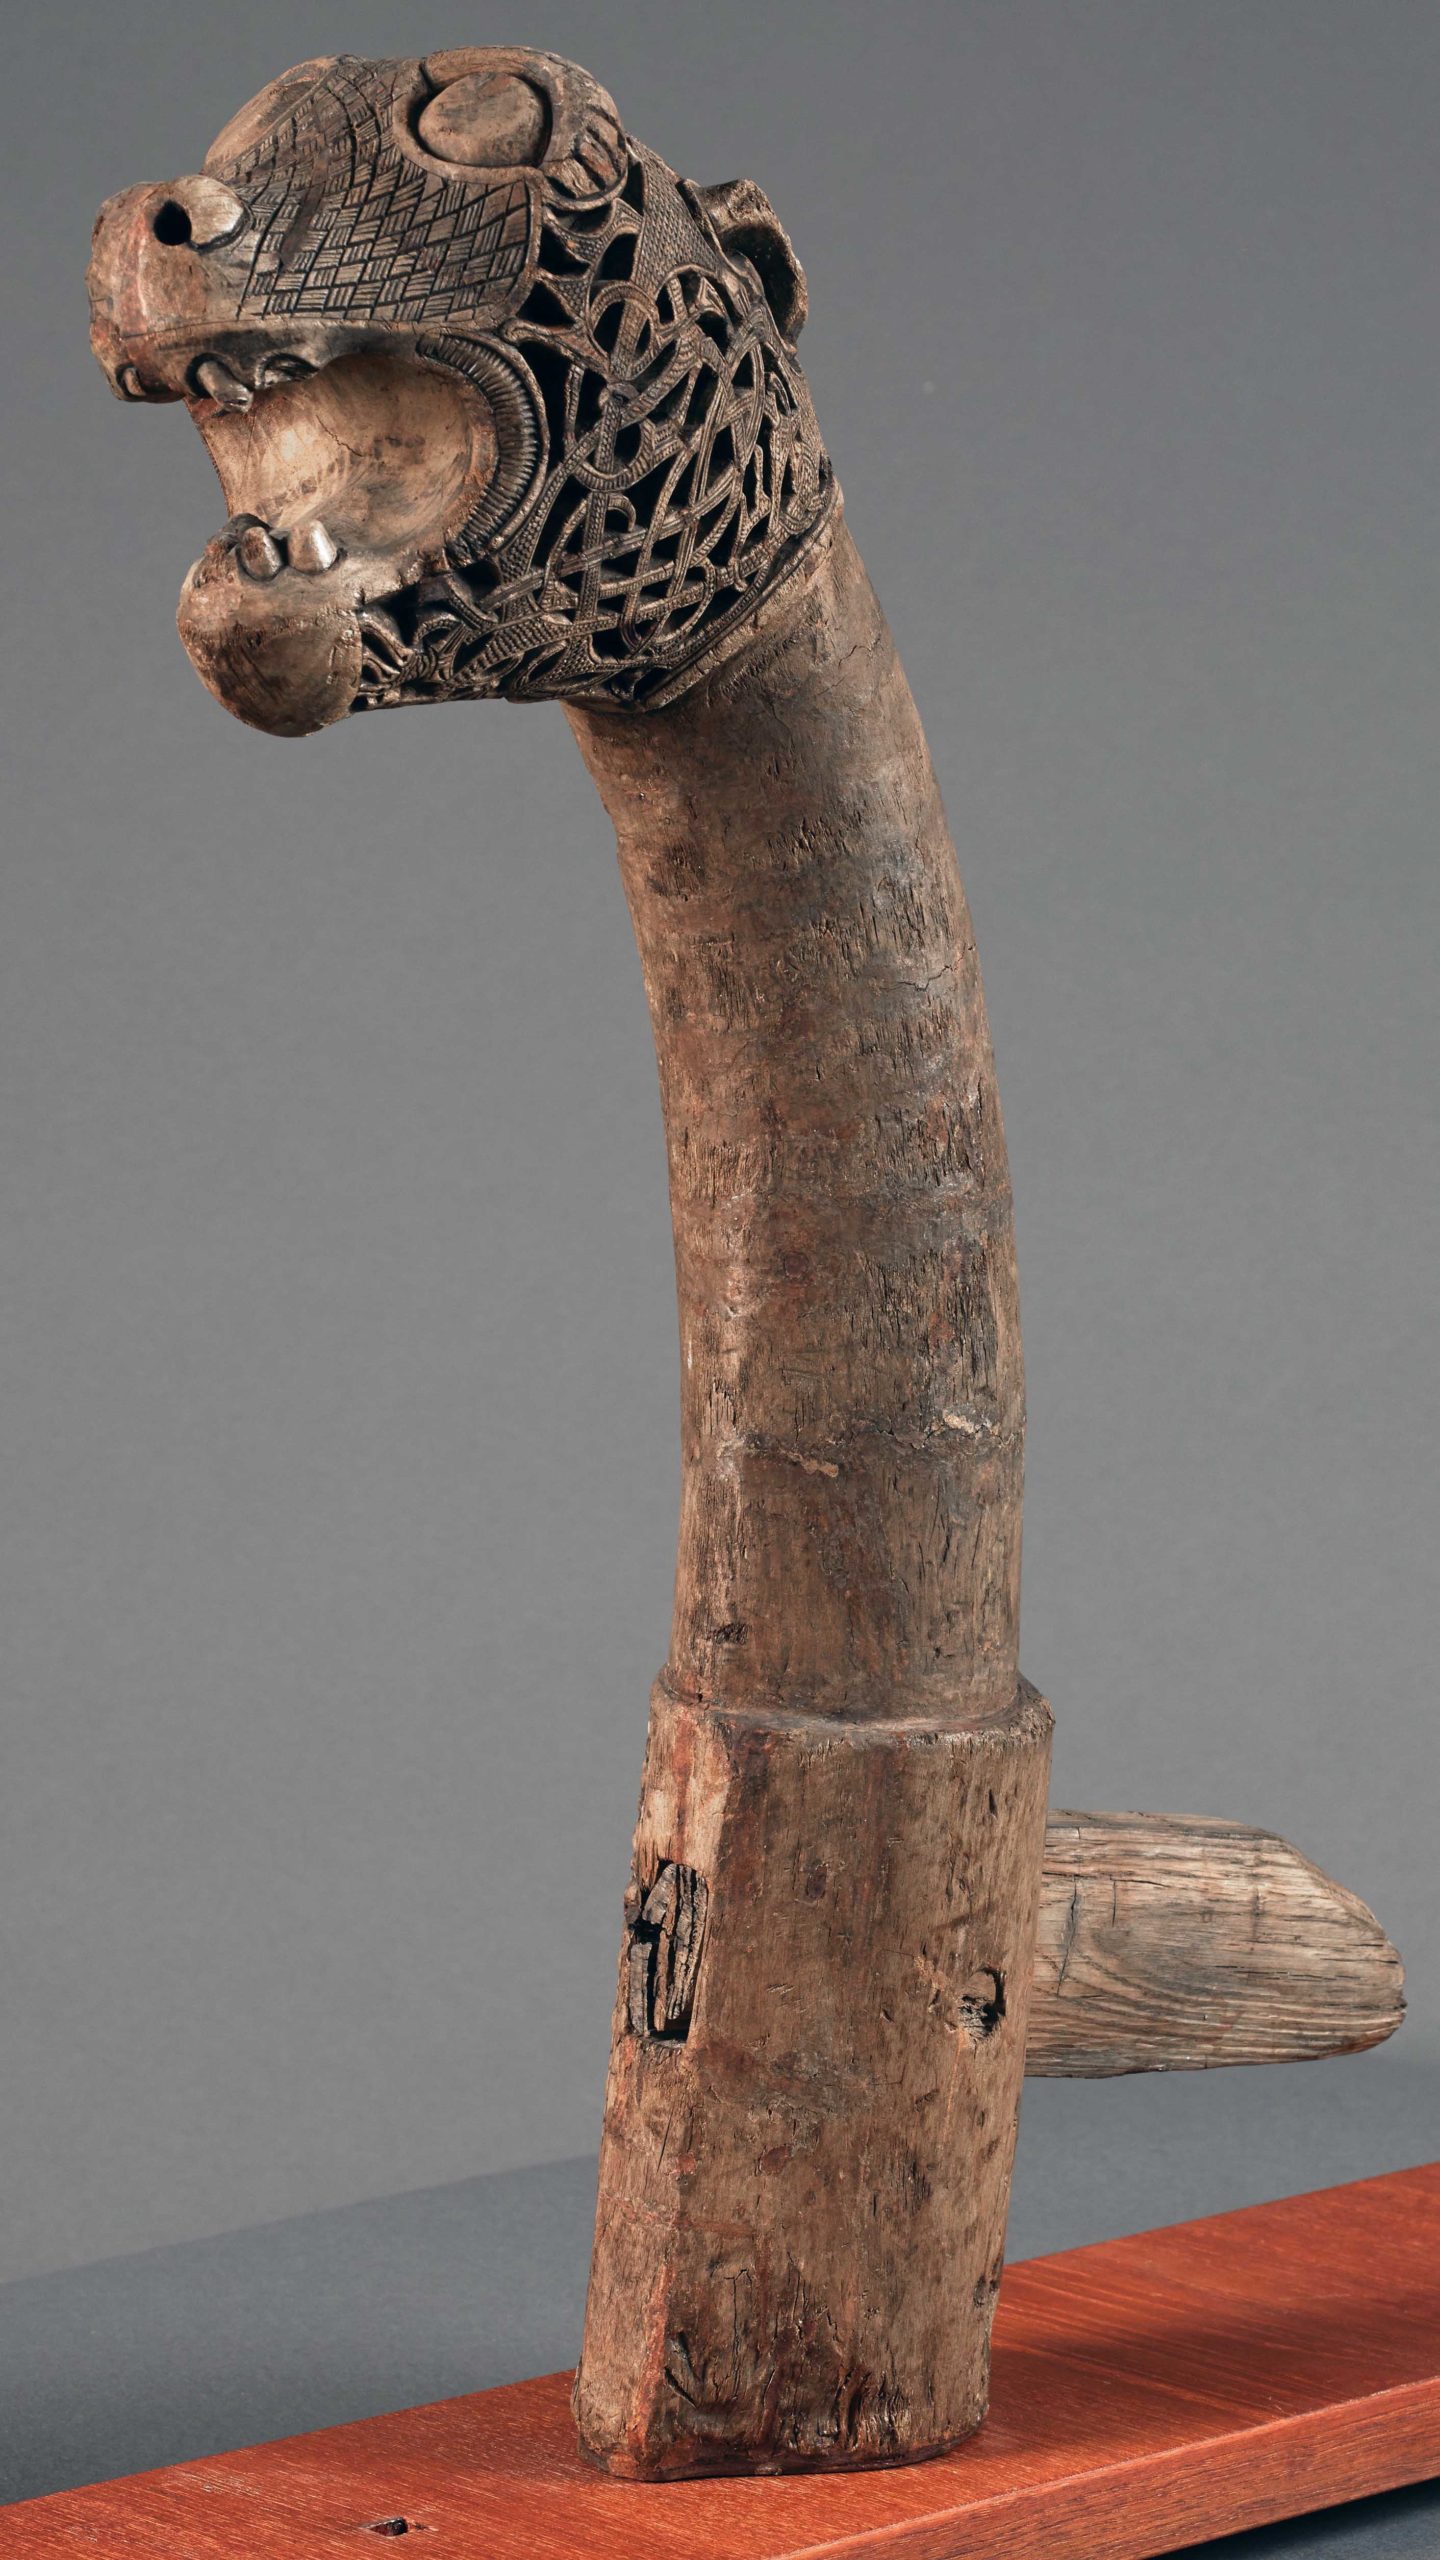
The “Academician’s” animal head post, 9th century, wood, found in burial mound near Tønsberg (Oseberg ship burial) (Museum of Cultural History, Oslo; photo: Kirsten Helgeland, CC BY-SA 4.0)
The Oseberg ship burial included carved wooden posts, decorated sleds, and an oak wagon that may have been made by master craftsmen from a nearby workshop. For example, the “Academician’s” animal head post is one of five wooden animal-headed posts found in the Oseberg ship burial. Although the purpose of these objects remain unclear, their detailed carvings demonstrate advanced woodworking skills.
Also included was a set of tapestries that, despite their poor condition, are believed to depict battle scenes and a religious procession. They illustrate many objects found in the grave, indicating that material goods were important for performing customs in life and in death.
Borre style
Overlapping with the Oseberg style is the Borre style, which was also popular on the mainland. However, unlike the Oseberg style, Borre artistic conventions spread to the British Isles and the Baltic region as the Norsemen traveled both East and West. Exchanges between local and foreign artistic customs can be seen on objects found in these areas (with less overt characteristics appearing in the British Isles and more emphatic characteristics appearing to the east of the Baltic Sea).

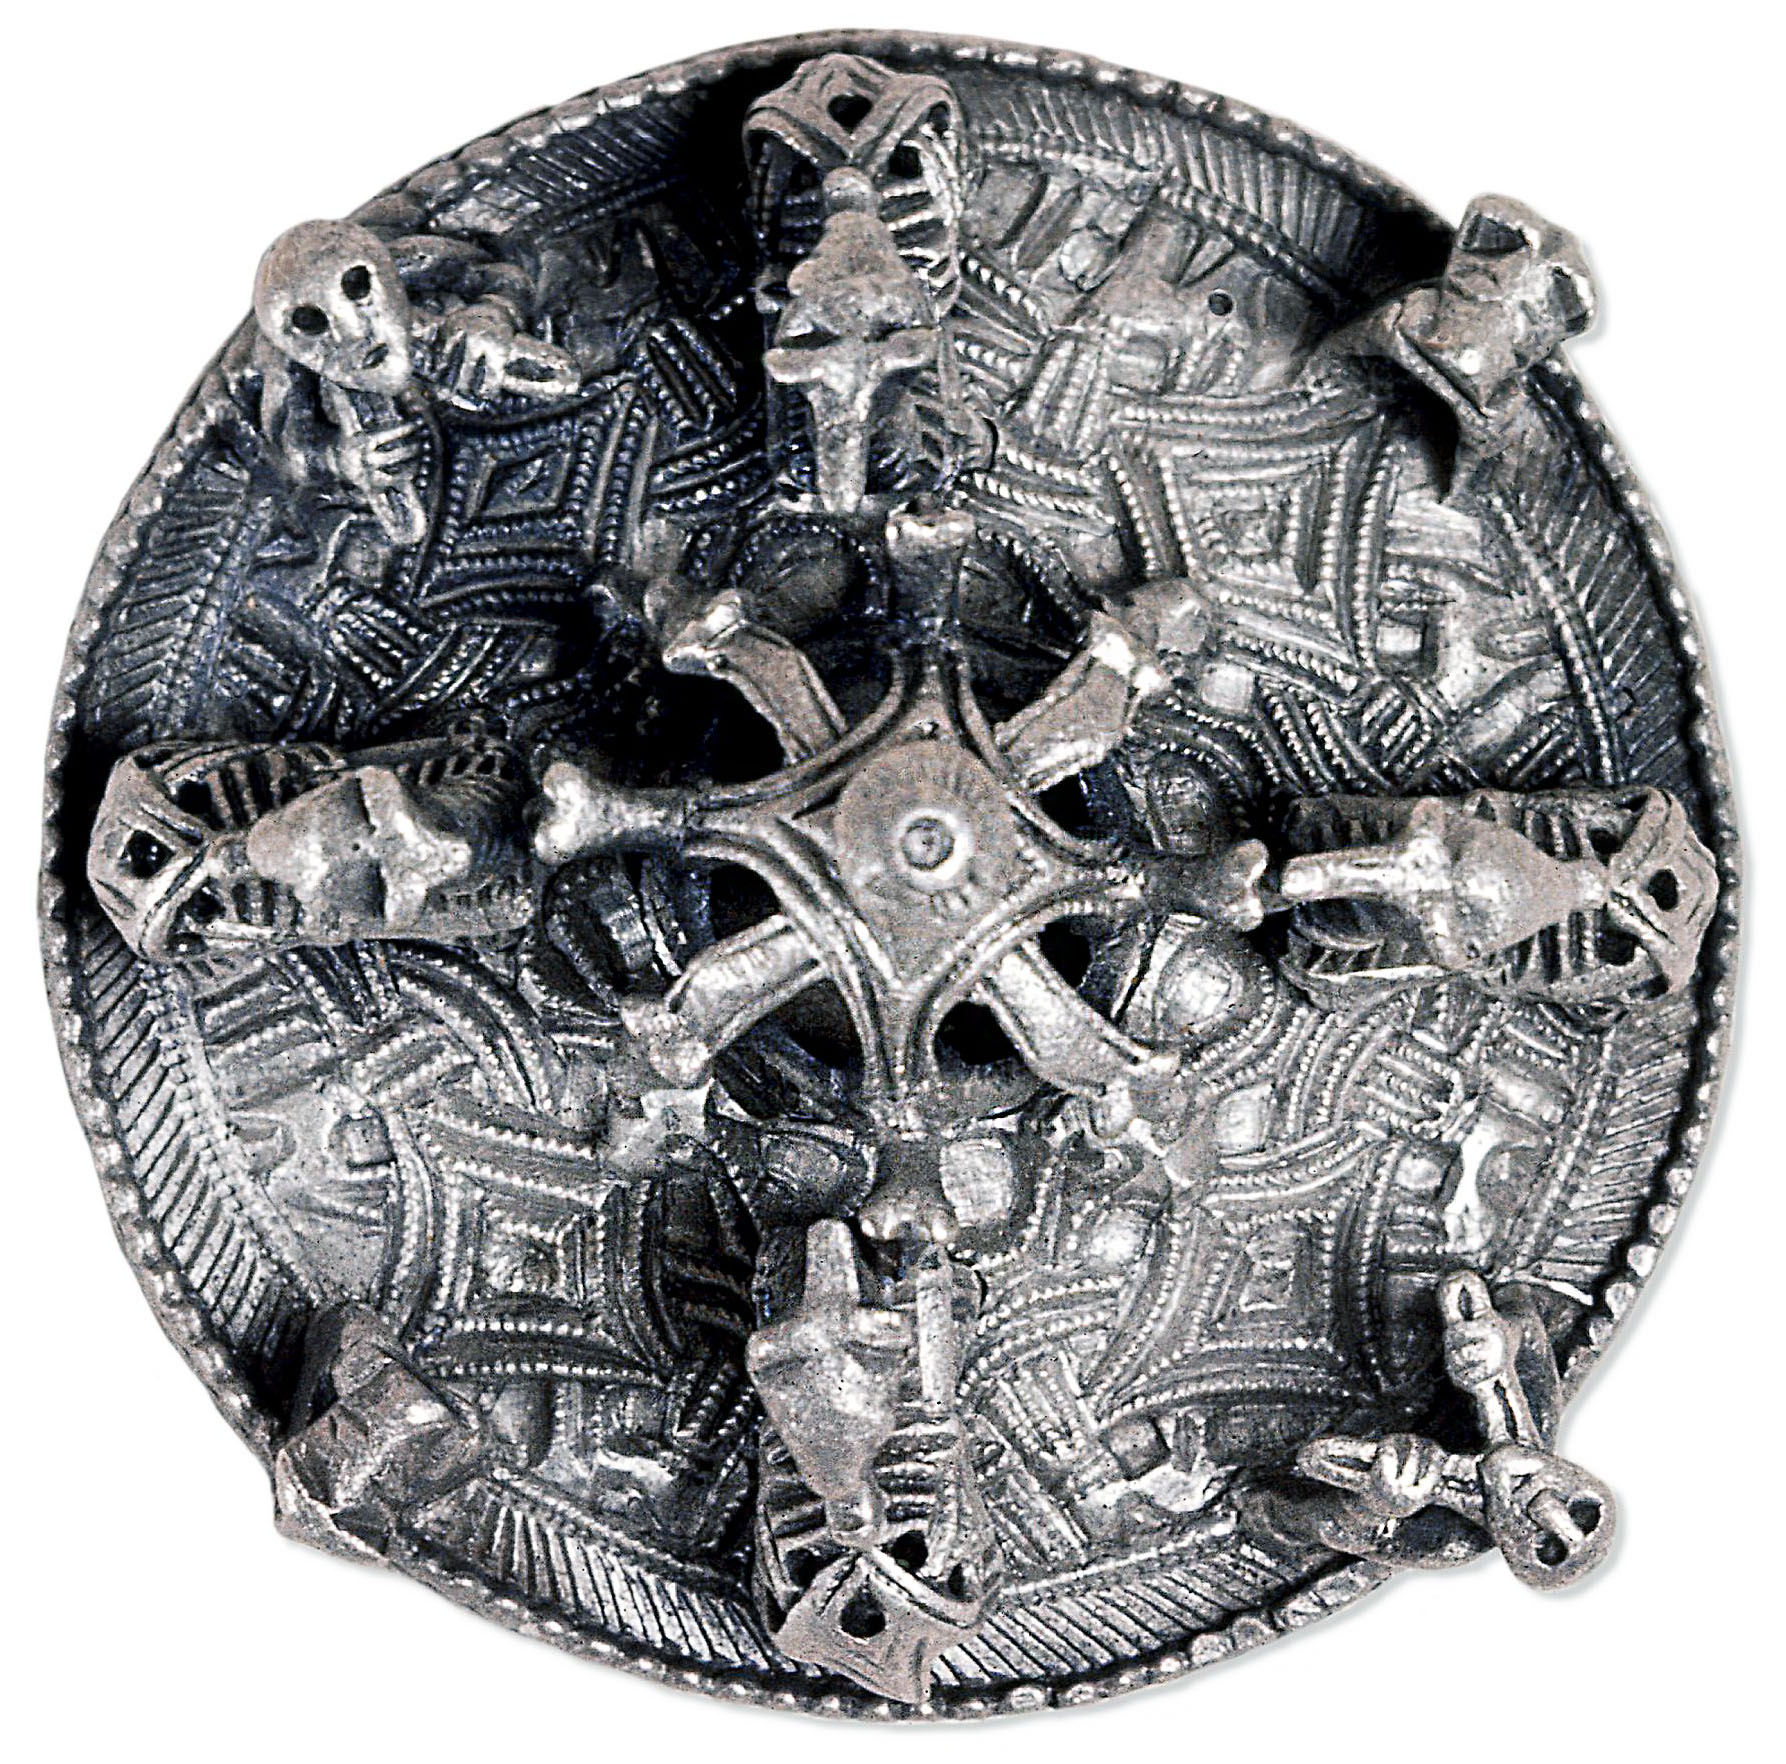
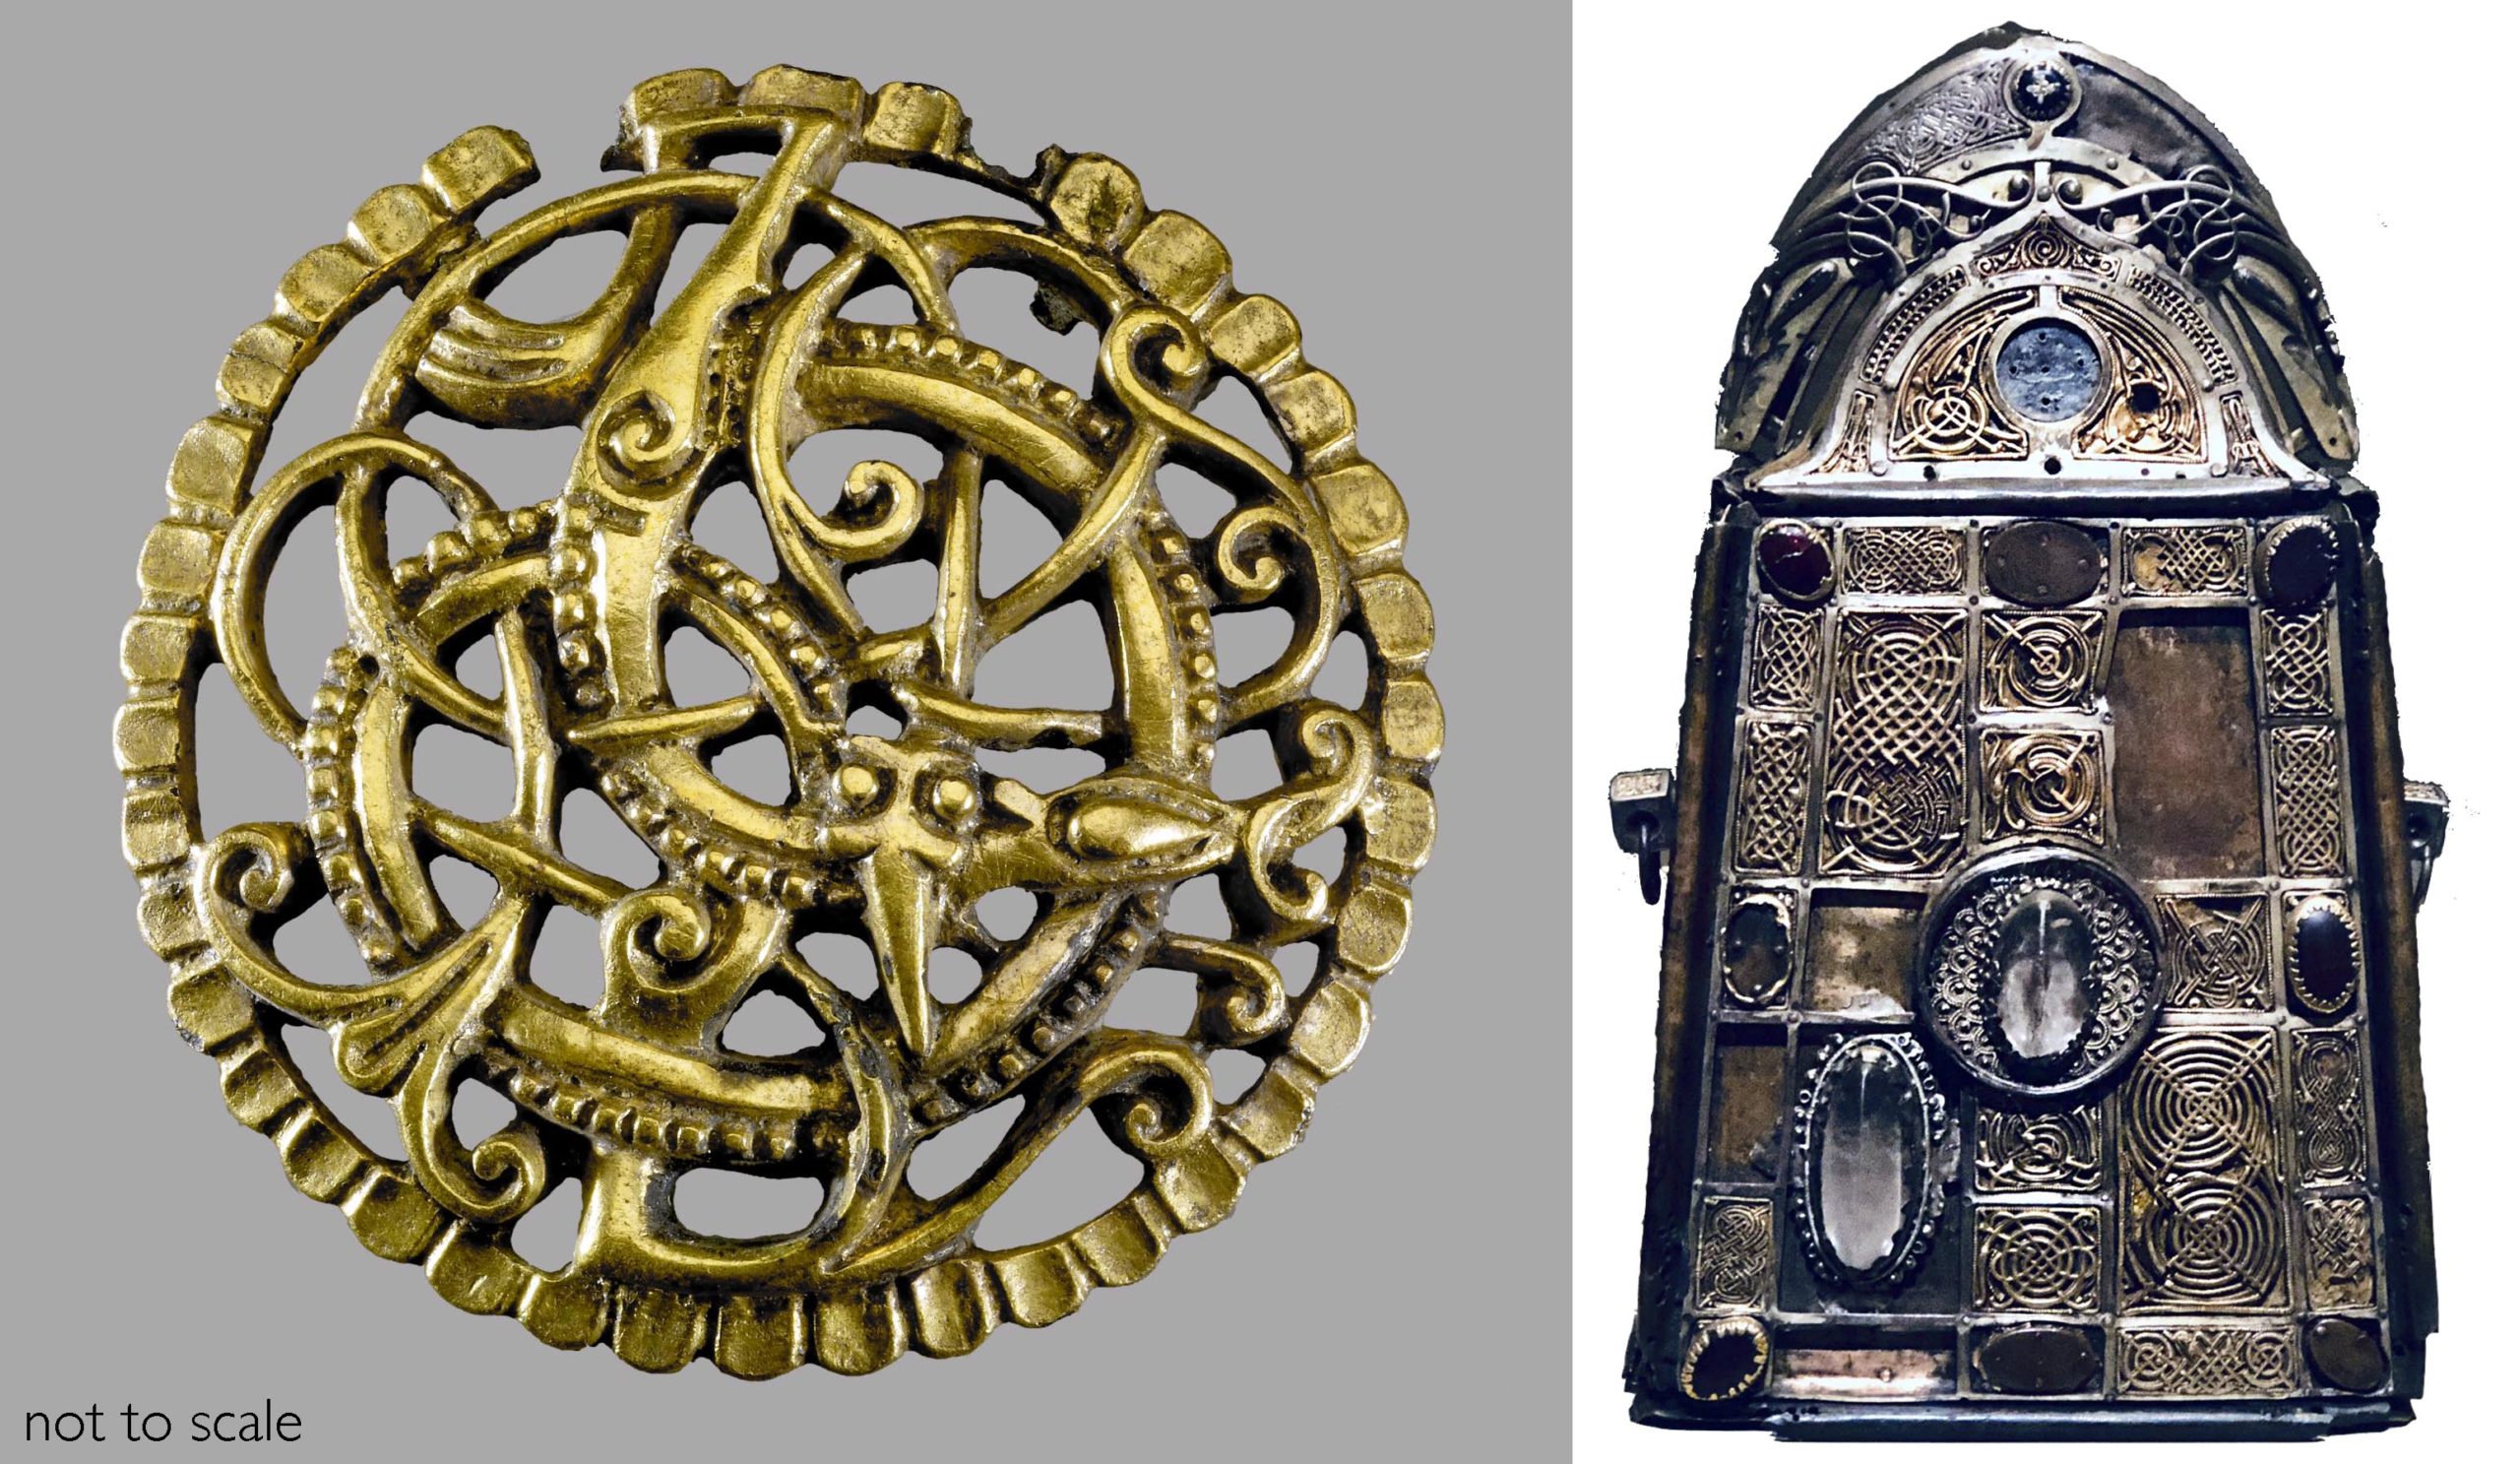
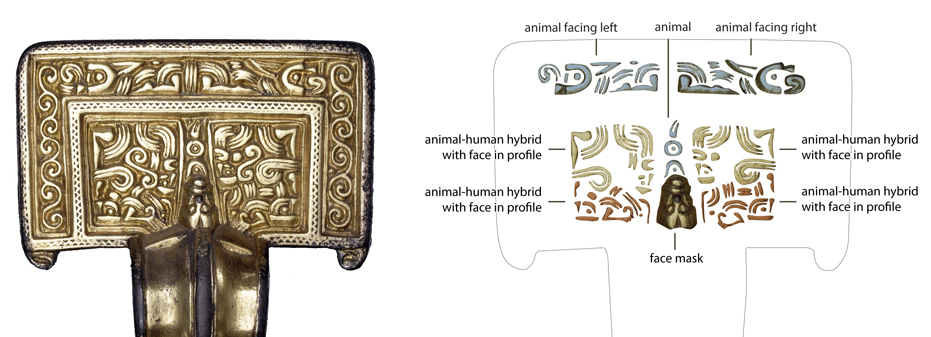
Animals with their tongues licking their backs, alternating with four human figures who face the object’s center, gripping unidentified protrusions from their necks. Silver disc brooch, Borre style, late 9th–10th century, silver, 7.8 cm in diameter, found in Gotland, Sweden (© The Trustees of the British Museum)
Side view: Animal licking its back (detail), silver disc brooch, Borre style, late 9th–10th century, silver, 7.8 cm in diameter, found in Gotland, Sweden (© The Trustees of the British Museum)
Borre objects swarm the viewer with décor. Forms are arranged in closed compositions with tight, knot-like interlacing that almost fully obscures the background. Animal motifs appear comparatively more naturalistic, with squat, relaxed bodies. Spirals are introduced to represent hip joints, and figures may be reduced to decorative heads or appear as fully in-the-round forms.
On a silver disc-brooch from Gotland, a series of animal and human figures protrude outward into space. In a motif rarely seen outside of this style, the animals’ heads are oriented backward, their tongues licking their backs. Alternating between them are four human figures who face the object’s center, gripping as of yet unidentified protrusions from their necks.
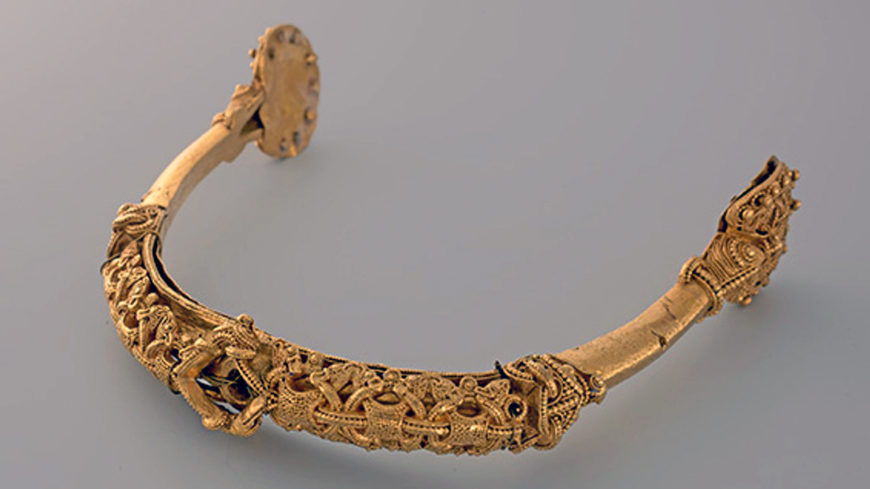
Gold spur from Verne Kloster in Norway, 10th century, Borre style, gold (The Museum of Cultural History, University of Oslo)
The “ring chain” pattern, which combines ribbon shapes to create a continuous band, is another Borre style trend. It is seen on small metal objects, such as the gold spur from Verne Kloster, and seems to have influenced stone carving traditions on the Isle of Man and in northwest England. This gold spur allowed a rider to control the movements of a horse. Featuring granulation and filigree details, along with the “ring chain” pattern, it is far more complicated than what is normally found in the Borre style.
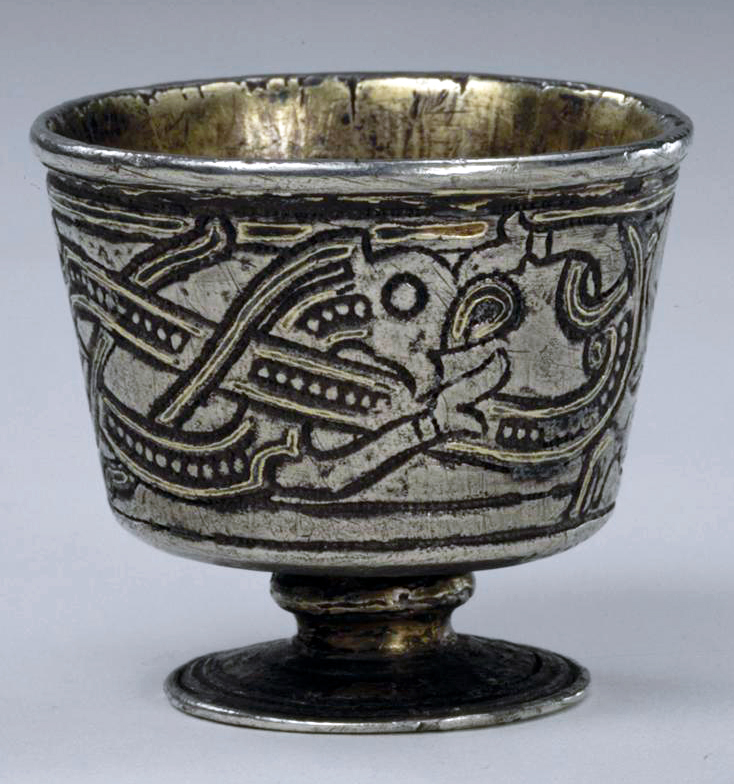
Silver Cup, 958/959, Jellinge style, found in Jelling, Jutland, Denmark (National Museum of Denmark)
Jellinge style
Sitting chronologically between the Borre style and the soon-to-be-discussed Mammen style, the Jellinge style is a malleable one. It appears on a diverse body of objects and can share features with the previous and subsequent styles, leaving it difficult to define as a separate movement. It was named for a cast silver cup that was found in a royal burial mound in Jelling, Jutland, Denmark (an “e” was accidentally added to the style’s name in the nineteenth century). Despite this mishap, this unique spelling helps art historians differentiate the style from the place.
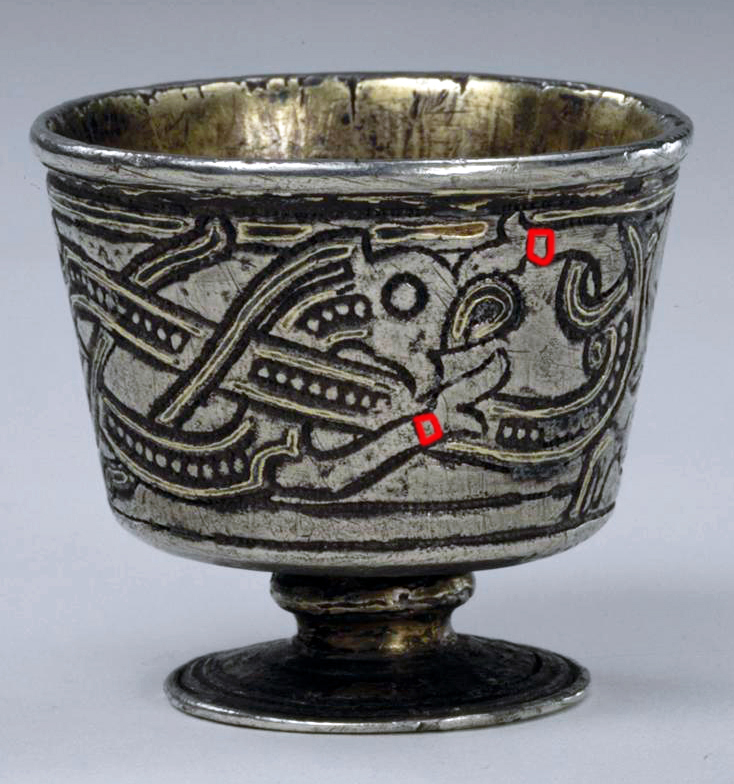
Red annotations show the wrist/ankle segments. Silver Cup, 958/959, Jellinge style, found in Jelling, Jutland, Denmark (National Museum of Denmark)
We can see this style’s main motif around its belly: a set of interlacing creatures that form a row of fluid, S-shaped forms. Within their bodies are single rows of beading (dot-like metal forms) and their feet resemble mitts. Lappets, the protrusions that look like ponytails, extend from their heads, distinguishing them from creatures of the Borre style.
Compositions in this style open up and expand, with the backgrounds becoming more visible. The anatomy of animal and human figures is simpler, with bodies portrayed as solid masses defined by individual or double contour lines. Hip joints are represented by spirals, while ankles and wrists are defined by small, geometric segments like those seen on the Jellinge cup. Heads have round or almond-shaped eyes and lips are apt to curl, while ribbon-animals are more prominent and the gripping beast fades.
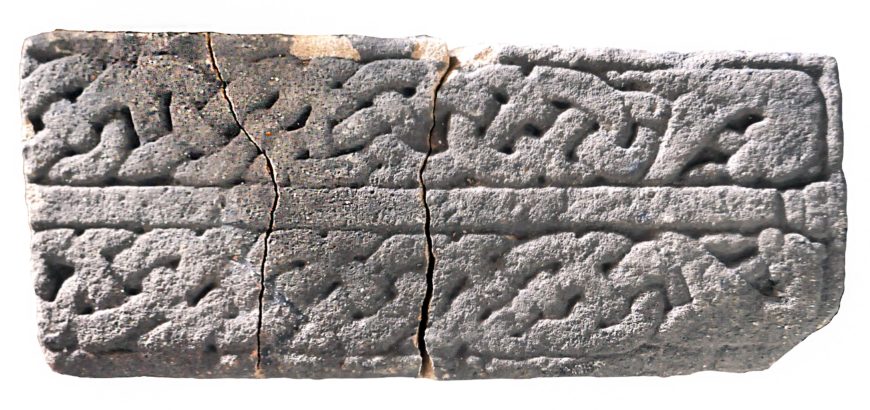
Grave slab with Jellinge style elements, 10th century, gritstone, 26.8 x 37 cm, from the cemetery beneath York Minster (Image courtesy of York Museums Trust, CC BY-SA 4.0)
The Jellinge style expanded as far as the Volga Bulgars and the Lower Volga River, along the Caspian Sea. It influenced art in western Europe, where stone sculptures from York show its considerable influence. A 10-century grave slab from the cemetery beneath York Minster, for instance, integrates the Jellinge style ornament with the Anglican tradition of marking burials with recumbent monuments.

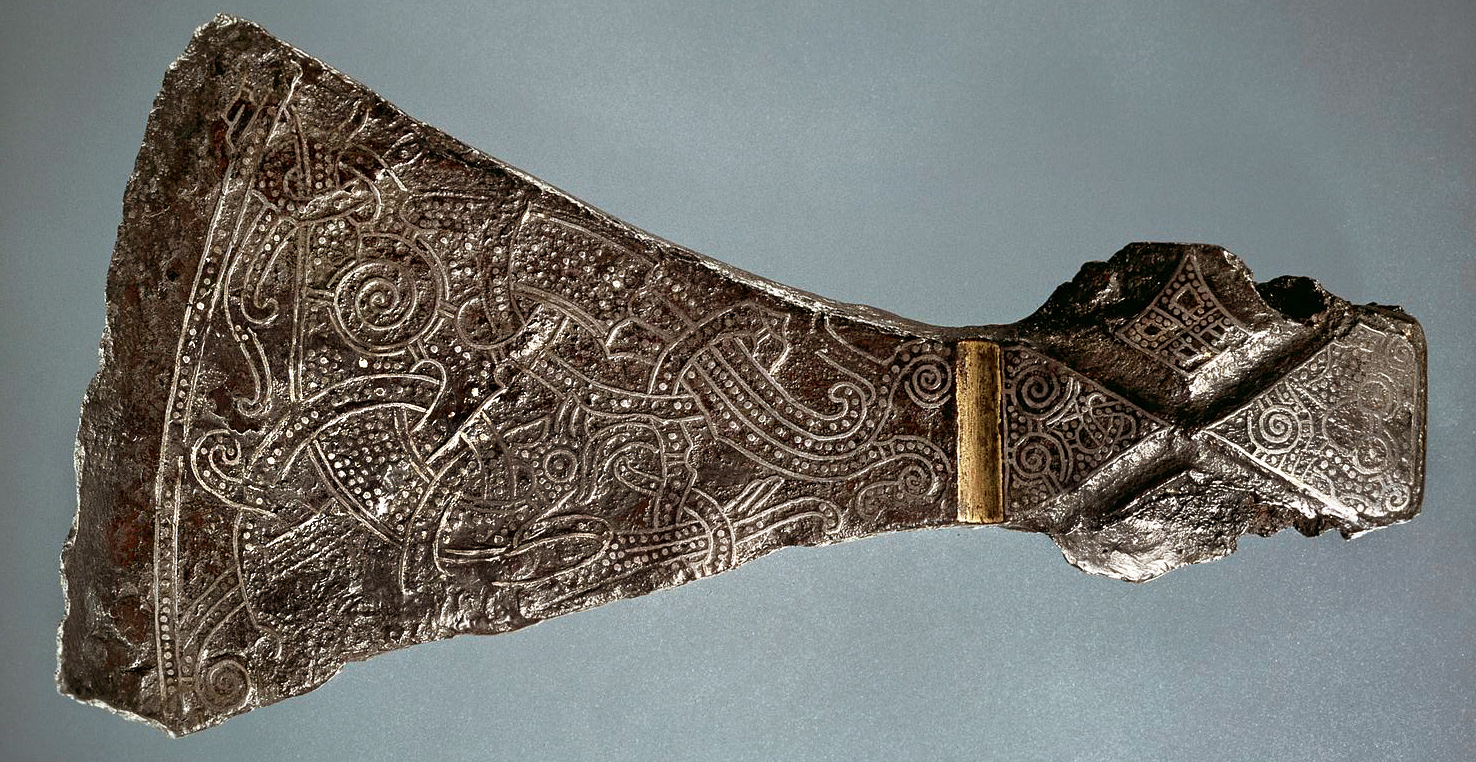
Mammen-style axe (side with a possible tree), 970–71, inlaid with silver, from Mammen (National Museum of Denmark)
Mammen style
Named for a ceremonial axe head found near the Danish village of Mammen, this innovative style was popularized as the “court” style of King Harald Bluetooth (King of Denmark and Norway who ruled from c. 958–986). Its compositions span elongated waves and terminate in loose tendrils. We also see foliate motifs that were borrowed from other European traditions. A few of the qualities associated with the Jellinge style are exaggerated in it, like geometric shapes that segment the wrists, ankles, and other body parts of animals.
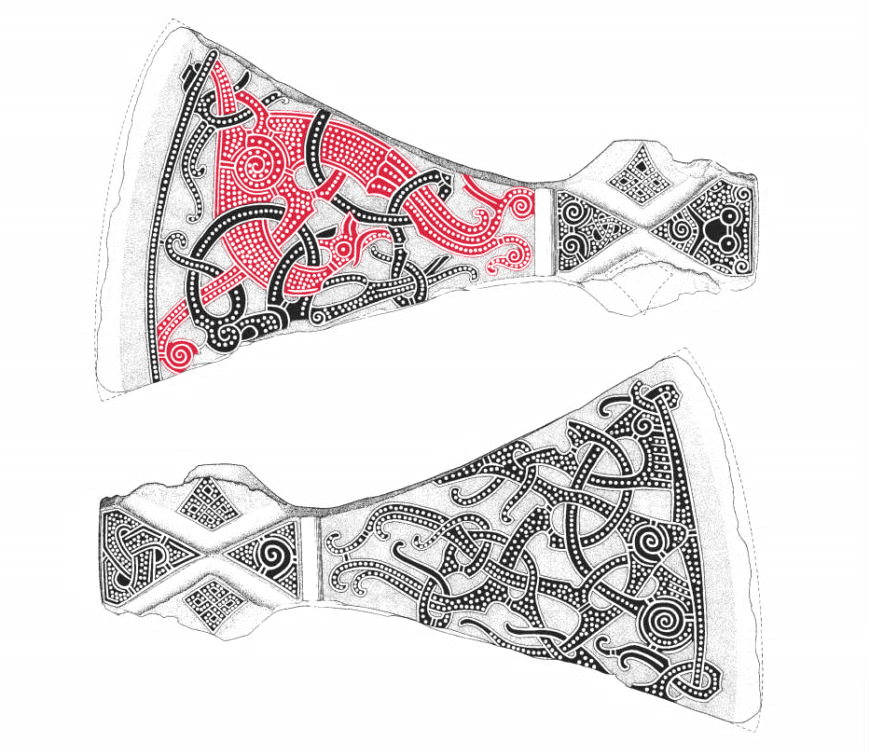
Top: a bird with a prominent hip joint; bottom: a set of winding tendrils, possibly depicting a tree. Mammen axe head. Diagram from Mette, Iversen, Ulf Näsman, and Jens Vellev, Mammen. Grav, kunst og samfund i vikingetid (1991).
This can be seen at the base of the bird’s neck on the Mammen axe, along with ornamental beading throughout its body. Its limbs and wings are represented as expanding coils. Some background is visible, with glimpses of the underlying surface peeking out from beneath lively, energetic designs.
Each side of the Mammen axe head is inlaid with silver: on one side, a set of winding tendrils; and, on the other, a fabulous bird loops through even more tendrils and has a prominent spiral hip joint. Axes were very important to the Norsemen, who used them for domestic purposes and in battle, but the inlays of the Mammen axe indicate that it was a ceremonial object.
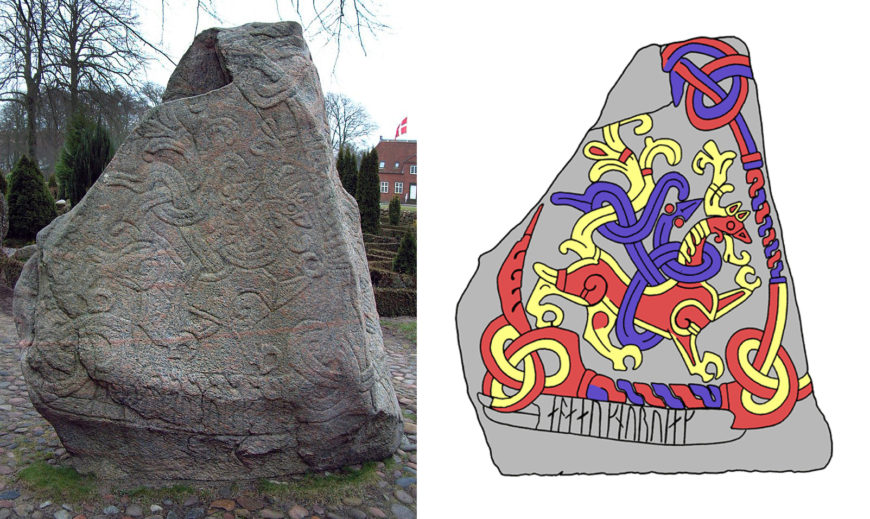
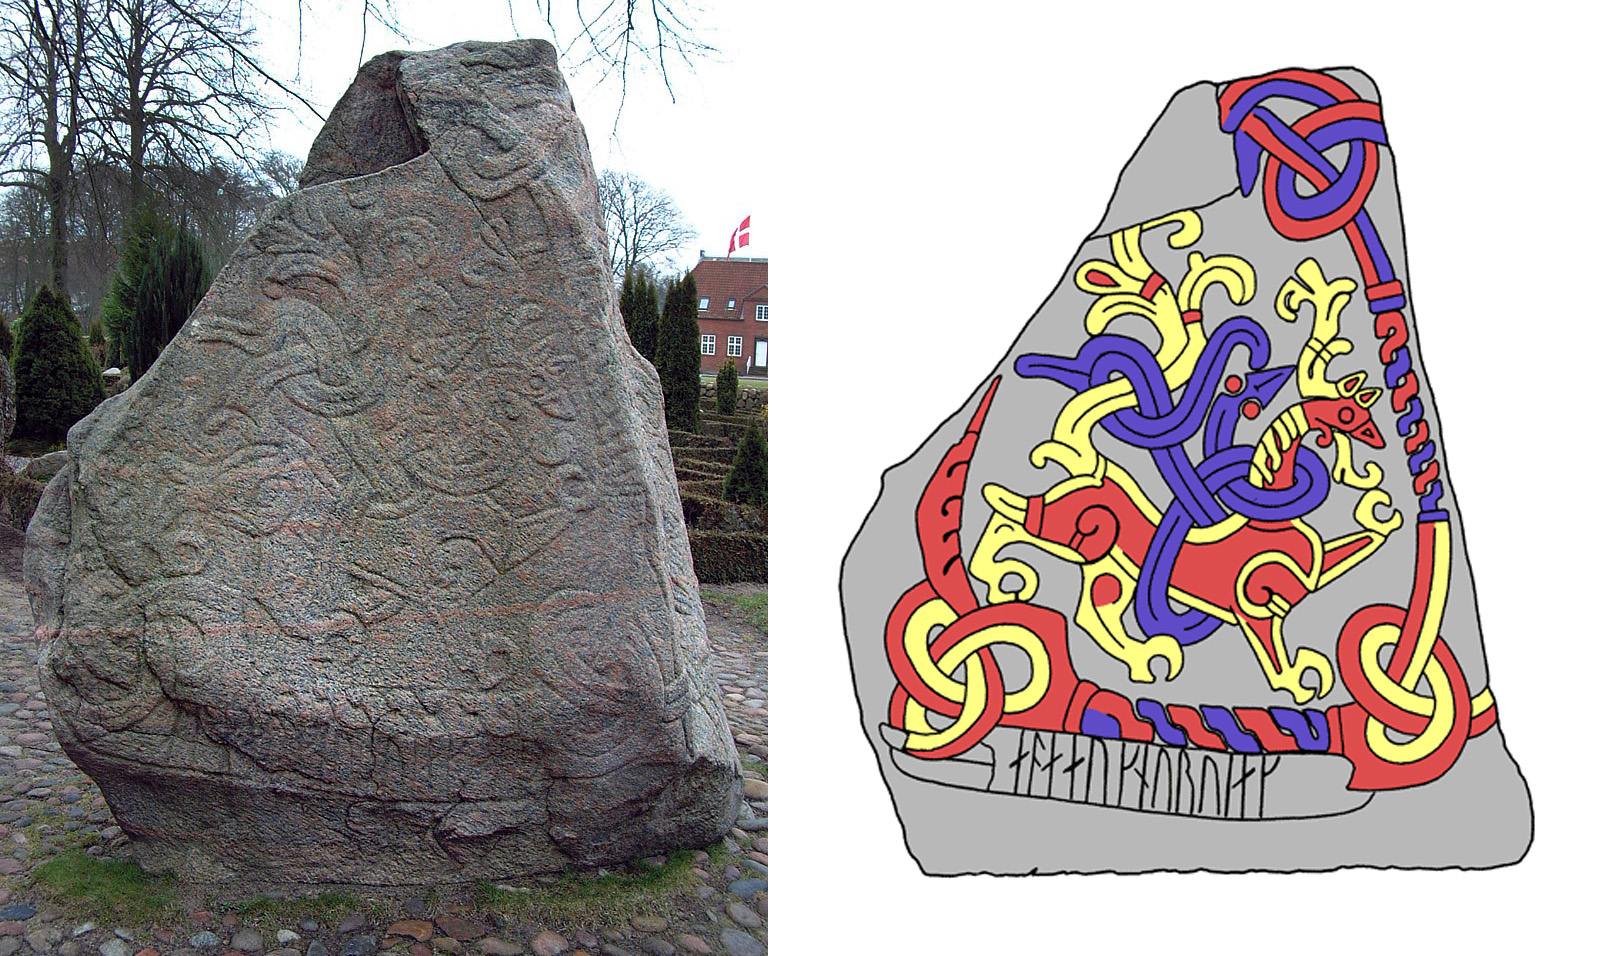
Jelling stone with traits of the Mammen style, 970 and circa 986, raised by King Bluetooth. Left: side B with Great Beast motif (photo: Casiopeia, CC BY-SA 2.0); right: diagram of side B showing Great Beast motif
Often discussed are the runestones at Jelling (in Denmark), which feature traits of the Mammen style. It is in this style that a magnificent motif emerges: the Great Beast. We can see it on one side of the Jelling Stone, standing above a runic inscription that references his conquest of Norway and the religious conversion of Denmark.
The Great Beast is an amalgamation of several animals; it has features that appear similar to horns or antlers protruding from its head, and what appears to be a mane falling from its long neck. Its feet are segmented with claws, and in some representations—like the greater Jelling stone—serpents may wind around its body to create a dynamic interplay between the two motifs. The creature has been interpreted as a symbol of power.

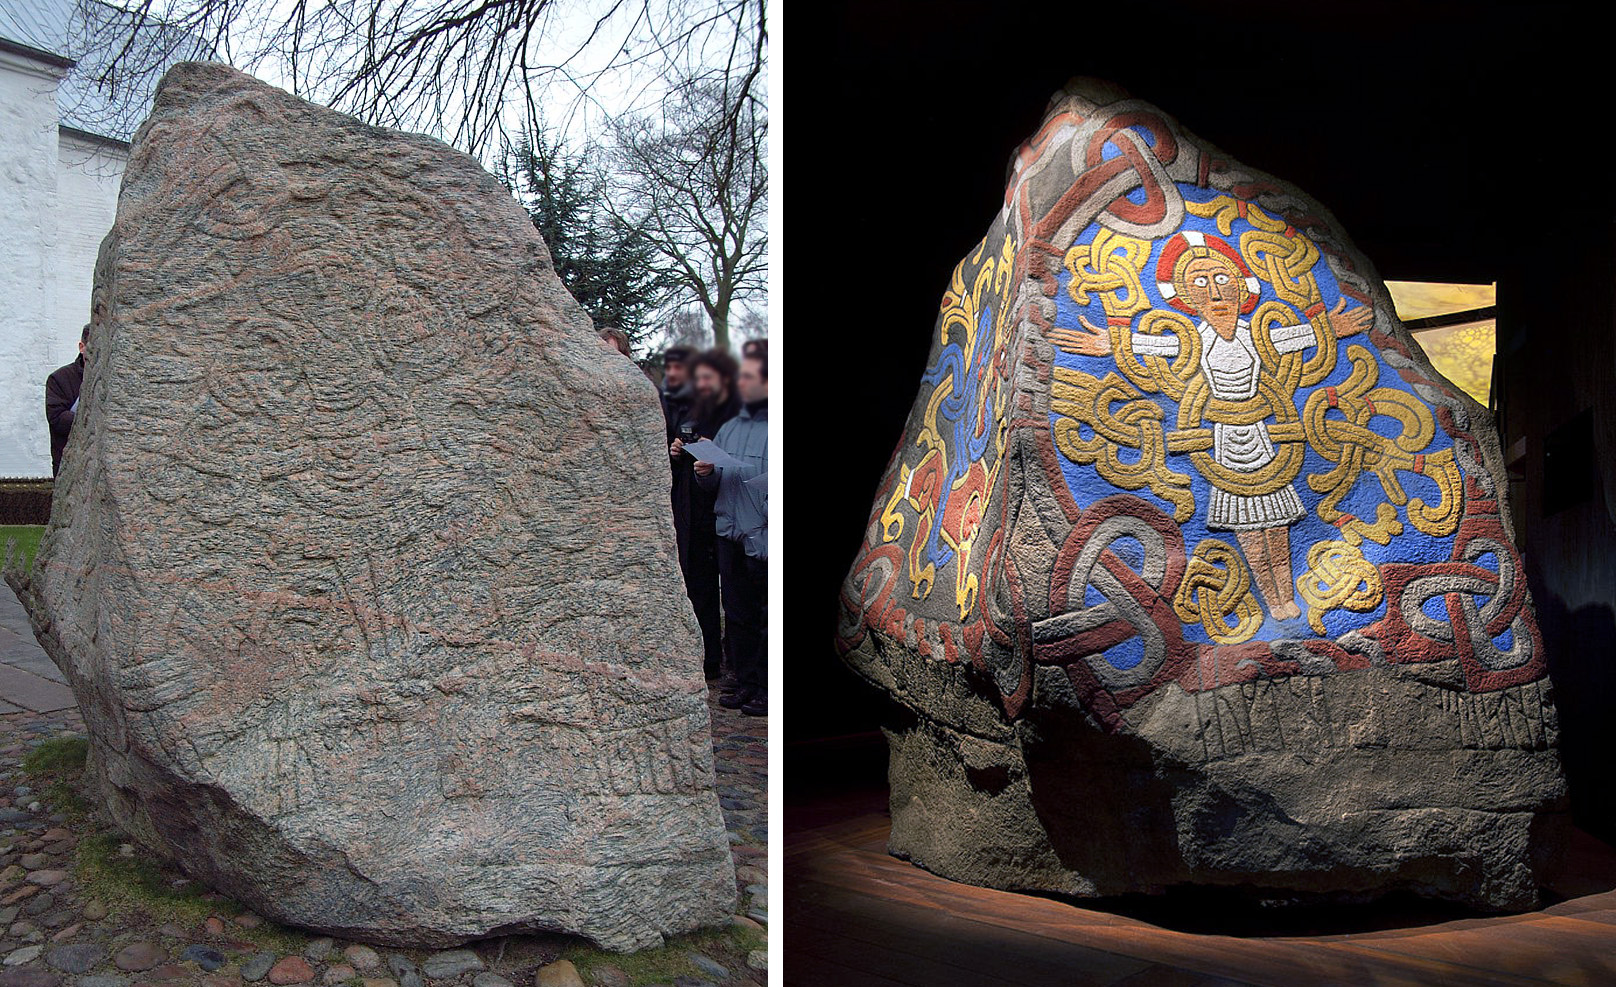
Jelling stone with traits of the Mammen style, 970 and circa 986, raised by King Bluetooth. Left: side A showing Christ bound in tendrils (photo: Casiopeia, CC BY-SA 2.0); right: side A with reconstruction of original polychromy (National Museum of Denmark)
Carved with runic inscriptions, these monumental stones were raised by King Bluetooth in memory of his deceased parents. As a Christian convert, Bluetooth was responsible for Denmark’s increasing acceptance and adoption of the religion. He had one side of the larger stone depict Christ bound in tendrils that end in pronounced foliates (leaf forms). With an inscription surrounded by serpentine ornament on its third side (not illustrated), this object is exceptionally detailed for a runestone.
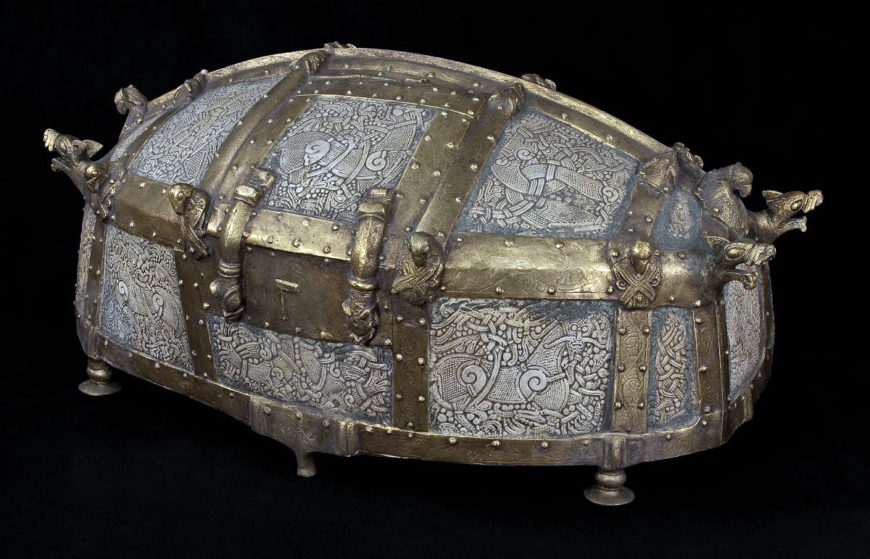
A replica of the Cammin Casket (also called the Cammin shrine), a masterwork of Viking Age art, c. 1000, found in Kamen Pomorski, Poland. The original disappeared during World War II (Hamburg Archaeological Museum)

Bamberg Casket (or so-called Casket of St Kunigunde), c. 1000, oak with mammoth ivory, 13.3 x 25.7 cm (from St. Stephans in Bamberg, now in the Bavarian National Museum, Munich)
Three particularly fine examples of the Mammen style survived into the modern era: the Cammin casket found in Kamen Pomorski, Poland, the Bamberg casket of southern Germany (now located in Munich), and the León reliquary of Spain, which is the only known Viking object to be found on the Iberian Peninsula. These three examples demonstrate how Mammen-style objects have been found in many regions, attesting yet again to the far reach of Norse visual culture.
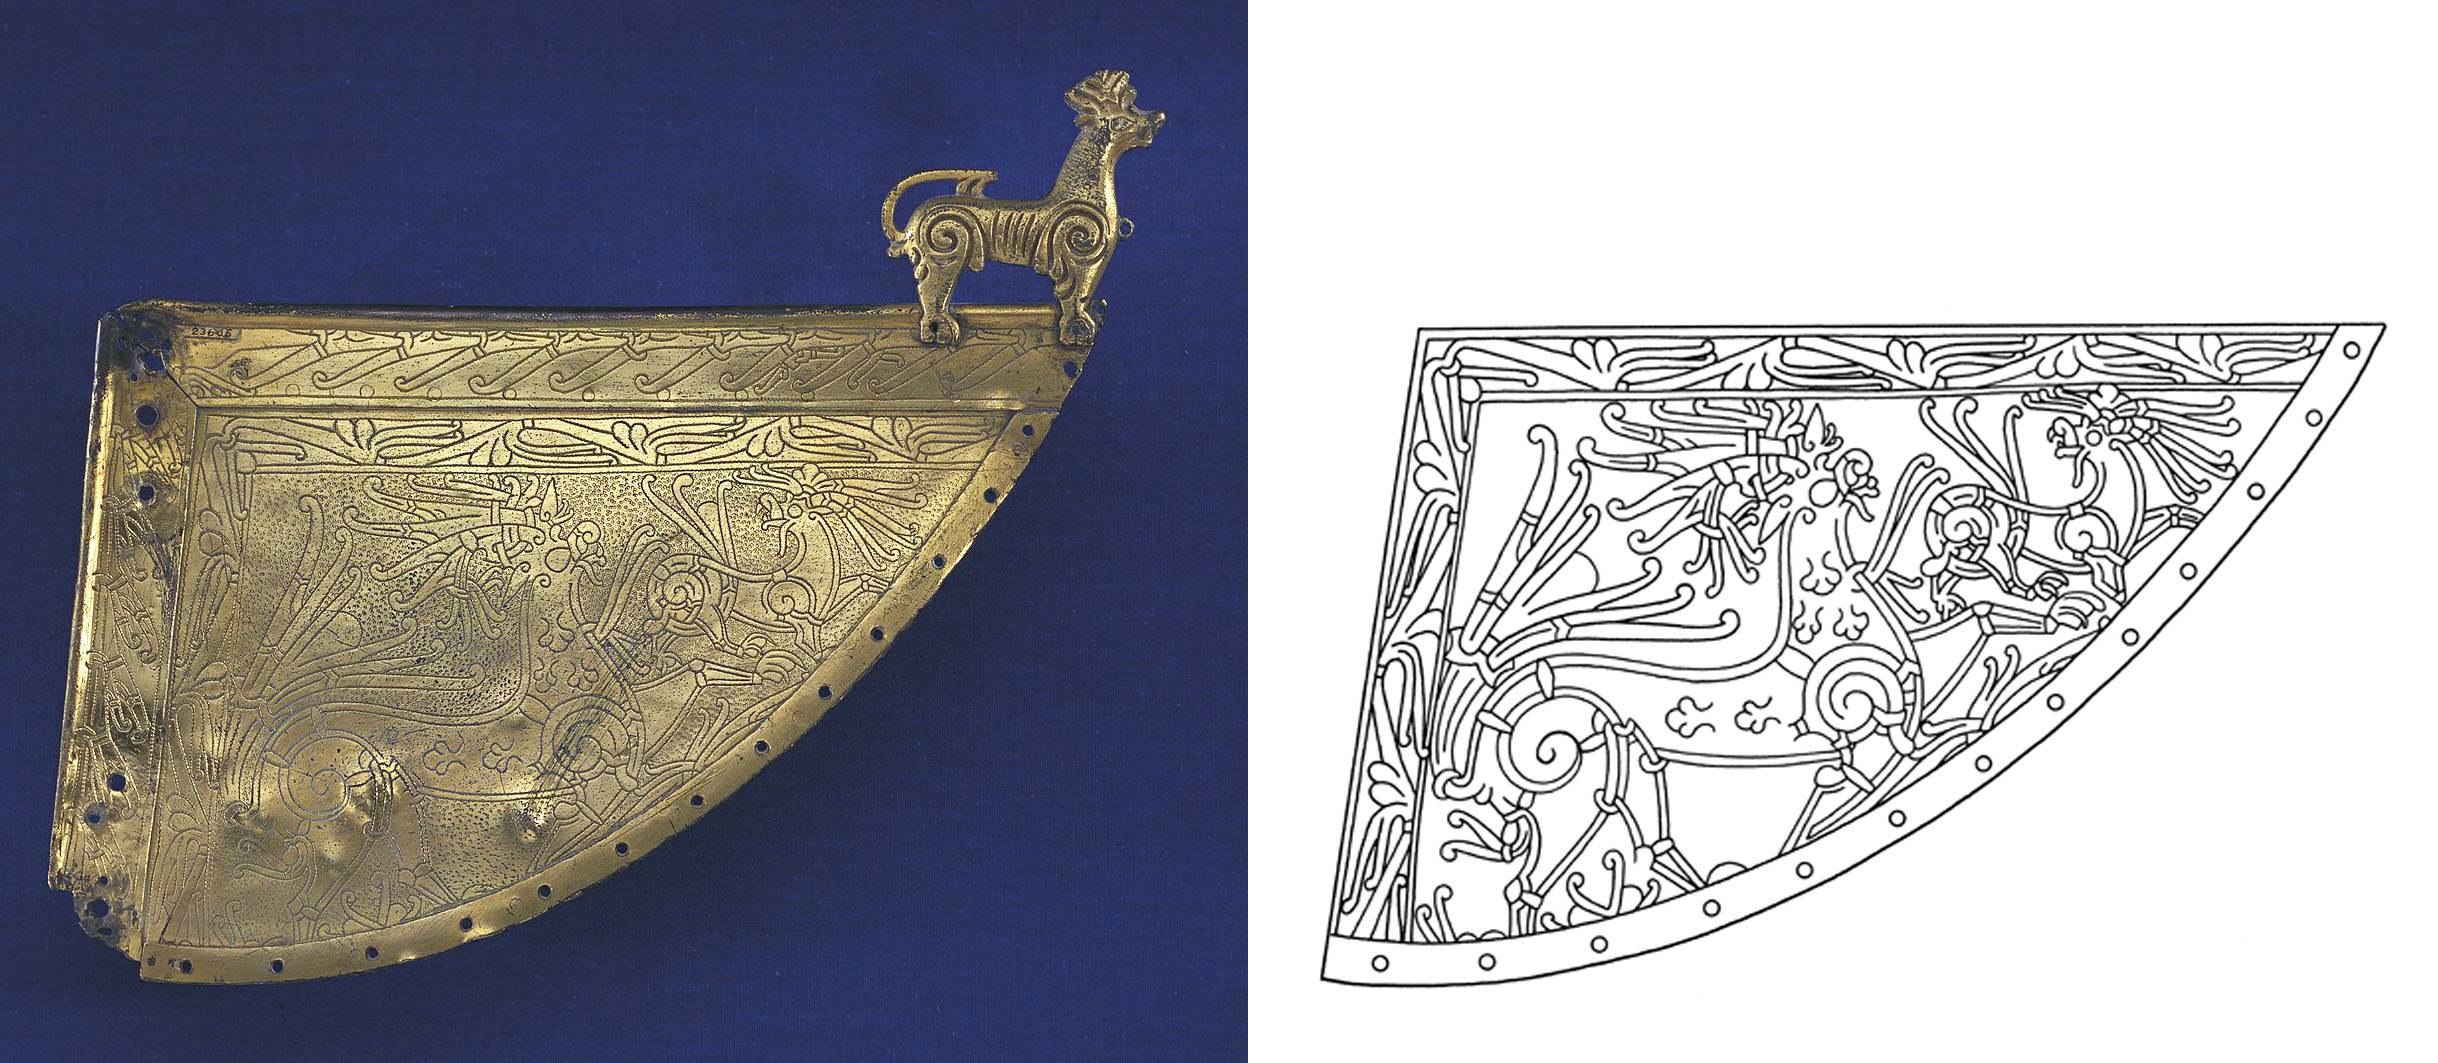
Heggen weathervane (left) and drawing of the designs which include the Great Beast (right) (Kulturhistorisk museum, UiO, CC BY-SA 4.0)
Ringerike style
The Mammen style was short-lived, but the subsequent style—called Ringerike—was energized by its ingenuity. Continuing to use the double contour lines and spiral hip joints seen previously, Ringerike ornament is tightly composed. Bird motifs become more common and the Great Beast appears in full force, but neither feature the beaded ornamentation of Jellinge and Mammen creatures.
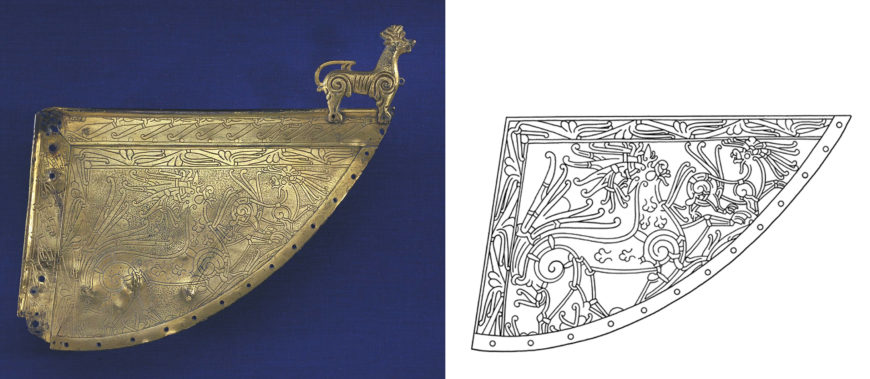
The adoption of European influences into Norse artistic conventions are visible in the Ringerike style. Diverse uses of foliates and tendrils, for example, are features that were taken from Frankish and British influences and modified to suit Norse sensibilities. Appearing in clusters of varying thicknesses, tendrils grow outward from animal bodies. This can be seen on several weathervanes (such as the Heggen weathervane), which were customarily gilded, fixed to the prows of ships, and later, repositioned on the roofs of churches. Their borders feature friezes of vegetal motifs, and on their plates are beasts—including birds and the Great Beast—tangled within foliates.
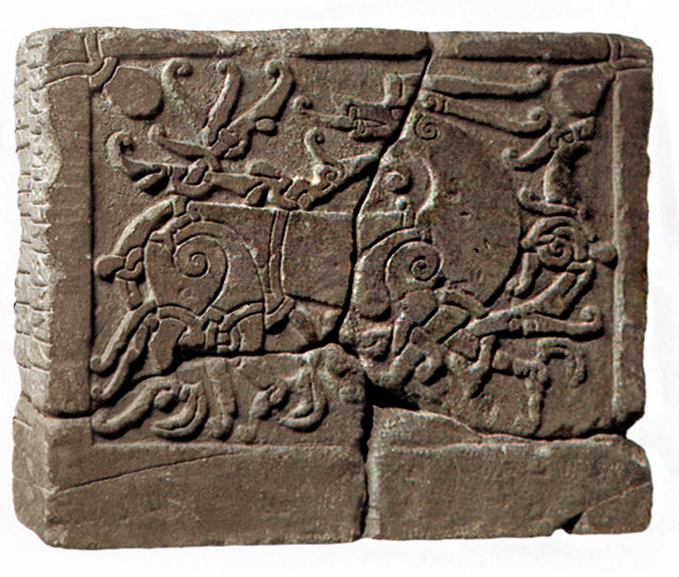
Stone from sarcophagus at St. Paul’s churchyard, London (photo: David Beard MA)
New variations on the Great Beast appear in the Ringerike style. The Great Beast may be shown with other Great Beasts, with multiple snakes, or with monsters we cannot always identify. A carved stone slab that was found at St. Paul’s churchyard in London, for instance, shows the Great Beast with long tendrils that curl at the far end (a variation of the lappets seen in the earlier Jellinge style) forming tendril-like horns and tongue. It also has spiral hip joints. Its body is entwined with a serpent and another, smaller creature wraps around its forelimb. The carved stone slab comes from the end of a box-tomb. The runic inscription carved into its side suggests that the carver was Swedish.
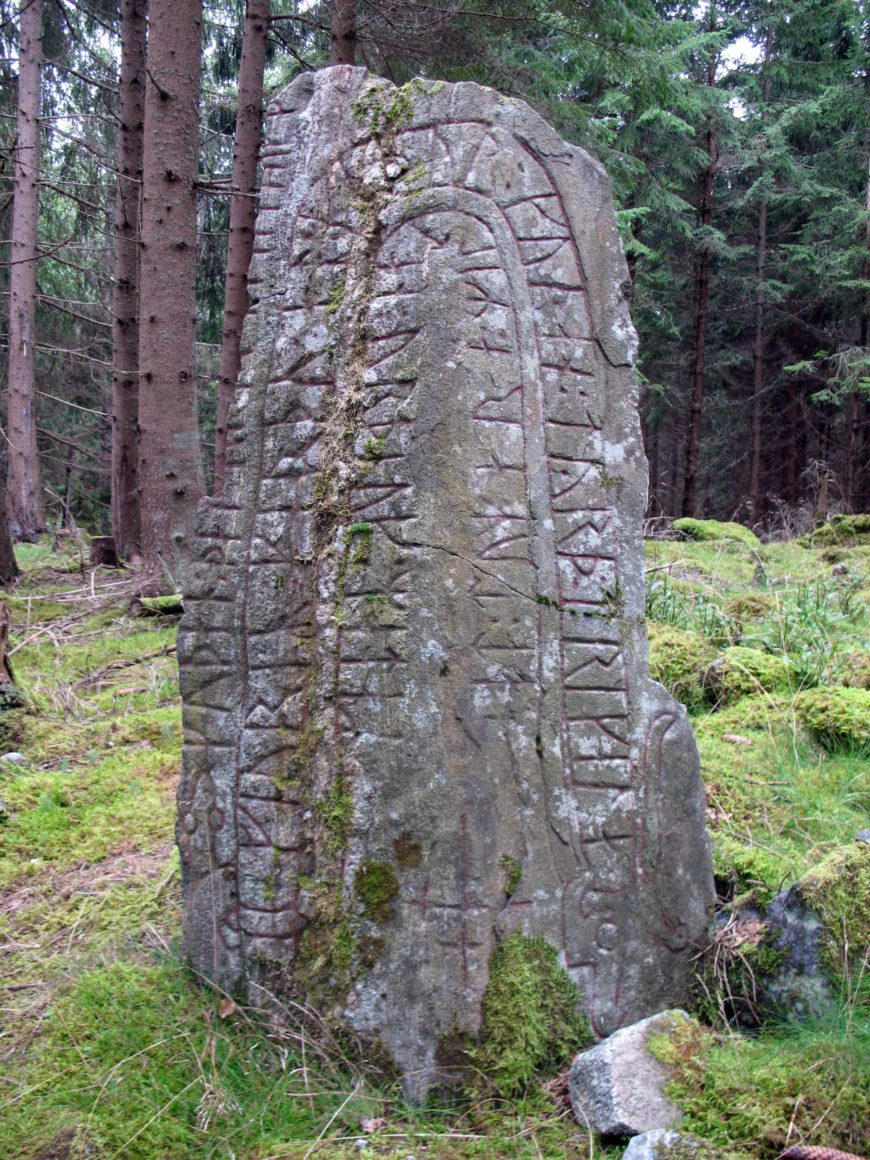
Ringerike-style runestones that only feature inscriptions were common. For example, Runestone Sö 130 from Södermanland County, Sweden, has only bands of runic text. These commemorate a man who died in what would be modern-day Russia (photo: Berig, CC BY-SA 3.0)
Due to the growing popularity of Christianity, funerary customs shift and there are fewer grave goods in the Ringerike style. Architecture, weapons, and ivory carvings become the more prevalent remains, and runestones—although less detailed than the greater stone raised at Jelling—become more common.
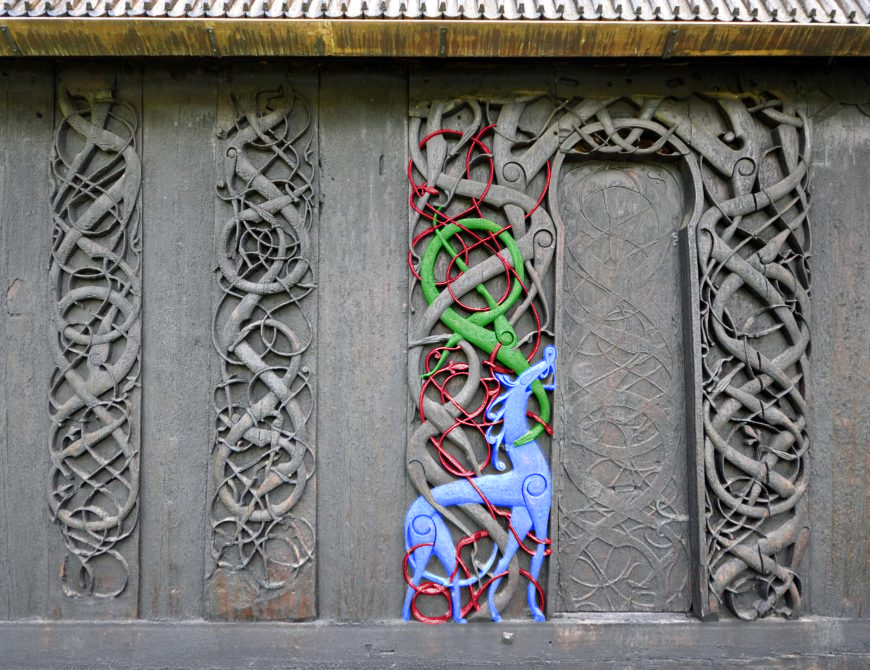
The Great Beast motif is in blue, a snake-like creature is in green, and a ribbon is in red. The Urnes Stave Church north portal, c. 1132, wood, Ornes, Norway (photo: Micha L. Rieser)
Urnes style
In the last phase of Viking Age art, the Urnes style, there is a turn to elegant, schematic forms. Animals are portrayed with tapered anatomical features and in regal stances.
The Urnes style has three primary motifs: a standing, four-legged animal resembling the Great Beast; a snake-like creature but with a single foreleg and/or hind leg; and a thin ribbon. Perhaps associated with the growth of Christianity, there was an increased esteem for this style across mainland Scandinavia. Surviving examples of it can be seen on architecture and runestones, each of which could use pagan and Christian iconography simultaneously.
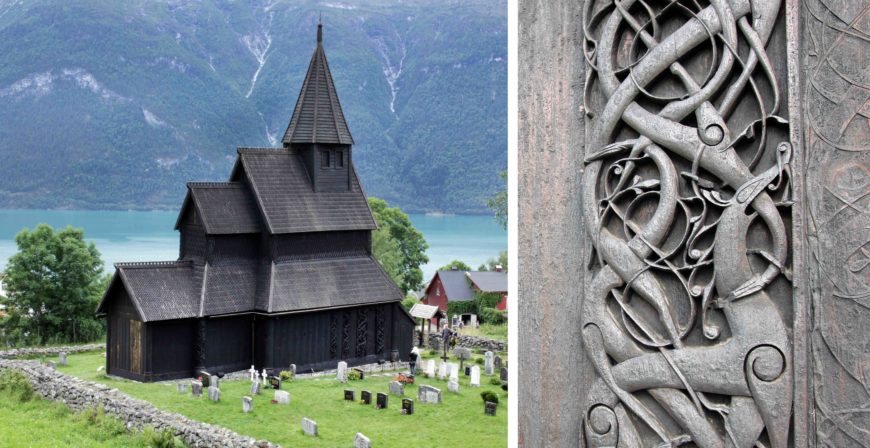
Left: the Urnes Stave Church with a view toward the north portal (photo: Evelina Ander, CC BY-NC 2.0); right: detail from the Urnes Stave Church north portal, c. 1132, wood, Ornes, Norway (photo: Bjørn Erik Pedersen, CC BY-SA 4.0)
Although its origins are likely Swedish, this style is associated with a stave church in the Norwegian village of Urnes. Its relief carvings, which fully embody the style’s characteristics, have been the subject of art-historical interpretation for some time. Their rhythmic compositions have elegant swooping, symmetrical, and interlace designs, and the background is more clearly visible.
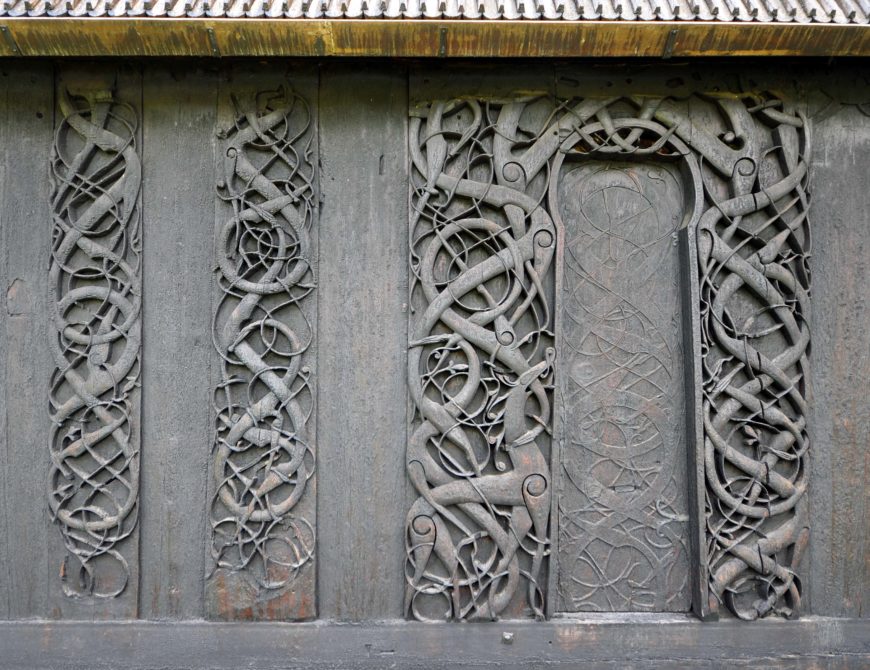
The Urnes Stave Church north portal, c. 1132, wood, Ornes, Norway (photo: Micha L. Rieser)
Although the use of spiral hip joints persist, the proportions of creatures’ bodies curve and swell in a fashion that differentiates them from previous styles. Eyes are enlarged, nearly filling the heads, and lower jaws are given hook-like extensions. The feet of the Great Beast standing next to the door gracefully end in wisps that rest between delicate vegetal motifs. Although the structure is Christian in function, these decorative forms remain indebted to pre-Christian styles.

The Pitney disc-brooch, late 11th century, Urnes style, copper alloy and gold, found in Pitney, England (© The Trustees of the British Museum); The Bell Shrine of St. Patrick, c. 1100, bronze, silver-gilt frame, 30 gold filigree panels (some now missing), rock crystal (National Museum of Ireland; photo: Lauren Kilroy-Ewbank)
As the Norsemen traveled, traded, and settled across new regions, this style’s influences were carried with them. Urnes-styled objects appear in the Baltic, and examples such as the Pitney Brooch demonstrate a localized adaptation of it in England. In Ireland, the Norse re-occupation of Dublin fueled artistic interest in the Urnes style, with metal and stone objects exhibiting its features. When looking at gold filigree ornamenting the bell shrine of St. Patrick, for example, precisely-crafted patterns demonstrate interest in geometry and rhythmic compositions. The style’s acceptance there, however, came just as it was dying in Scandinavia.
The Viking Age comes to an end
Prior to the 10th century, Scandinavian regions were considered peripheral to western Europe. It was from the 10th through the 13th centuries that the introduction of Christianity and the introduction of European-style monarchy eventually brought the Viking Age to a close. The Ringerike and Urnes styles described above flourished through this time, until the European Romanesque style was popularized, displacing pagan traditions.
There is much more to Norse art than style. While objects were made by skilled workers, they were also situated within a complex society whose endeavors affected a vast geographic expanse. Those discussed here provide only a small window into the Viking Age.

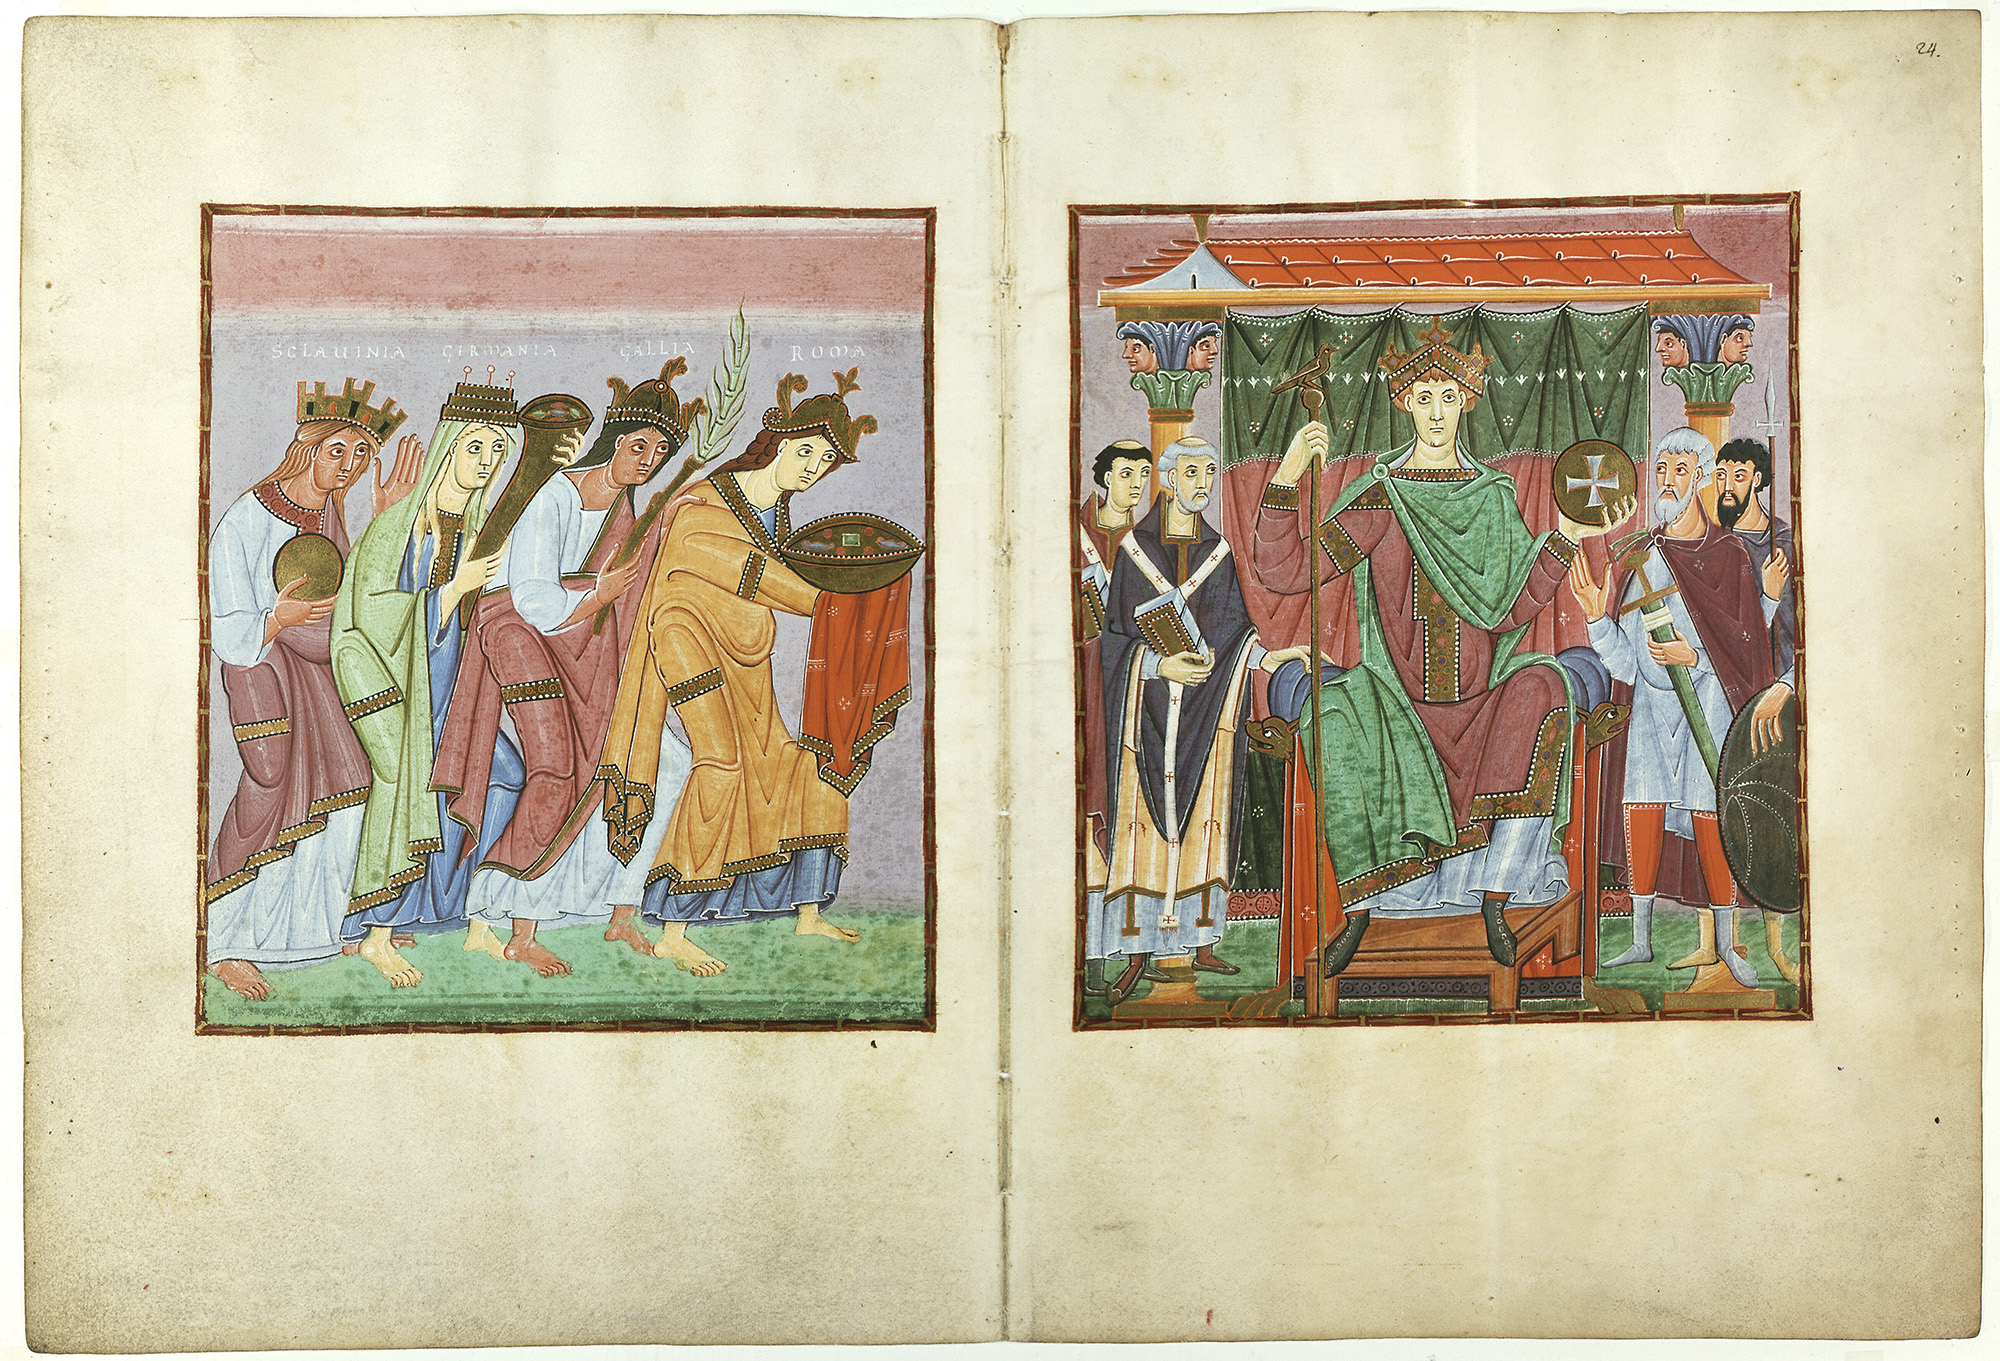
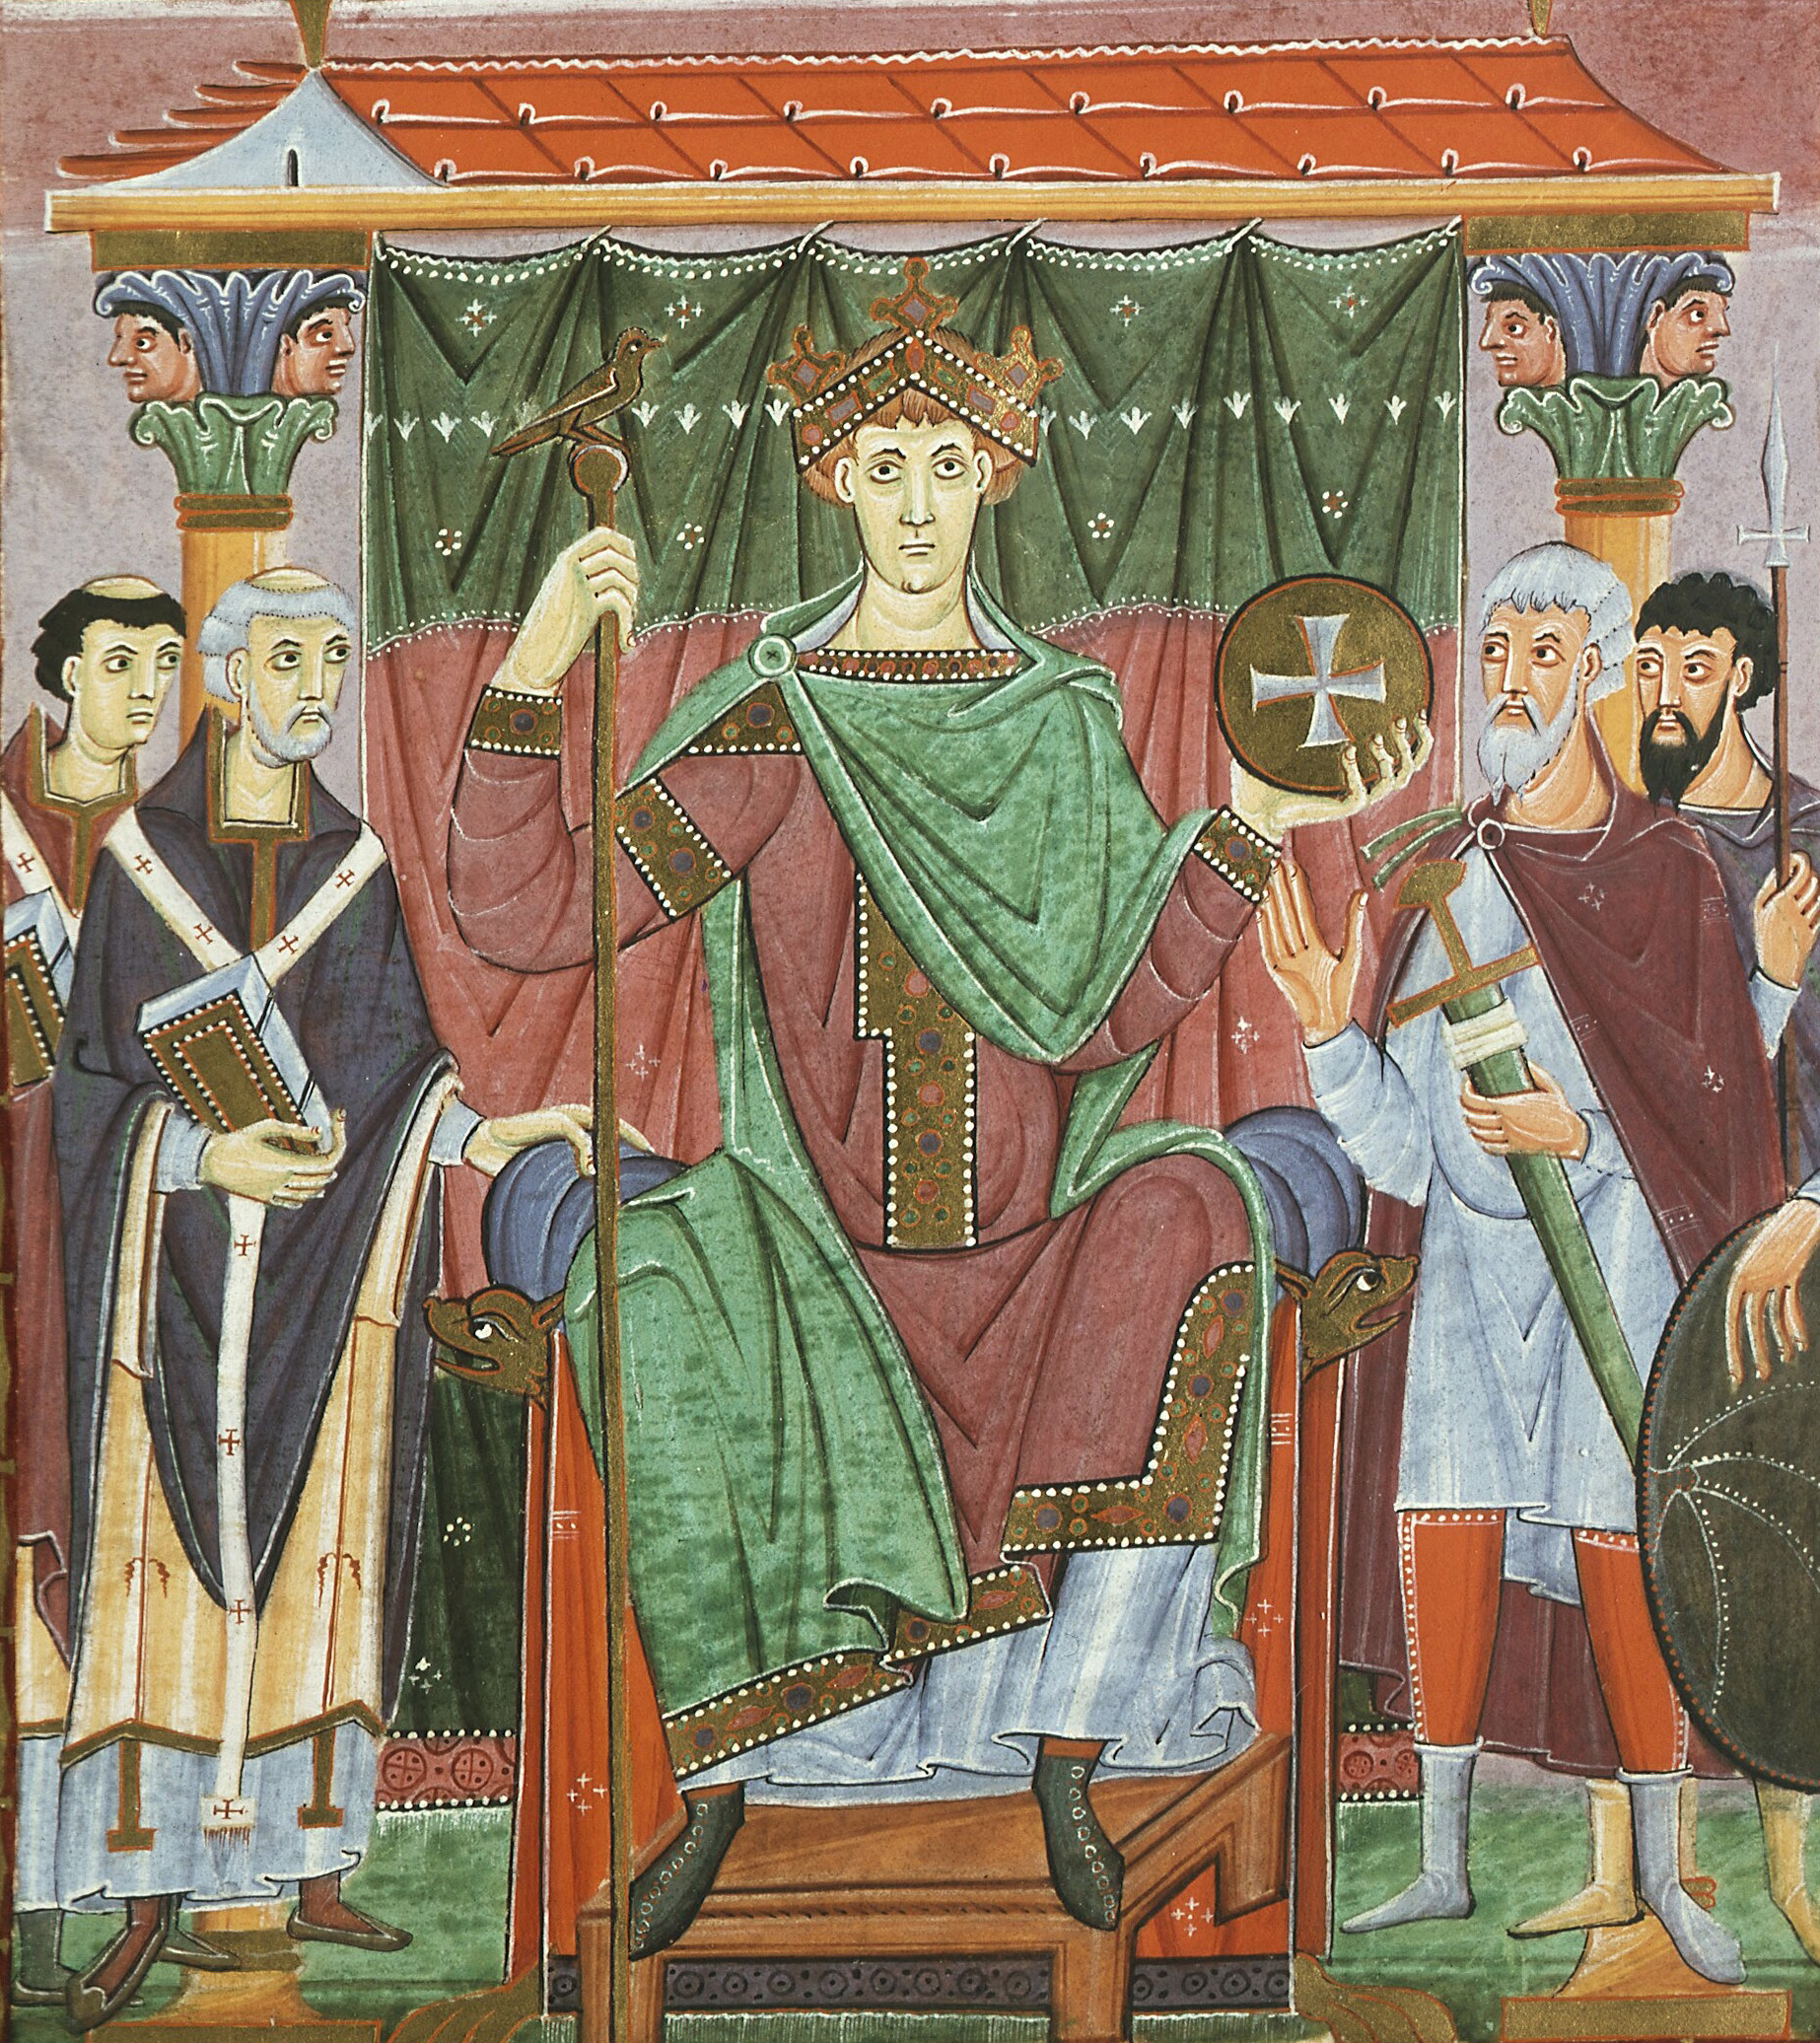
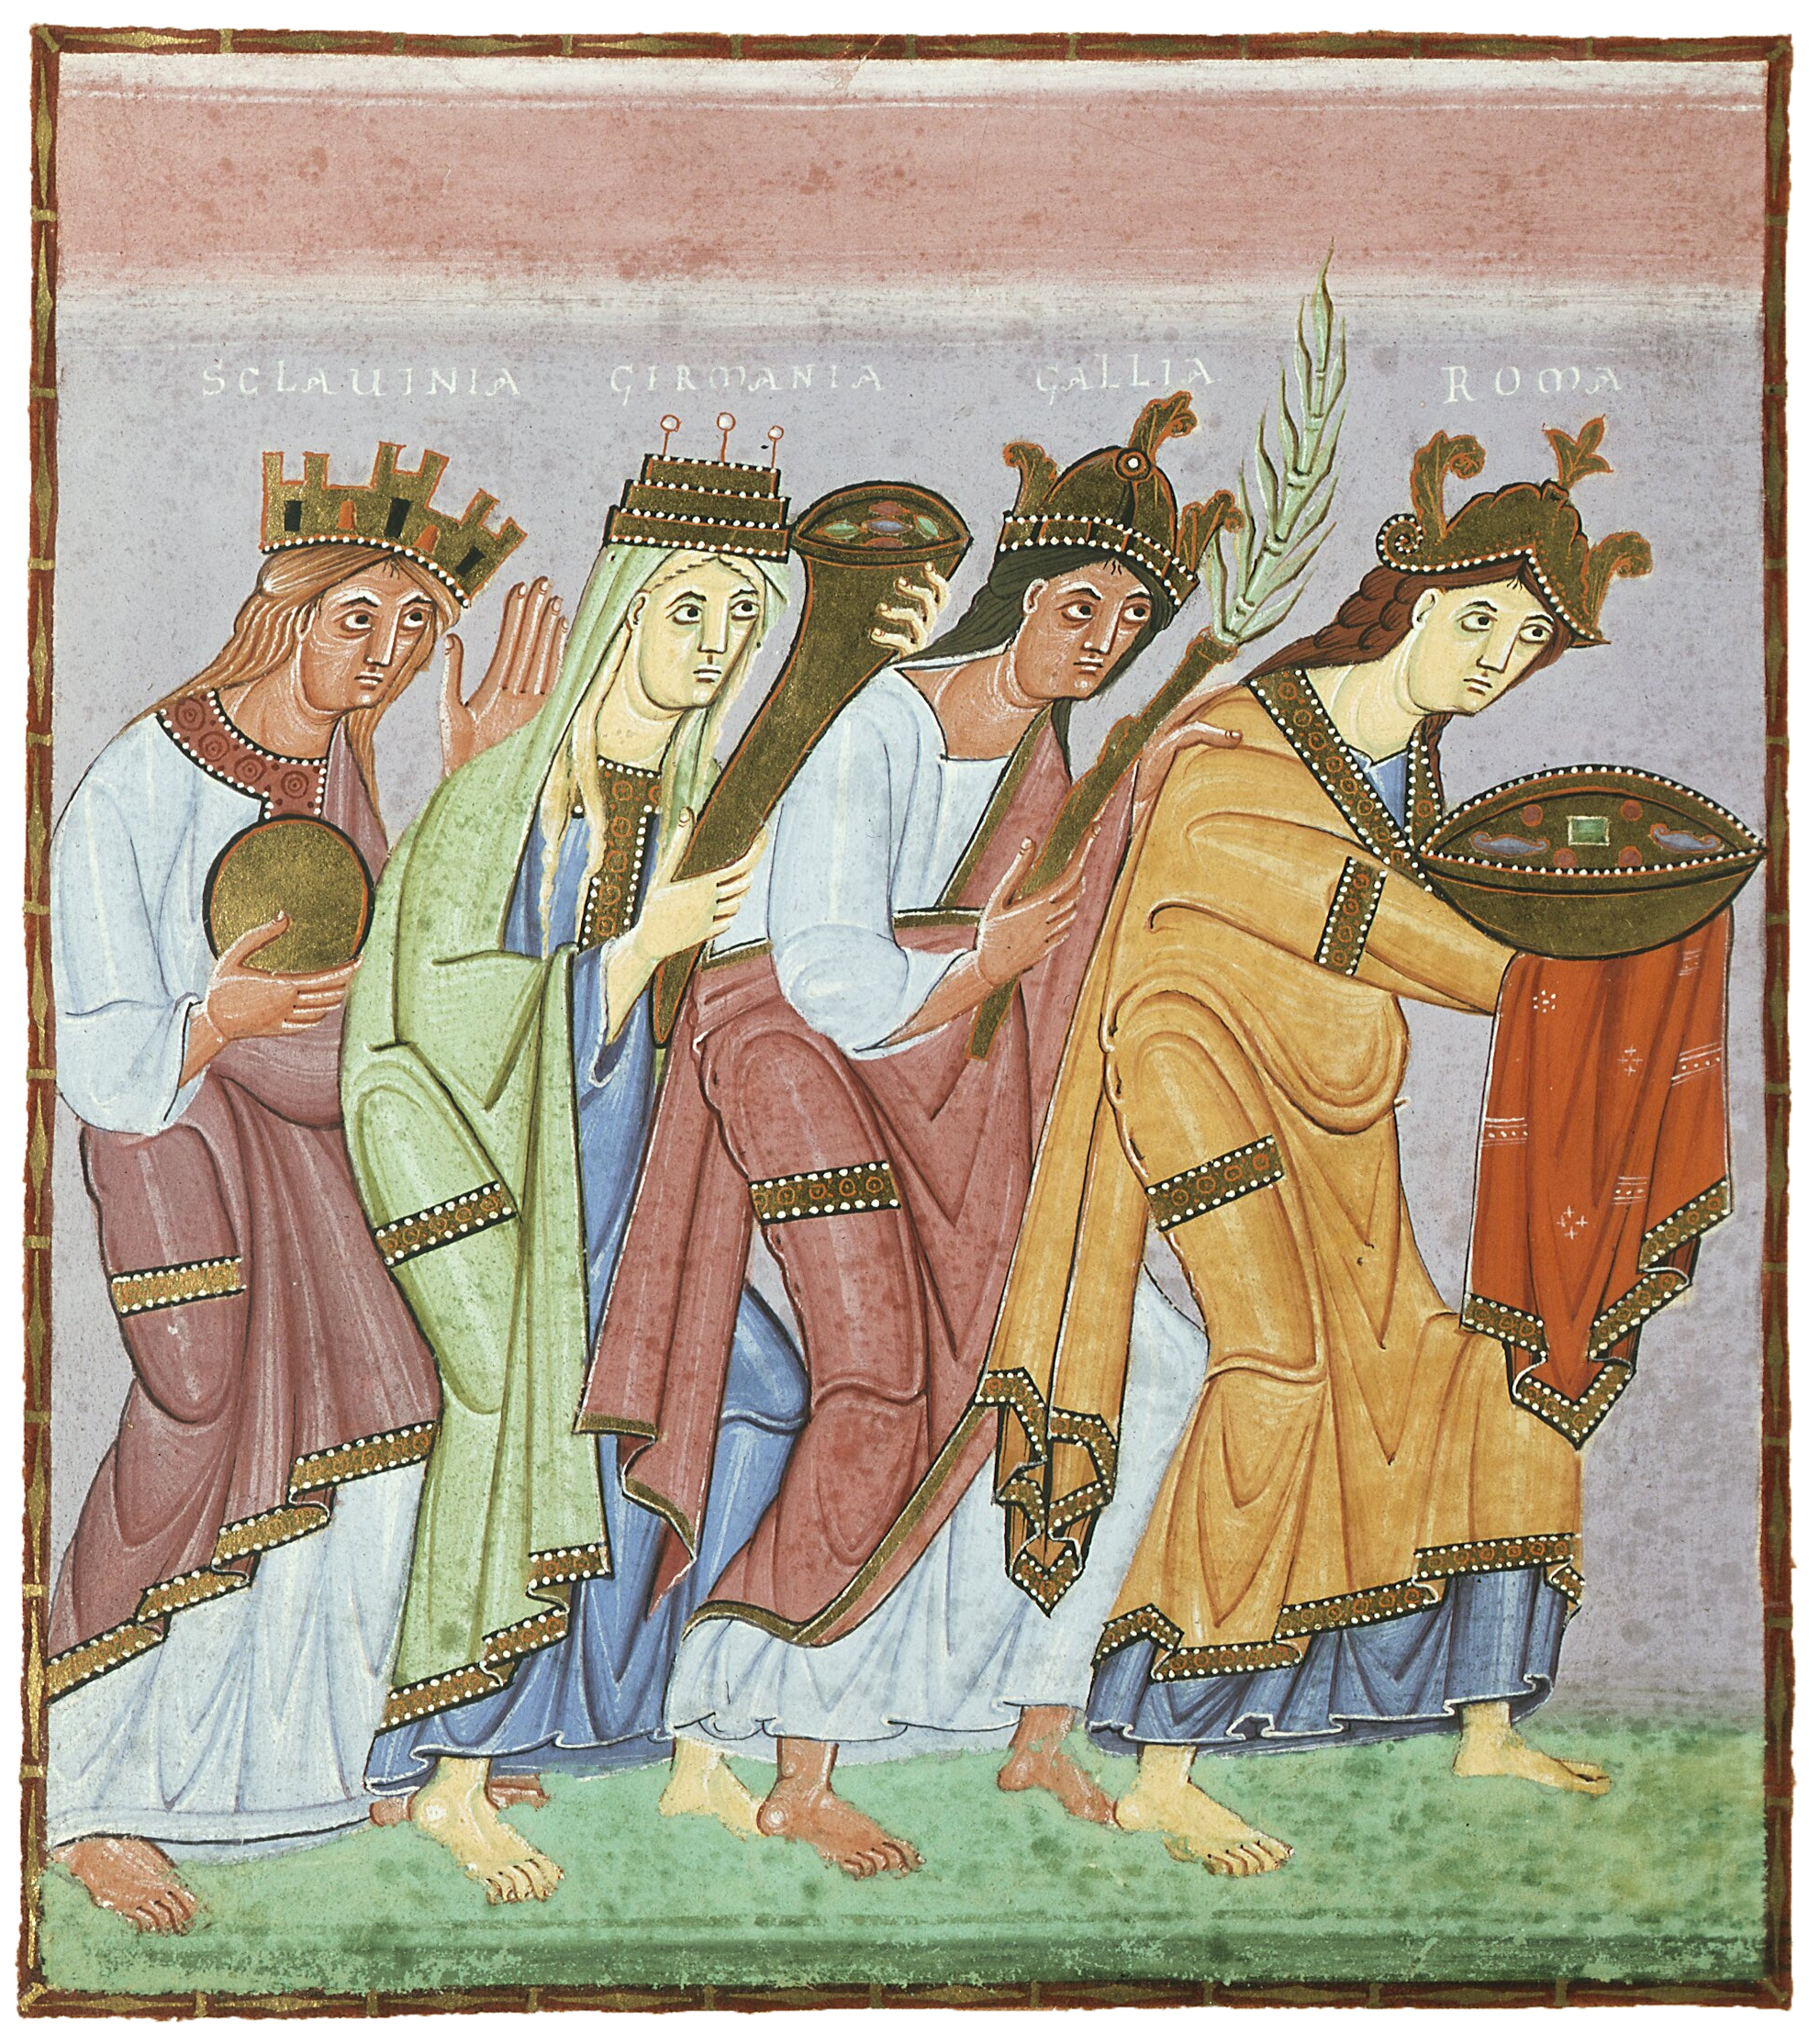
Detail, Otto I presenting the Cathedral of Magdeburg, 962–968, Ottonian, from the Cathedral of Magdeburg, probably made in Milan, northern Italy (The Metropolitan Museum of Art). On this ivory, Otto presents a symbolic model of the church to Christ for his blessing. As a humble servant, Otto is depicted smaller than the company of patron saints.
Henry’s son Otto I (who became emperor in 962) lends his name to the “Ottonian” period. He forged an important alliance with the Pope, which allowed him to be crowned the first official Holy Roman Emperor since 924. This contact with Rome was extremely important to Ottonian artistic development, since each Ottonian king was determined to define himself as a Roman Emperor in the style of Constantine and Charlemagne. This meant perpetuating a highly intellectual court and creating an extensive artistic legacy.
Ottonian art takes a number of traditional medieval forms, including elegantly illuminated manuscripts, lavish metalwork, intricate carving, and Romanesque churches and cathedrals. Perhaps the most famous of the Ottonian artistic innovations is the Saxon Romanesque architecture style, which is marked by a careful attention to balance and mathematical harmony. This focus on geometry is based on the texts de Arithmatica and Ars Geometriae by the 6th century philosopher Boethius. The Ottonians held mathematical sciences in high regard and this is reflected in many of their artistic productions.
The illuminated manuscripts produced by Ottonian “scriptoria,” or monastery painting and writing schools, provide documentation of both Ottonian religious and political customs and the stylistic preferences of the period. Manuscripts were most often produced of religious texts, and usually included a dedication portrait commemorating the book’s creation. The royal or religious donor is usually shown presenting the book to the saint of his or her choice.

Uta Codex (Uta Presents the Codex to Mary), c. 1020, Munich, Bayerische Staatsbibliothek, Clm. 13601, f. 2, recto (digitized)
Here we see a powerful abbess, Uta, presenting her codex to St. Mary. Many manuscripts also included a page depicting the artist or scribe of the work, acknowledging that the production of a book required not only money but also artistic labor.

Hillinus Codex (Hillinus Presents the Codex to St. Peter), c.1020, Cologne Dombibliothek, folio 16, verso, manuscript 12 (digitized)
In the Hillinus Codex, a monk presents the codex that he has written or painted (or both!) to St. Peter. The work of the artist and scribe were often one and the same, as can be seen in many of the fantastic decorated initials that begin books or chapters in Ottonian Manuscripts. As you can see from the dedication pictures, the manuscripts in question are often depicted as they were frequently displayed, that is with the text securely enclosed between lavish metal covers.
Ottonian metalwork took many forms, but one of the most common productions was bejeweled book covers for their precious manuscripts. This cover is one of the most expensive that survives; it includes not only numerous jewels, but an ivory carving of the death of the Virgin Mary.

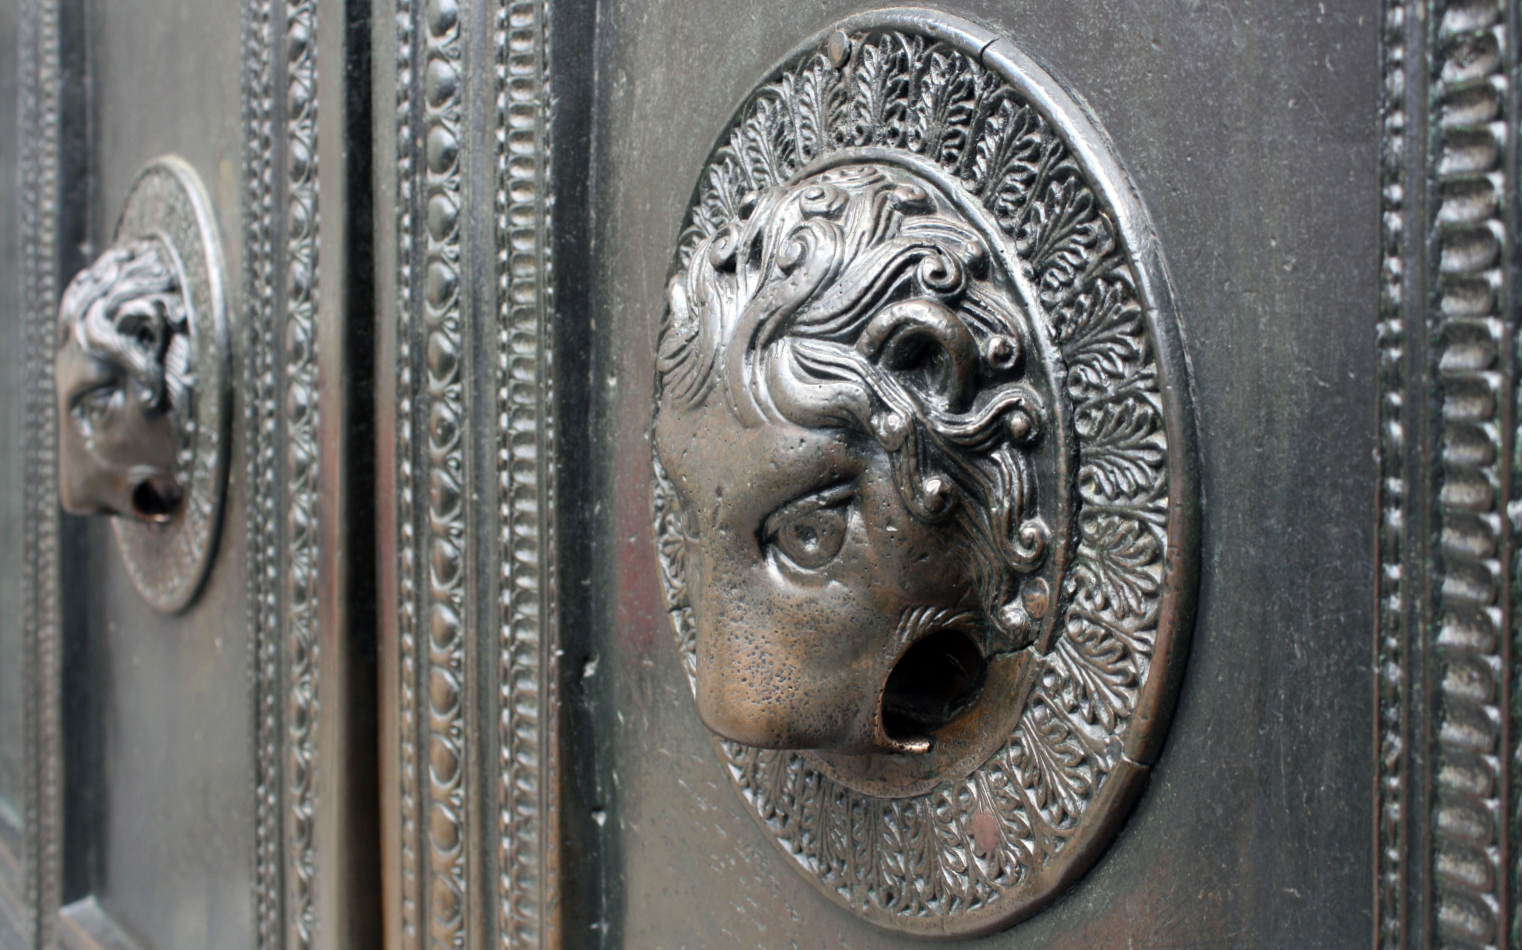
Presentation of Christ, Bronze doors, 1015, commissioned by Bishop Bernward for Saint Michael’s, Hildesheim (Germany) (photo: Holly Hayes, by permission)
On a larger scale, clerics like Bernward of Hildesheim cast his 15-foot doors depicting the fall and redemption of mankind out of single pieces of bronze (see the video in this tutorial). This was an enormous undertaking, and the process was so complex that it would not be replicated until the Renaissance.
For a modern viewer, Ottonian art can be a little difficult to understand. The depictions of people and places don’t conform to a naturalistic style, and the symbolism is often obscure. When you look at Ottonian art, keep in mind that the aim for these artists was not to create something that looked “realistic,” but rather to convey abstract concepts, many of which are deeply philosophical in nature. The focus on symbolism can also be one of the most fascinating aspects of studying Ottonian art, since you can depend on each part of the compositions to mean something specific. The more time you spend on each composition, the more rewarding discoveries emerge.
Additional resources:
Ottonian Art on The Metropolitan Museum of Art’s Heilbrunn Timeline of Art History
Gospel Book from Bamberg Cathedral (Reichenau Gospel)